It's time to celebrate because Amber's Craft a Week Blog turns 8 today! In honor of this occasion, I dug through some of my old crafts and came up with one that I thought you all might get a kick out of: my early attempts at making my own clothes. I'll tell you about how I constructed them, show you what they looked like back in the day, and then try and style them using my current wardrobe. This is probably the longest post I've written, so if you just want to see what these monstrosities look like, feel free to skip to the photo shoot shown at the end of the post.
When I was in high school, I loved watching America's Next Top Model. While I had long since abandoned my middle school dream of becoming a model (I hadn't grown since 8th grade, so it was pretty clear at that point in time that 5'2" was as tall as I was going to get), I thought maybe I could make it as a fashion designer. During the summer of 2008, I convinced my sister Katie and our friend Bre to join me in a fashion design club and I started keeping a fashion journal.
The biggest issue with my fashion design aspiration was that I didn't know how to sew. I could backstitch by hand, and had used a sewing machine at the teen center I had gone to once to make a bag, but that was all I had ever learned about sewing. Nonetheless, I did not let this stop me.
Looking back, what I love the most about my fashion journal is my rampant optimism. Although my crafting skills have only grown over time, in some ways I have become more timid, and when things aren't working out, it really discourages me. Issues that may have stopped me in my tracks today were minor inconveniences back then. I love eighteen-year-old Amber's ingenuity and dedication, and I hope this post will do her justice in those respects.
Early Attempts
Before I tried sewing my own clothes, I used screen printing to personalize a plain black T-shirt. When I was fifteen, I attended the Powerhouse Teen Center, which was a teen center in Bangor. The center had access to a screen printing device and I decided that I was going to design a shirt for myself. I sketched up an image of silhouette that was supposed to represent me and surrounded it with things I loved or felt were representative of me in some way. The star I think was supposed to represent the idea that I'm a star (remember, I was 15), the Chinese character for dragon was supposed to both reflect the fact that my Chinese class was one of my favorite classes and that I'm powerful, like a dragon (again, I was 15), the soda bottle was there for my love of diet soda, the music note represented my love of music, the palette and paintbrush represented my creative side, and the equation my appreciation for math. I can't recall what the heart symbolized, but I loved hearts during this time and even signed my name by drawing a heart around it. The rectangle in the bottom corner was there so I could sign the shirt with my name. Below is a copy of the design I used to create my shirt.

I printed the design in white on a black fitted T-shirt. I believe I used a black permanent marker to sign my name. Unfortunately I no longer have the shirt, and I also don't have pictures of it, but if I recall correctly, I was mostly pleased with how it came out.
After my success with my own shirt, I decided that I wanted to create a fashion line dedicated to screen printed shirts like that one. The shirts would showcase silhouettes of a variety of body types with all sorts of different symbols around them. My hope was that everyone would be able to find a shirt in the line that represented them. I only ever drew one further design, though, and I never got around to screen printing it.
This one I think was based loosely on my sister and included a baseball and bat for love of sports, a book for love of reading, the word "friends" for the value of friendship, and a music note for love of music. I'm not sure why I included the Chinese character for water. The rectangle in the bottom right corner was there so that the recipient of the shirt could sign their name.
The Journal
The screen printing project was perhaps my first foray into clothing design, but it was not my last. I began trying to create my own clothes from raw materials during the summer of 2008, which I chronicled in my newly created fashion journal. Before we get into the clothes that I actually made, I'd like to show you some of the sketches I came up with. The first page of my fashion journal is this image:
The gray top in the third row was the precursor to one of the few tops that I did end up making.
I also had some ideas for a horror-related clothing line:
Look at that sea monster top! I kind of wish I'd made that one because it's so absurd. The other two tops actually look like the sort of thing I would wear today.
I also contemplated creating a zombie clothing line:
As best as I can tell from the journal entry, the clothing line would have consisted of disheveled clothing. I think I was planning on picking up old clothes from a thrift store and dirtying them up. I have made zombie tops twice now,
one of which you may have seen on this blog, and the other which I made for Halloween 2009, but I've used them for zombie costumes rather than for everyday wear.
I also sketched out designs to represent the elements, plus a couple of other elemental-type things:
There were a few more designs here and there, but these were the ones that stood out to me the most. Now that I've subjected you to my absurd sketches, let's look at the clothes I actually made.
The Clothes
My original plan for the fashion club was that Katie, Bre, and I would each create an outfit and then model the outfit we devised in our own runway show. As I explained in my fashion journal,
My plan is for each of us to create our own outfit. With a few exceptions (i.e. shoes), everything should be hand-sewn if possible, but the outfit has to include at least one original item. Then, once all of the outfits are made, we will have a photo shoot/runway show.
For my look, I planned on making a metallic silver outfit, shown below:
I had to darken the image a lot because it has faded over the years, and it's still kind of hard to see, but here's the basic idea of the outfit. It would consist of a metallic silver top with a spiraling silver belt and metallic silver pants. I would wear it with silver heels, metal jewelry, silver nail polish, silver eyeshadow, black eyeliner, lip gloss, and straightened hair, plus potentially a silver scarf.
Remember, I had no idea how to sew clothes, so after taking my measurements, I started trying to construct a top. I cut a straight sided piece for the back and a curved piece for the front and sewed the two together. I did not include a seam allowance, and the fabric has virtually no stretch, so when it came time to try on my shirt, I could not get it on. Instead of giving up, I decided I would cut the back open and add laces for the closure. I wrote in an entry in my fashion journal from July 1, 2008,
I finished the shirt today! It took hours to make and things kept going wrong, but now it's finished and it actually looks okay. I forgot to add a couple extra inches to my measurements, so I ended up w/ the shirt being too tight to put on. At first I thought that it was just that the material wasn't stretchy enough, so maybe if I added a zipper, things would work out, but it didn't take long to figure out that what I needed was a few more inches, so I just had it lace up in the back. Now I have to make the belt and pants and the outfit will prettymuch be done.
This is what the finished shirt looks like:
I did not complete the belt at this time, although I did start it. My aunt had given me a book about making jewelry from paper clips the previous year for Christmas. I uncurled a bunch of plain metal paper clips and reshaped them into spirals. The plan was to link all the spirals together to form a belt, but the spirals kept getting tangled together and eventually I gave up and stowed them away. Here's what they looked like:
I never did get a chance to make the pants. After the shirt fiasco, I went online and printed out a free pants pattern. I even went as far as cutting out the pieces from the fabric. However, my mom told me that if I didn't use a sewing machine, then the edges would fray, and we didn't have a sewing machine, so I was kind of stuck.
At the time I was working on the silver shirt, I found this other fabric at Joann called "soho pink" that I really liked. I sketched a design idea:
As I stated the July 1st entry in my fashion journal,
I've decided that I want to make a tank-top out of the soho pink fabric, something ... w/ chunky straps & big buttons ... It will probably have to zip up in the back because of the fabric that it's made out of, but that's fine. I have decided that I'm going to put smiley pom-pom creatures on my new flip flops.
I did end up making the flip flops, although sadly I no longer have them. Here's what they looked like, though:
The pants I never did make. The top I ultimately did make almost a year after I came up with the original design, although it underwent a transformation between the initial sketch and the time I actually made it. As I wrote in an entry in my fashion journal from June 5, 2009,
The body of the shirt is basically the same for both designs [the original sketch and almost finished product], but, instead of traditional straps, it has a sash belt ... For the finished shirt, I'm going to have a pin/brooch on the side holding the sash and belt together, and possibly have some sort of chain for the other shoulder, though I would probably make it detachable. I could make [the shirt] such that it can be worn multiple ways ...
Below is a sketch I did of two possible ways to wear it:
Instead of cutting out multiple pieces of fabric, this time around I cut out one, with curved edges, and sewed a zipper to it. As you can probably guess if you sew clothes, this was not the best way to go. The back is awkwardly lumpy because of my poor choices and decisions. I didn't photograph the back during this time frame, but here's what the front of the top looks like:
This next garment is one I modified rather than designed. I bought an Andy Warhol T-shirt from Hot Topic sometime during high school. Below is a picture of me wearing it, taken when I was probably about 16.
I loved this shirt and wore it so often that it started developing sweat stains. To get rid of the stains, I decided to turn the T-shirt into a tube top. I cut up and sewed the top on February 28, 2010. I sewed it by hand since I didn't have access to an operational sewing machine. I had to take it in a bit to get it to function as a tube top, so, given that I more or less winged it with the whole taking in process, it didn't turn out too badly.
The final top that I want to focus on in this post is not one that I designed in my fashion journal, but I included it in the journal, so I figured I'd write about it here as well. It is also the first clothing item I made using a sewing machine. The first two shirts I constructed from raw materials I made in 2008 and 2009 respectively, but this one came a little later, in 2011. The write up in my fashion journal was short and didn't say much about the difficulties I'd had in making it, so I will quote from my craft journal instead:
I read online that you could make a new shirt by cutting apart an old one and tracing the two halves. Not wanting to cut up one of my shirts, I turned one inside out and traced along the seams, adding about an inch of extra space as I went. I sewed it together using the sewing machine and voila! I had a a shirt. The main problem with the shirt was that I had made it using a rigid fabric, so I could not pull it over my head. Furthermore, I had not made it wide enough in the area near my hips, so even if I found a way to get it over my head it would not have fit near my hips. I cut open the back of the shirt, added a zipper, and stuck some fabric between the bottom parts of the zipper to make it wider at the base. Now I could get it on, but it was tight in some places and lumpy in others.
Here's what the front and back of the shirt look like:
Yes, each of the garments I've profiled here is kind of a sewing disaster, but this is how I got my start. I don't know if I'd ever have tried sewing clothes were it not for these early attempts.
The Photo Shoot
Rereading this journal, I saw that eighteen-year-old Amber was super excited about the idea of doing a photo shoot with her fashion creations (she was also really interested in doing her own runway show, but hey, I'm not a miracle worker), so I decided that, as an homage to my younger self, I would model these clothes for you all.
First up is the metallic outfit. I started by trying to come as close as I could to my original design. That effort included finishing the belt, but it also involved a not so successful attempt at making silver pants. Rather than sew a pair, as I had planned in my original conception of the project, I used silver fabric paint to turn a pair of light colored jeans silver. There were two key flaws with this plan. The first and most major was that the jeans I selected were very wrinkled. I thought I could fix that issue after painting, but that turned out not to be the case. The second issue was that I didn't want to mess up a pair of jeans that I currently wear, so I opted for a baggier pair that I had been planning on donating. While the looser fit works well with my late teenage aesthetic (I was afraid of getting jeans in my actual size because I lost weight in high school due to medical issues and thought I was going to put the weight back on), it's not a look that I really go for anymore. At any rate, the pants are not great, but in some ways that's fitting because other pieces of the outfit have issues as well. I also tried straightening my hair, but between my hair's general refusal to straighten out and a bout of wind it encountered during the photo shoot I did earlier in the day, it was not very cooperative for these photos. Here's what the outfit looked like:

I then tried styling the shirt with a pair of glittery black leggings. This look was not as true to my high school fashion sense, as I did not own a pair of leggings until well into my twenties, but I think it looks a lot better.
In the top picture of the leggings look, I was trying to hold the top up as high on my chest as possible to minimize the bunching at the waist. In the lower two pictures, I let the shirt fall where it naturally wanted to. It did bunch up in the waist quite a bit, but I think it looks fine like that.
I never added any pictures of the back of the shirt to my fashion journal, I think because I was trying to minimize the flaws of the design. However, here is what the lace up back looks like:
It's a bit of a mess, as you can see. I used white string to finish the belt as well, so the bow you see around my waist is from the belt.
The next outfit I constructed around the "soho pink" top. I tried to replicate the outfit sketch from my fashion journal as well as I possibly could. I dug out a pair of jeans that I have had since my senior year of high school that I thought matched the vibe of the jeans in the sketch. I didn't feel like gluing pom pom critters to any of my pairs of flip flops, so I grabbed a pair of flip flops with the Joe Boxer winking smiley face. I only have one brooch, so that's what I used to hold the sash together. I did not realize until after I had finished the photo shoot that I had put the sash on wrong, so that's why it looks so awkward in the photos below.
This was probably the outfit I was least jazzed about. There must be a better way to style this shirt, but I couldn't think of anything. Still, I think this was pretty true to my high school sense of style and for all the time and effort I put into sewing it, at least that monstrosity of a top got another wear.
Here's what the back of the top looks like. As you can see, it's loose and lumpy in places. At least it was easy to get into and out of.
This next top was not so easy to get over my head. Because of the way I sewed the zipper, I had to squeeze my head and arms through a space the size of my waist. However, I think this shirt lent itself to some more put together looks than the "soho pink" top did.
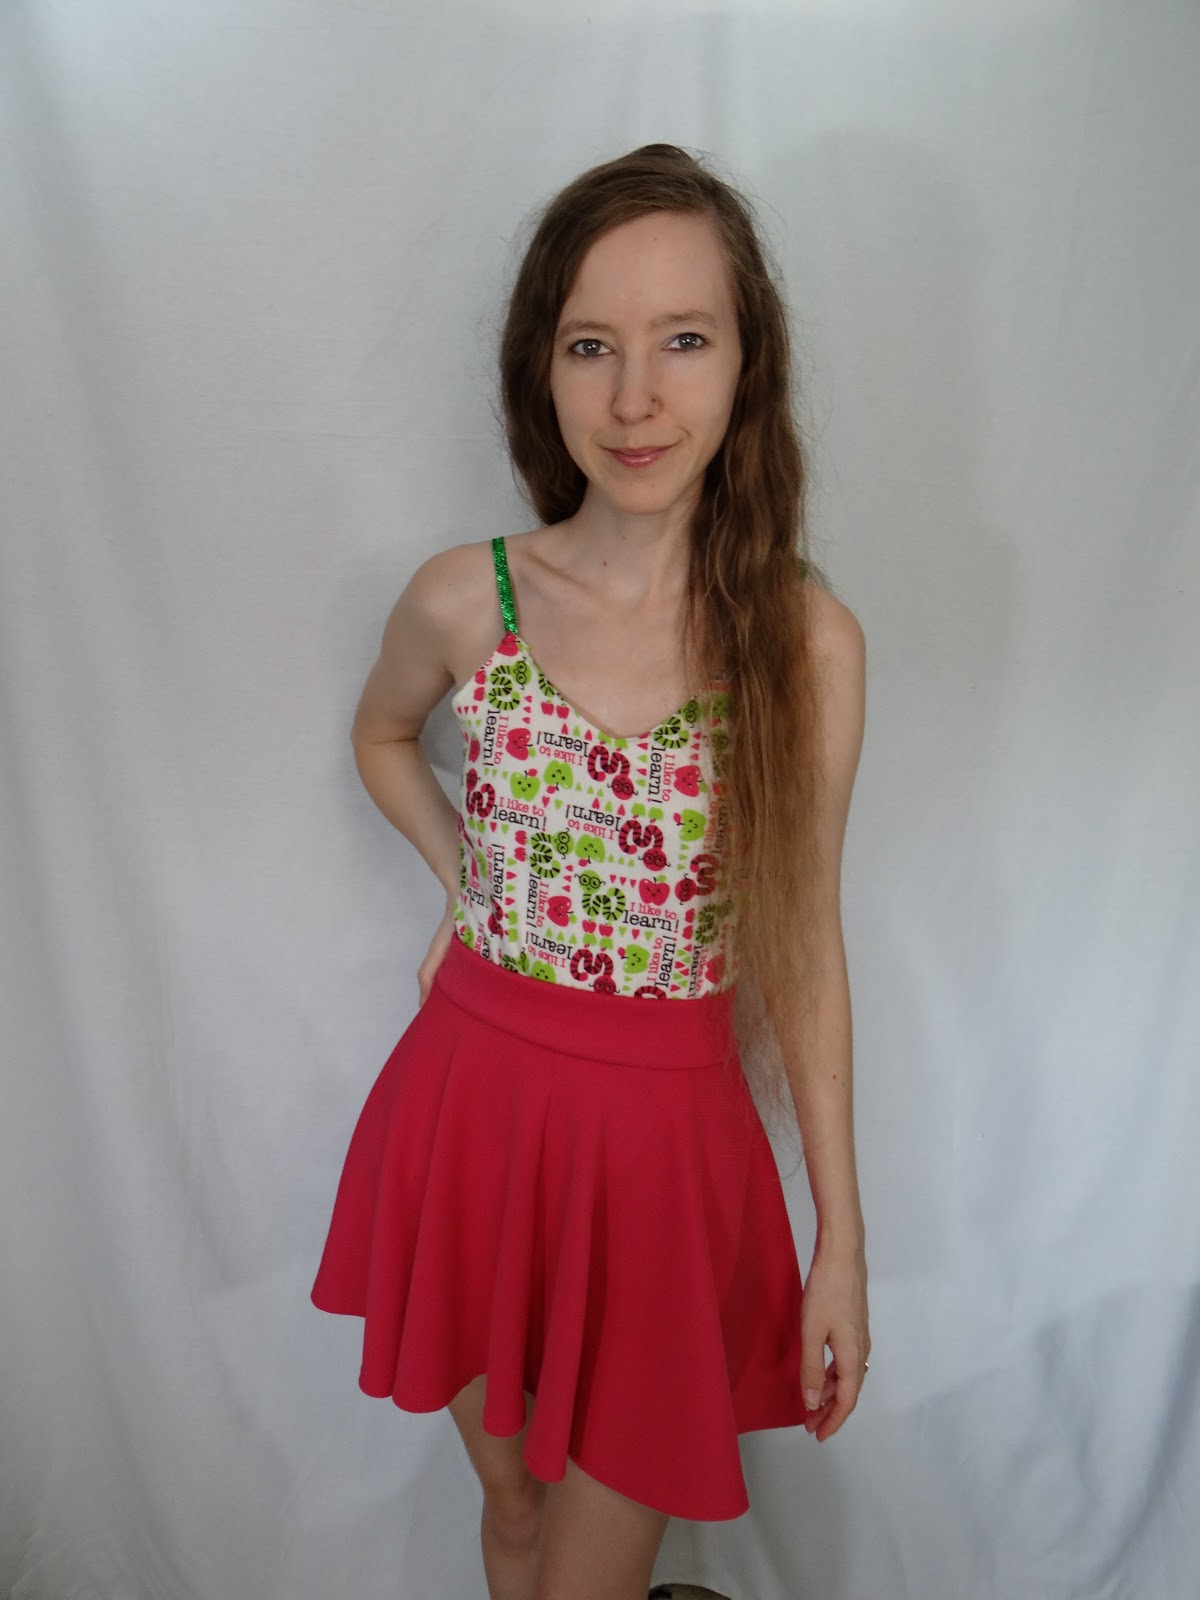
For the first look, I tried pairing my bookworm top with garments that seemed like something I would have worn during my senior year of college, which is when I sewed the shirt. I'm not sure if I'd taken to wearing jeggings at that point in time, but the Converse sneakers definitely fit with my 2011 style sense. I dubbed the two looks I created with this top my "good student" looks, so I had to incorporate a book into my photo shoot. You can't see the cover in these pics, but I opted for my copy of The Making of the Atomic Bomb by Richard Rhodes because it was close at hand and seemed studious enough.


I had a pink skater skirt that I acquired for a different photo shoot which happened to match the color of the pink bookworms almost perfectly. I thought it might be nice to try styling the top with that as well. This look certainly is not representative of my undergrad aesthetic and honestly it's not super my style now, but I think it makes the shirt look pretty good. I used the same book for a prop and this time you can actually see the cover.


For the last of my old looks, I decided to pull out a couple more old garments, the Andy Warhol T-shirt turned tube top I mentioned earlier and a bag that I sewed. I call this look my artistic look. The bag is the first thing I sewed using a sewing machine. I made it at the Powerhouse Teen Center back in 2005, when I was 15, with the help of one of the volunteers. I managed to sew the bag itself okay, but I messed the sewing machine up somehow when it came time to make the strap, and so I glued the edges of the strap down with hot glue so that they wouldn't fray.
I was originally planning on wearing my black sequin pants with this look. However, I was wearing my black sequin shorts the day of the photo shoot and decided to see what it would look like if I paired those shorts with my Andy Warhol top. I liked how the two garments looked together, so I went with those instead. I completed the look with my chain booties. I also wore a pair of earrings that I made in 2012, which you can see in
this blog post. I wanted to wear the treble clef earrings I had made during high school, since music had been an integral part of my high school self, but I found I no longer had them.
As you can see in the pictures below, my bag is decked out with buttons. I've been rocking buttons since childhood. In high school, once I had this bag, I had to divide my buttons between the bag and my backpack. Because the buttons on my backpack were more likely to fall off, I reserved my favorite buttons for this bag. They're a bit hard to see in the pictures, but most of the buttons are related to music or pacifism. My two favorites are probably the Alice in Wonderland pin a mentor and friend gave me as a souvenir from her trip to Disney and a heart shaped button with my name on it that I found at a yard sale one of my relatives was holding.


Of all the old looks I modeled, the artistic look was my favorite and it's probably the only one I'd seriously consider wearing in public. The "good student" outfits were also pretty cute, but I barely made it out of that top, so I'm not going back into it anytime soon. I think the bunched up metal top looked decent too and worked well with the leggings. The only garment I didn't feel like I got in its best light was the "soho pink" top, and I don't know if that one even has a good light. Nonetheless, I had a ton of fun with this project and I'm super glad I revisited these old clothes, even if most are pretty terrible.
In addition to these old outfits, as a bonus, I thought I'd debut a new sewing project of mine. In the years following these early sewing efforts, most of the sewing I've done has consisted of minor alterations to existing garments. However, I've made a few clothing items using patterns. I've already posted about my first attempt at pattern sewing,
these pajama pants, which I made in August of 2013. I've also showed you my second attempt,
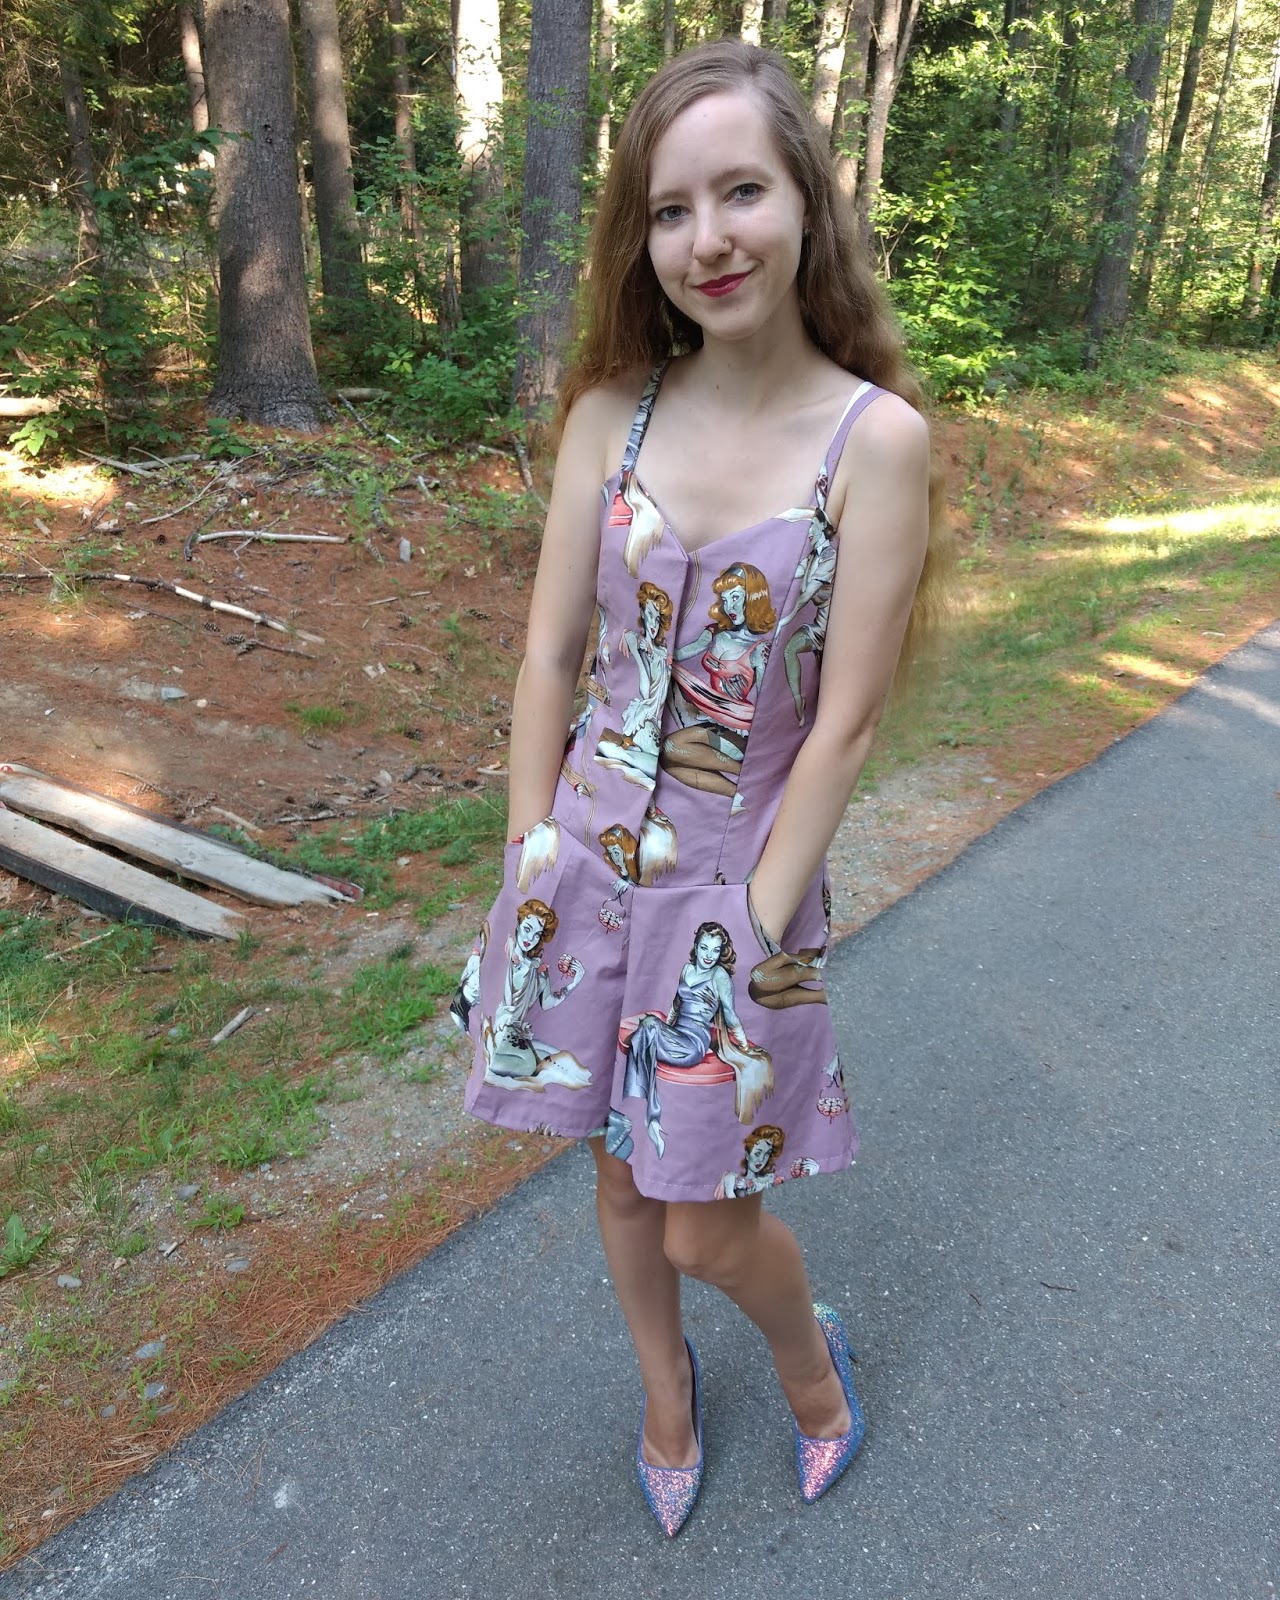
my zombie romper, which I made last year. The pajama pants I made using the sewing machine, while the romper I sewed by hand using a needle and thread, as I had run into too many difficulties using the sewing machine to feel confident using it for such an ambitious project.
This summer I decided to give the sewing machine another try. I ordered
this vintage Simplicity pattern to make some high waisted shorts. I originally wanted to make them using the same zombie fabric that I used for the zombie romper, but the darts (the little half seam things in the center of the thighs) would have intersected the zombies' heads. Instead, I used some plain black fabric I had on hand. The shorts came out all right, although the side closure area could use some improvement.
I thought it would be neat to make another pair of shorts with the same pattern using some Halloween print fabric. I picked up this
tarot card fabric from Joann and went to work. Here's how the second pair of shorts turned out:
Here they are again, paired with my
bat wing boots:
While my initial attempts at clothing design may have turned out poorly, I'm getting to a place now where I can sew wearable garments. I still have a long way to go, but I've also come a long way over this past decade or so. Who knows, maybe in another decade I'll be able to sew clothes I've designed without the aid of a commercial pattern, like I originally wanted to.
I hope you've enjoyed this blog post. Let me know if you'd like to see more of my old crafts in the future. I don't have a ton of them anymore, but I'd be happy to bust them out for special occasions, like future anniversary posts.