Showing posts with label Games. Show all posts

Thursday, July 19, 2018

Writing a Choose Your Own Adventure Style Story


     For my Goosebumps birthday party, I developed a Give Yourself Goosebumps style story for my interactive Choose Your Own Adventure game.  It had 16 different endings and ended up being about 8,900 words.  While my guests got to explore only one ending during the party, I sent them home with copies of my story so that they could read all the endings.
     Writing a story with multiple endings can be a bit more complicated than writing a story that follows one path.  Here are some things that I have found helpful when writing choose your own adventure style stories.

*Come up with a labeling system to identify your paths.  You're going to need some way to keep track of which choice connects to which story arc.  Numbering your choices 1, 2, 3, etc. may seem like a good idea at first, but it's easy to forget which number you left off on and adds complications if you decide to go back and add another branch.  What I've found useful is the following: Suppose my first choice has three options.  The top option in the list I'll call 0, the next I'll call 1, and the last I'll call 2.  If I start writing the 0 branch and come to a choice, these choices will have a two digit identifier: 00, 01, etc.  The zero at the front tells me that I came from path 0 to get here and the second digit is a way of identifying the choices.  If I start working on the 01 branch and come to a choice, these choices I'll number 010, 011, 012, etc.  Again, the 01 identifies which branch I came from and the final digit is what distinguishes this choice from the others.  This strategy has it's downsides, the main one being that if you have a lot of choices, it's easy to mistype a 0 or 1 somewhere and mess up your coding scheme, but it's what has worked well for me.

*When using my labeling system, I put one label at the end of the choice and the same label at the top of the page on which that branch begins.  For example, this is what a choice might look like:

If you eat the ice cream, turn to page 010100.

This is what the beginning of that branch might look like:

010100

     You eat the ice cream.  Your body starts to tingle . . .

These labels will all be removed in the end and replaced with page numbers, but it helps to keep track of your paths while you're writing the story.

*Keep a story map.  It's easy to get lost in a story with multiple paths, so this gives you a way to keep track of what you've done and where you're going.  You'll want to write out each choice with a brief description (1-2 sentences) of what happens in that choice.  For example,

You wake up in a cool, damp enclosure.

If you turn on your flashlight, turn to page 0.
If you decide it's safer to leave your flashlight off, turn to page 1.

0

You turn on your flashlight and see you're in a cave.  You hear a scraping sound.

If you go toward the sound, turn to page 00.
If you move away from the sound, turn to page 01.

00

You go toward the sound and see a slimy creature.

If you go toward it, turn to page 000.
If you run away from it, turn to page 001 . . .

And so on.  You can use this map to keep track of which paths you've written or to plan out where you want to go.  I tend to use them for both purposes.

*Write branches one at a time.  This way it's more like you're writing a traditional story.  I tend to start by writing all the 0th choice lines, e.g., 0, 00, 000, etc. until I reach the end of that line.  Then I go back to the last choice I made and finish that line.

For example, if 00000 comes to an end, after I finish writing it I would then go back to 00001 and write this branch and all of its choices.  Then I would go back to 0001.  Each time I finish a path, I move back to the last choice I made until I finish the story.

*Limit your choices.  This is one of the hardest things for me when it comes to writing a choose your own adventure style story.  I want to give people lots of options, but the more options I give, the harder it is to finish the story.  Also, the longer your branches are, the more options you'll end up having.  This is one place where your story map could come in handy.  If you start mapping out the options you want to have, you can see whether your plan is too ambitious.  For the most part, you'll want to limit yourself to two options per choice and maybe four or five choices per main story branch.  If there's a particular branch you're really interested in, you can always have a few more choices or options for that one and truncate some of your other branches.

That's all the advice I have for now.  If you do end up writing your own choose your own adventure style story, let me know how it goes.

The Grand prize for my cover design contest was a copy of my story with this holographic cover.

Everyone else got a copy of the story with a non-shiny cover.

Thursday, July 5, 2018

Bringing a Choose Your Own Adventure Story to Life

Brian the Dark, at your service.

     Growing up, my favorite books were the Give Yourself Goosebumps books, in which my choices determined the outcome of the story.  Well, I was too afraid of getting bad endings, so if I was reading with someone else, I would make them choose.  The neat thing about these books and other Choose Your Own Adventure style books is that you can actively take part in the story.  When I was planning my birthday party, I thought it would be fun to bring one of these stories to life.  It was I think the most enjoyable party activity I've ever tried and I hope to have a chance to do something similar again.  If you'd like to try hosting your own interactive Choose Your Own Adventure game, here are some tips to help you get started.  While in many ways it would be easier to choose a book that has already been written for your party, if you're interested in writing your own story, like I did, I'll have some tips for that in next week's post.

Help, my guests are turning into plants!

*Choose a book to enact that takes place in one location.  That way you won't have to worry about changing scenery partway through the story.

*Pick a few key decorations to use to set the scene.  Your guests will probably get the idea and it will help them feel like they're part of the story, but it won't be as exhausting as going all out.

*Choose your props wisely.  Props can really add to the story, but Choose Your Own Adventure stories generally have many endings.  Since you probably don't have the time or energy to make props for every path, stick to the paths your players are most likely to encounter.  For example, at the beginning of my story, the players drink a mysterious punch and start turning into plants.  I had a punch bowl available for them and artificial vines they could drape around their shoulders to signify that they were turning into plants.  In one of the choices in my story, the players turn into cats.  I wanted to make some cat eared headbands for that storyline, but there was a small chance that they would actually pick that ending, so I decided not to.  Indeed, they did not pick that ending, so I'm glad I didn't go to all that extra effort.

*Get into character.  While this might not be applicable to all stories, some involve a central character or villain the player is constantly coming into contact with.  If you dress up as and act like this character, it can enhance the game experience for your players.  If there are multiple villains your players are likely to encounter, you may want to enlist some help.  Brian ended up playing a key role the game I hosted.

*Decide in advance who will make the choices.  If you have multiple players, the odds are that they won't all want to make the same choice at every juncture.  At my party, we used majority rule to decide.  However, if you're hosting the party for someone, you may want to task them with making the choice (or choosing who will make the choice).

*Use copies of the book as party favors.  You won't be able to get through all possible endings in one party, so giving players a copy of the book could help sate their curiosity.  This option may help alleviate any potential complaints from players who did not get to pick the ending, as it gives them the option to experience their ending at a later time.

Planning on trying your own Choose Your Own Adventure game?  Let me know how it goes for you.  You can tell me in the comments, or send me an email at hathaway.amber@gmail.com.

Saturday, June 9, 2018

Mock Goosebumps Cover Design Contest


     Looking for a fun, easy activity for your Goosebumps themed party?  Host a cover design contest.  Print out copies of the template given below and hand them out to your guests along with some colored pencils and then sit back and watch the creativity flow.

Template


     Note that if you print this template at the size of an actual Goosebumps cover, it will come out a little pixelated.  Scholastic used to offer a free, printable template on their website, but when I went there while I was planning my party, I couldn't find it anymore.  I threw this together and even though it's a little fuzzy, that pixelation didn't seem to detract from the activity any.

Sample Covers


     These are the cover designs my guests came up with.  When it came time for us to vote, many of us had trouble ranking them because they were all so good.  Katie's Cat Got Your Tongue (pictured at the top of the post) scored a very narrow victory.

Wednesday, May 23, 2018

Goosebumps Birthday Party

     As a 90s child, I adored the Goosebumps series, especially the Give Yourself Goosebumps books, in which the reader picked the ending.  I decided to throw a Goosebumps themed birthday party, complete with an interactive Give Yourself Goosebumps style game.  I've had many fun birthday parties, but I think this one was the most fun one yet.
     Over the next few weeks, I'll be sharing how I designed the crafts, games, and snacks for the party.  For now, though, here's an overview of the party.
     One nice thing about throwing a Goosebumps party was that it gave me an excuse to use some of my Halloween decorations.  That meant I had fewer decorations I had to make.


     First up are the outdoor decorations.  I brought out my "beware of werewolf" display again because there are werewolves in several Goosebumps books (e.g., Night in Werewolf Woods, Werewolf of Fever Swamp).  I also brought out the zombie garden gnomes because I'm pretty sure there was a Goosebumps book about killer garden gnomes (it turns out it's called Revenge of the Lawn Gnomes), so the statues seemed fitting.


     Cemeteries are featured in several Goosebumps books (e.g., Curse of the Creeping Coffin), so I dragged my foam tombstones out of storage.  I'm pretty sure my neighbors were probably wondering why I had a cemetery in my yard in the middle of May.  I also added the eyeball path markers because they're fun.


     The only new decoration I made for the outdoors was the slime for the front steps.  The steps were pretty dusty, so it took several applications of packing tape before I got the slime to stay up.


     Inside the house, I had two main setups, both relating to the story I wrote for my interactive game in one way or another.  First up is the mad scientist setup.  The test tubes and beakers all came from Target and we're part of my existing Halloween decorations.  The test tube shot glasses came from Party City.  The holes around the shot glasses were very tight, so I cut off the top of the original holder and made one with larger holes from cardstock.  I then painted the holder black.


     The other setup was the magic setup.  Again, most of the potions and whatnot I already had (see these four posts for more on the potion bottles).  I added some cardstock to the inside of an olive jar to make a vase for the dried flowers.  The monster blood was also new, although I'll write more about that in a later post.


     The cutlery, napkins, and plates came from Party City.  I chose neon green because monster blood is green in the books.  I decorated some of the cutlery with dripping glitter "monster blood."  The snack you see there is purple peanut butter on crackers, a reference to the book Beware of the Purple Peanut Butter.  We also had four kinds of pizza: cheese, pickle, Alfredo, and an everything pizza.


     Here is the punch setup.  The cups came from Party City, but I decorated them using cut outs I made with my Silhouette CAMEO.  I think I got the bowl from Dollar Tree, although that was ages ago, so I'm not sure.  I got the Nessie ladle from Amazon.  I had been wanting to get one for a while now, so this was the perfect excuse.  People thought Nessie was adorable.  The "punch" was just Sprite Zero with green food coloring.


     After people had their pizza, we played my Give Yourself Goosebumps style game.  The premise is this: You're at your friend Amber's Goosebumps themed birthday party and decide to have some punch.  Suddenly vines start growing from your body.  It seems like you're turning into a plant.  You can choose from items in the mad scientist setup or the magic setup to try to return to your human form.  Here my guests are turning into plants.


     They ended up choosing a story line involving Brian the dark sorcerer.  They decide to take Brian's wager and roll for a chance to be returned to their human form.


     After the game, we had a Goosebumps cover design contest.  The entries we're all excellent, but Katie's "Cat Got Your Tongue" scored a narrow victory.  She won a holographic cover edition of the story I wrote for the party.  Everyone else got a copy of the story as well, just without the shiny cover.


     We had a photo shoot against this spooky backdrop Brian picked up on Amazon.


     Next we had cake and ice cream.


     I set up an "I scream" lab, where people could add spooky colors or toppings to their ice cream.
     I was planning on having a costume contest to win a vial of monster blood, but since Brian and I were the only ones who dressed up, we had a Goosebumps trivia contest instead.  I brought out my Give Yourself Goosebumps books and people would grab whichever book they thought answered the question.  The first question, which no one answered correctly, was what was my favorite Goosebumps book when I was a kid?  (Correct answer: Deep in the Jungle of Doom.)  The second question, which Ken answered correctly to win the monster blood, was which Give Yourself Goosebumps book did the Veazie school library have when I was a kid?  (correct answer: The Curse of the Creeping Coffin.)
     I had a ton of fun hosting this party and I can't wait to share all these crafts, games, and snacks with you.

Thursday, May 17, 2018

Non-Transitive Dice


     Non-transitive dice are a fun take on traditional dice.  You may recall from algebra class the concept of transitivity from algebra class, probably expressed to you in a statement like this: if a>b and b>c, then a>c.  If something is not transitive, then if a>b and b>c, a is not necessarily greater than c.
     The way non-transitive dice work is that each die in the set has a certain probability of having the higher value when rolled against another die in the set.  If one person picks a die, there is another die in the set that is likely to outscore the first die when both are rolled.  Thus if you pick second, you can skew the odds in your favor.  To see examples of how some non-transitive dice work, including the ones discussed in this post, see this page.

Materials:
*Paint in the colors of your choice
*Paintbrush
*Wooden blocks
*Pen

Directions:

*Paint the wood blocks in whichever color or colors you would like.  Let dry.

*Dip the end of the pen in paint of a different color and press against the wooden blocks to make the numbers.

Thursday, June 1, 2017

Nail Polish Roulette Slumber Party Game


     Here's a fun sleepover party (or un-slumber party) game.  If you already have a collection of nail polish, you have the bulk of what you'll need to make the game (and if you don't, you can pick up bottles at Dollar Tree for $1 each or buy multi-packs after Halloween and Christmas at steep discounts).  If you're buying new bottles rather than digging into your personal collection, you could even give away some of the bottles as party favors.
     My version of the game requires 20 different nail polish colors, but you could easily play with fewer bottles by using a six-sided die instead of a 20 sided one or using a game spinner (Brian suggested using a spinner from the game of Life and matching nail polish colors to the colors on the spinners.  I've also seen several variations of this Spin the (Nail Polish) Bottle game, which generally use 8 colors but which could be modified to use more or fewer).  Also, although I thought my game board was a nice touch, you can easily make a variation of this game using only nail polish, a die, and some way of numbering your nail polish bottles.

Materials:

*20 bottles of nail polish
*20 sided die
*Painter's or masking tape
*Marker
*12x12 sheet of cardstock
*Number and letter stickers (or cutouts; I used my CAMEO for the lettering/numbering)

Directions:

*For making the game board, add a title like "Nail Polish Roulette" to the top of a 12x12 sheet of paper and then place numbers 1-20 along the board.


*Write numbers 1-20 on painter's or masking tape and stick them to the backs of the nail polish bottles.

*Place the nail polish bottles along the board at their designated spots.


Game Play

 *Players sit in a circle around the game board taking turns rolling the die.

*The number a player rolls corresponds to the nail polish color a player will have to paint one of their nails.

*The game concludes when each player has painted all of their fingernails (or toenails).

Thursday, May 25, 2017

Birthday Un-Slumber Party

     As far as parties go, it's hard to beat a sleepover party.  My sister and I used to have friends over whenever possible growing up, and I have fond memories of those days (some of which you'll find at the end of this post).  Living in a one bedroom apartment with no couch, hosting an overnight party is out of the question.  However, there was nothing keeping me from offering the games, activities, and food of a slumber party during the day, and I decided to throw an un-slumber party.
     Over the next few weeks, I'll be sharing the details of how I made the various crafts for this party.  For now, though, here's an overview of the decorations, activities, games, and food I had at my party, plus some memories of sleepovers past.


     While in years past I've thrown some elaborately decorated parties, this year I focused a lot more on the games and activities than I did on aesthetics.  As far as themes go, an un-slumber party doesn't have an obvious decorating scheme.  I chose a black and silver color scheme because that reminds me of stars in the nighttime sky.  I made this curtain of streamers to cover the entryway.


     Here are the plates, cups, utensils, etc.  All of the tableware came from Dollar Tree.  I bought plain black party supplies and then decorated the cups and utensils so that things weren't so dark.


     Here's the tablescape.  I bought a plain black tablecloth from Dollar Tree and scattered silver stars across it.  On the table you'll see two of our party activities.  One is a nail polish roulette game I made.  The other is coloring page photo frames which I designed, although you can't really see what's on the pages in this picture.  My plan was to have people color the photo frames and then send them home with the photo frames and a group photo to put in one of the frames as a souvenir.  However, we ended up spending a lot of time on the other activities, so I gave people plain pages to color at home.


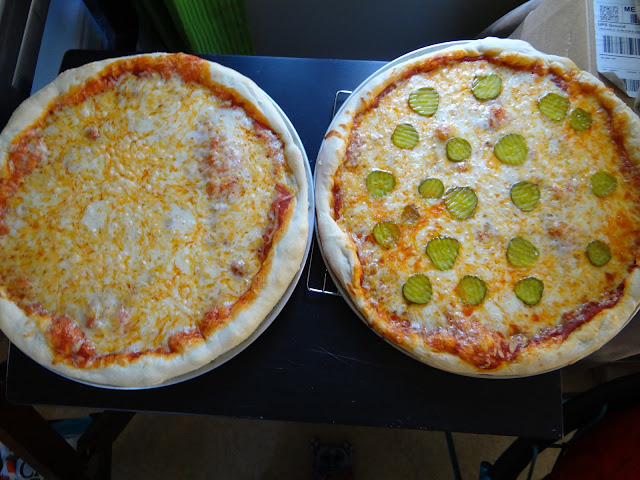
     Brian made homemade pizza.  Pictured above are the pickle and cheese pizzas, but he also made Alfredo pizza (cheese pizza with Alfredo sauce instead of tomato sauce) and his "heart attack pizza" (pizza loaded with hamburger and pepperoni).


     Playing nail polish roulette . . .


     . . . and the aftermath of our game.  Some of the colors kind of worked together, and some really didn't.


     Here we are taking a group photo with some of the photo booth props I made.  It's hard to see from this picture, but dad and I tried to give Katie bunny ears simultaneously.  Also, you can see Katie's lovely Stephen King book artwork on the fridge.


     For my cake this year, we I didn't do a lot of decorating.  I just made that Little Owl cake "topper."  Brian added some icing decorations.  I found the black candles with silver glitter at Party City.
     While eating cake and ice cream, we also played Mad Libs.  There is a free Mad Libs app that you can download for your phone or tablet.  It comes with a handful of free stories, but if you need more than what they offer, you can also buy whole Mad Libs books through the app.


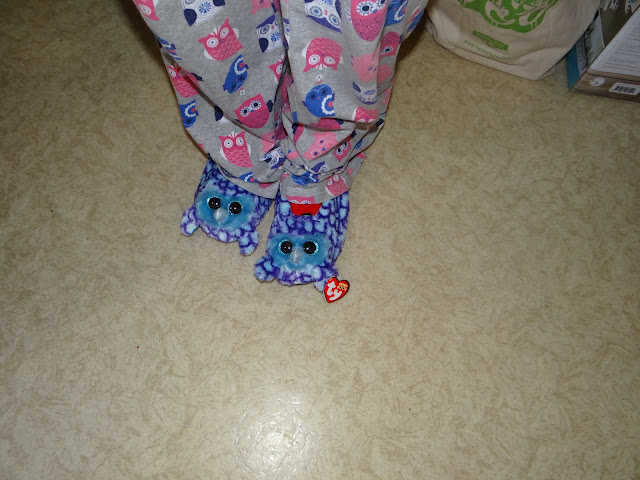
     Aren't these slippers adorable?  They have the cutest little faces.  Brian got them for me for Christmas.  If you're throwing a party for a younger audience (I think the size I have is about the largest they offer) and you can afford to spend some money, these could make for great party favors.


     Dad always gives awesome birthday cards.


     It wouldn't be a Hathaway family function without an attempted murder!


     Failing to give dad bunny ears.  I always underestimate how high I'll have to lift my arm to make bunny ears visible.
     Well, that wraps up another birthday party.  What are your favorite sleepover activities?  Snacks?  Any favorite sleepover memories?  Here are some of the sleepovers that stick with me.  


     Katie, Becky, and I decided to camp out on Becky's porch swing.  We draped sleeping bags over the swing to seal it off from the bugs, but the bugs still got in and had a feast.  Plus it was really cold.
    Another time, we camped out in a tent in Becky's front yard.  Katie had seen one of those true crime shows in which a man cut a hole in the wall of a tent and abducted and murdered a little girl.  Katie was worried that someone was going to cut a hole in our tent and kidnap her, so I had to sleep near the wall of the tent.


     One final memory.  When my mom bought a shed for our house, Katie and I decided that before she started filling it up with boxes, we were going to have a sleepover in it.  She, Breanna, and I grabbed our bedding and junk food and camped out.  One of our neighbors heard about our plan and started banging on the shed.  We were sure we were about to be murdered.


     I can't remember if we barred the door before or after the knocking, but we were not letting any murderers in if we could help it!

Thursday, August 25, 2016

Jack O'Lantern Halloween Game


     Today Amber's Craft a Week Blog turns 5!  It's been difficult at times, churning out a craft (almost) every week as I finished my Bachelor's degree, my Master's, and started in on a PhD, but I'm glad I've kept going.  Thank you to all of you out there who have been a part of this journey, whether you're a constant reader or someone who checks in every now and again.  Here's to hoping for another five years!
     Today's craft is a game that is easy to make and fun for all ages.  I got the idea from this blog post, although I've structured my game differently to make it competitive.  As far as game play goes, each player starts off with a blank pumpkin template.  Players take turns rolling a die with sides labeled eye, mouth, nose, stem, add any, and remove.  If a player rolls eye, nose, mouth, or stem, the player adds that particular body part to their pumpkin shape.  Players need to roll "eye" twice, one for each eye.  If they already have the part that they roll, then they do nothing until their next turn.  "Add any" allows the player to choose which piece to add.  "Remove" requires that players choose a piece to take away.  The first person to complete their jack o'lantern wins.
     So that's how you play, but how do you make it?

Materials:
*Cardstock in orange, yellow, and green
*Pencil
*Scissors
*Wooden block
*Halloween/fall themed patterned paper
*Printer
*All purpose adhesive
*Optional: laminator

Directions:
*Resize the below template to the desired size and print.
*Cut out the template pieces.  I thought it would be fun to have a variety of jack o'lantern faces instead of just one, so I've included extra sets of eyes and mouths that you can mix and match as you please.
*Trace the pumpkin shape onto orange cardstock and cut out.  You'll want one pumpkin shape for each intended player.
*Trace a set of eyes, nose, and mouth onto yellow cardstock and cut out, one set for each jack o'lantern.
*Trace the stem onto green cardstock and cut out, one for each jack o'lantern.
*To make the game pieces more durable, you can laminate them if you'd like.
*To make the die, type out the words for the different faces in a word document, leaving a significant amount of space between each word.
*Print the words onto a Halloween or fall themed piece of patterned paper.  It works best if the paper uses one or only a few colors which are very different from your chosen text color.
*Place the wooden block over one of the words and trace around it.  Repeat with the other words.
*Cut out the resulting squares and glue them to the faces of the wooden block.  Let dry.
*Now you have your jack o'lantern game.  Enjoy!


Thursday, March 31, 2016

Mini Checkers Board


Materials:
*Mini image of a checkers board
*Thin cardboard (e.g. from a cereal box)
*Scissors
*Hole punch
*Cardstock in two different colors
*All purpose adhesive

Directions:
*Print out an image of or construct a mini checkers board, with squares just slightly wider than the size of a circle produced from a hole punch.  I took a picture of my butterfly checkers board and then resized and printed it.
*Reinforce the mini checkers board by gluing some thin cardboard to the back.
*Punch out game pieces from cardstock in two different colors.  You can either glue the pieces to the game board or leave them unglued so that they can be moved around.

Thursday, May 7, 2015

Toilet Paper Tube Bowling

     I found this idea here.  Below are my slightly modified directions.

Materials:
*6 toilet paper tubes
*Duct tape in various colors/patterns
*Red duct tape
*Scissors
*Stress ball

Directions:
*Wrap toilet paper tubes in duct tape.
*Add a red band around the middle of each tube using the red duct tape.
*Use a stress ball or a similarly lightweight ball for the bowling ball.

Thursday, March 26, 2015

Non-Candy Easter Egg Surprises

     Looking to surprise someone with an Easter egg hunt, but want something more personal than candy and little store bought trinkets?  Here are a few crafty ideas:

Mini Origami


     What could be more adorable than tiny origami critters?  For this craft, resize your origami paper to a fraction of its original size and then make your favorite animal as you normally would.

Egg of Quotes


     This craft is basically a miniaturized version of the quote jar idea that I had heard of, wherein you make a jar of funny or heartwarming things people say.  Brian says many silly and bizarre things and I make sure to jot down the best of them.  I printed off a bunch of his quotes, cut the paper into strips, with one quote per strip, and then folded them up and stuffed them inside the egg.  Alternately, you can use some of your favorite quotes, or perhaps write up a short story and cut out strips with one sentence per strip, then see if your recipient can piece them together to figure out the whole story.

Mini Paper Doll Set


     Draw your own paper dolls or find a pattern and shrink it so that the dolls will fit inside the egg.  I created these "paper dolls" using Paint.  These are the Happy Candy Corn and their various friends and foes.  They're from a comic strip that I drew for Brian.

Things I Love about You


     All you need for this craft is a heart template, colored cardstock, and a pen.  Cut out a bunch of hearts and write on them various things that you love about the recipient.

A Puzzle


     Draw or print out a picture, cut it into pieces, and hide the pieces in the eggs.  Alternately, you could buy a puzzle and place the pieces inside the eggs.

Customize Toys with a Message


     Want to make a store bought item feel more personal?  Write a personal note to go with it.  If it's an animal or something else that tends to be treated anthropomorphically, come up with a personality for the toy, one that will match your recipient's.

For the Jewelry Lover

Spring Pinwheel Earrings
Clay Owl Earrings
Rose and Crystal Drop Earrings
Easy Earrings
Duct Tape Rose Ring
Clay and Button Pendants

Other Ideas

 Note: some of these might be a little large to hide in a standard sized Easter egg, but could still make nice presents for an Easter basket, so I decided to include them anyway.

Pom Pom Chick
Dollhouse Miniatures
Spring Butterfly Bookmarks
Fuse Bead Spring Magnets