Thursday, October 24, 2013

Cute Halloween Pom Pom Pals


     Halloween is almost upon us.  If you still need some decorating or craft ideas, here's an adorable Halloween craft that is fast and easy to make and relatively inexpensive.  For more Halloween craft ideas, check out my Halloween section of my blog.

Spider
Materials:
*2 black pipe cleaners
*Black pom pom
*2 googly eyes
*Scissors
*All purpose adhesive

 Directions:
*Cut each pipe cleaner into four equal pieces.
*Bend the pipe cleaners to make them into the shape of the spiders' legs.
*Glue the legs to the pom pom.
*Add googly eyes to the pom pom.

Black Cat
Materials:
*Black pom pom
*Black pipe cleaner
*2 googly eyes
*Black felt or cardstock
*Scissors
*All purpose adhesive
*Black foam

Directions:
*Cut a heart shape out of the foam slightly larger than the pom pom.
*Glue the pom pom to the heart shape so that the top of the heart becomes feet for the cat.
*Cut off a piece of pipe cleaner and bend it, then glue to the back of the pom pom to form the cat's tail.
*Cut two small triangles out of a sheet of felt or cardstock and glue to the top of the pom pom to make the cat's eyes.
*Add two googly eyes to the pom pom.

Bat
Materials:
*Purple pom pom
*Purple cardstock
*Purple foam
*2 googly eyes
*Scissors
*All purpose adhesive

Directions:
*Cut a heart shape out of the foam slightly larger than the pom pom.
*Glue the pom pom to the heart shape so that the top of the heart becomes the bat's feet.
*Cut out wings from cardstock and glue to the back of the bat.
*Cut two small triangles out of cardstock and glue to the top of the pom pom to form the bat's ears.
*Add two googly eyes to the pom pom.

Cyclops
Materials:
*Green pom pom
*Mini green pom pom
*Green foam
*Large googly eye
*Green pipe cleaner
*All purpose adhesive
*Scissors

Directions:
*Cut a heart shape out of the foam slightly larger than the pom pom.
*Glue the pom pom to the heart shape so that the top of the heart becomes feet for the cyclops.
*Cut off a piece of the pipe cleaner and bend it into a squiggly shape.  Attach one end of the pipe cleaner to the top of the larger pom pom and the other to the small pom pom to make an antenna for the cyclops.
*Glue on large googly eye.

Thursday, October 17, 2013

Quick and Easy Halloween Banner


Materials:
*13 4.5" x 6.5" sheets of Halloween paper (such as from these Spooky Time paper collections)
*Halloween stickers (I used Halloween Essentials bat felt stickers from Joann)
*6' black ribbon
*All purpose adhesive
*Scissors
*Ruler
*Pencil

Directions:
*Select 13 sheets of patterned paper (or some other odd number, depending on how long you would like your banner to be).
*Place a sheet of paper pattern side down and mark off the 2.25" mark along the bottom edge.  Using the ruler, trace a straight line from the upper right corner to the 2.25" mark and from the upper left corner to the 2.25" mark.  This should form a triangle.
*Following the pencil lines, cut out the triangle.
*Repeat the above steps for the remaining sheets of paper.
*Arrange the papers in a pattern you find pleasing.
*Decorate with Halloween stickers, if desired.
*Glue the triangles to the ribbon.

Thursday, October 10, 2013

Batty Vampire Cape


Materials:
*1 yard of Flocked Bats Organza Tie Dye Fabric from Joann's Halloween Spirit Collection
*6 feet of ribbon
*Sewing machine
*Thread

Directions (these are the same as the directions for the cape of my Witch Costume):
*Obtain cape fabric of desired length. 
*Fold the sides of the fabric down about half and inch or less and sew so that the edges of the cape will not fray.
*Repeat the above procedure for the bottom of the cape.
*Take the ribbon and lay it across the top of the cape.  Fold fabric over it and sew the fabric, making sure not to sew the ribbon.
*Once you have finished sewing the top of the cape, adjust the ribbon until you have the desired length for tying on one side, about 6 to 8 inches.  Sew the cape material closed over this part of the ribbon.
*Compress the fabric around the ribbon until the fabric covers about 1 1/2 feet of the ribbon, perhaps less if the person you are making a cape for is small.  Sew the cape fabric closed over this part of the ribbon.  You should have several feet of ribbon hanging out one side of the cape. 
*Trim the length of ribbon down to 6 or 8 inches.

A New Frame for Your Halloween Holographs

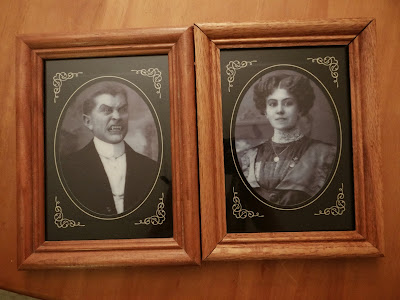
     I love the creepy holographic pictures that have been popping up in Halloween decoration sections for the past couple of years, but they always seem to come in these plastic or cardboard frames that I don't find particularly appealing, like in the picture below.  To remedy this, I picked up some cheap 5" x 7" frames from the Orono Thrift Shop for 25 cents apiece.  With the vampire couple, I just separated the two photos by cutting right down the center of the cardboard, then put them into the frames, which they fit inside perfectly.  

Before

After

     Dollar Tree has a number of these Halloween holographic photos that come glued to these ugly plastic frames.  For those ones, I recommend cutting off the plastic frame, as the glue is so strong that it's very difficult to pull the picture off of the frame.  Then slide the pictures into 5"x7" frames and you have a fun, creepy Halloween decoration.

Before

With frame removed

After

Thursday, October 3, 2013

Glittery Potion Bottles


Materials:
*Glass bottles
*Spray glitter paint in Halloween colors of your choice
*Paper and printer
*All purpose adhesive

Directions:
*In a well ventilated area, line your work space with newspaper, placing the glass bottles atop the newspaper.
*Following the directions on the spray can, apply a coat of paint to each glass bottle.  Let dry, then apply a second coat if desired.
*Print out the labels such as the ones I've included below or some of the many you can find freely available on the internet by searching, or design your own.


*Once your bottles have finished drying, adhere labels to your potion bottles.