Friday, December 29, 2017

Sequined Glitter Ornaments


     Step up your glitter ornament game with some fun sequins.

Materials:
*Plastic or glass ball ornaments
*Ultra fine glitter
*Shaped sequins
*Glitter It adhesive

Directions:
*Layer your work space with newspaper.
*Uncap your ornament and pour in some Glitter It.  Swirl the adhesive around until it has coated the entirety of the inside of the ornament.
*Pour excess adhesive back into the bottle.  Let the adhesive drain out for about 15 seconds.
*Pour some sequins into the ornament.  They will likely stick where they land, so i
f you pour them straight into the bottom of the ornament, you'll have a lot of sequins clustered toward the bottom of the ornament.
*Shake the ornament gently to move sequins onto the sides of the ornament.
*Open a container of glitter and pour into the ornament.  Swirl the glitter around inside the ornament until it has coated the entire ornament, adding more glitter as necessary.
*Pour any excess glitter back into the container.
*Place the top back on the ornament.


Thursday, December 21, 2017

Gift Genie: DIY Last Minute Gift Finder


     Need a last minute gift?  Unsure what to get?  Let the gift genie decide!  Better yet, if the recipient is indecisive, give them their very own gift genie to make their future holiday shopping a breeze.


     The "gift genie" may look like your run of the mill "cootie catcher," but it has the power to help you choose some gifts or at least get a few chuckles.  I got this idea from the "It's Different Every Day" calendar.  They had a foldable "psychic gift guide," which I had to play with.  I actually ended up ordering one of my sister's Christmas presents based on the guide's suggestion.  It was such a cute and fun idea, I thought, why not make one of my own?  My gift genie is actually a re-gift genie and it's meant more for laughs than serious suggestions.  However, if you need serious suggestions, the gift genie can provide that too.  See the end of this post for possible gift ideas your gift genie could include.

Materials:

*Paper
*Pencil
*Stickers (optional)

Directions:

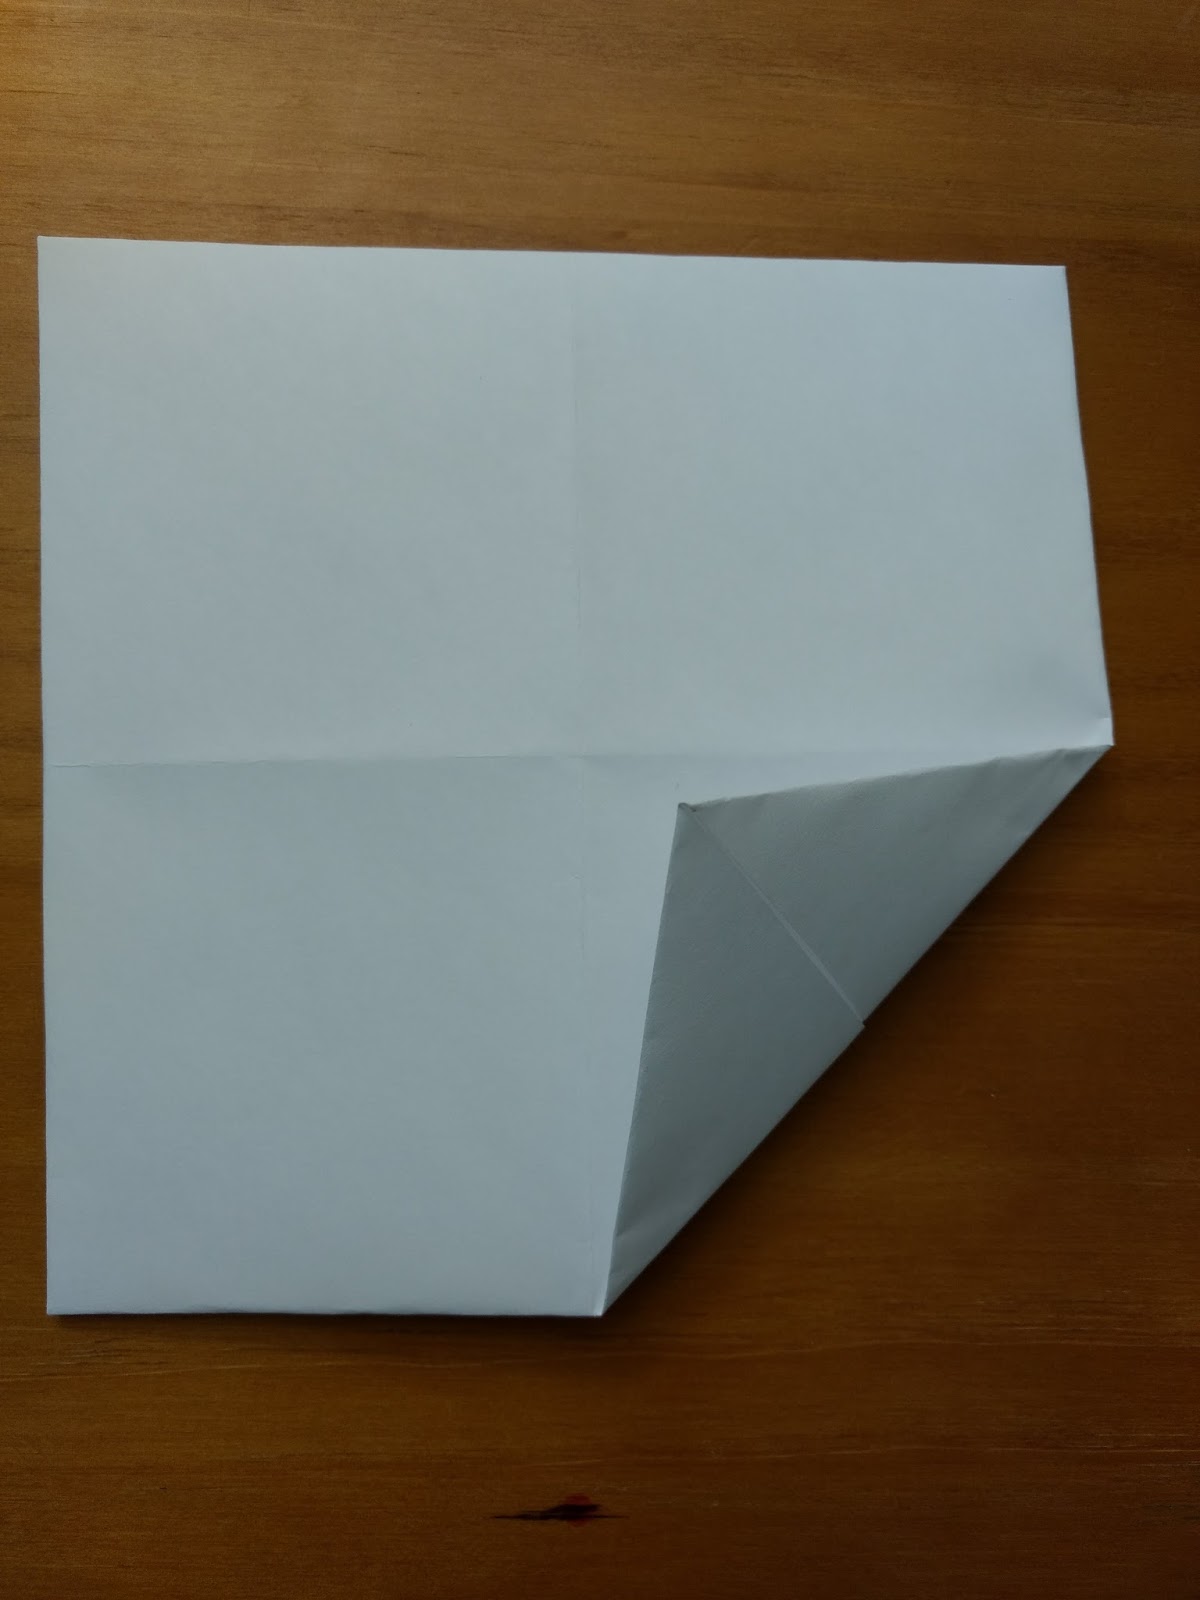
*Begin by folding the sheet of paper diagonally.


*Cut off the excess paper that goes beyond the fold.


*Unfold so that your paper forms a square and then fold in half diagonally going between the opposite corners of the original diagonal fold.


*Unfold the paper.


*Fold one of the corners to the center of the paper.


*Fold the remaining corners to the center in the same fashion.


*Flip the paper over and fold one corner to the center of the paper.


*Fold the remaining corners to the center.


*Number the triangles created by the folding 1-8.  Lift up the flaps and write a gift idea under each number.  Fold the flaps back to the center.

*Fold in half.


*Decorate the resulting squares using words, stickers, colors, or other things you can spell out.  I used stickers corresponding to different gift categories: clothes, shoes, makeup, and music (although these did not match the gift ideas beneath the flaps).

*Slide your fingers under the flaps and use as you would a "cootie catcher."

Ideas for gifts:

*Gift card to a favorite store
*Jeans
*Sequin top
*DVD with Jiffy Pop, popcorn seasonings, movie theatre candy
*Boots
*Craft scissors, if they're a crafter
*Concert tickets or other experience related gifts (see here for other experience ideas)
*DIY coupons (e.g. for a nice dinner, a back rub, a day trip, see here for design ideas)
*E.L.F. gift card
*Framed quote (see here for DIY idea)
*Pokemon themed gifts (see herehere, here, here, and here for DIY ideas)
*Lip balm (a good stocking stuffer; see here, here, and here for DIY ideas)
*Earrings (see here for DIY clay owl earrings)

Ideas for re-gifts:

*A rusty paperclip
*Out of season hand towel
*Holiday card with previous recipient's name scratched out
*Strongly scented lotion that has been sitting under the bathroom sink for at least three years
*Unusable nick knack that is at least one foot tall
*Well circulated state quarters
*Item from the back of your closet
*Half used candle

Thursday, December 14, 2017

Faux Fireplace


     Hanging stockings above a fireplace is a Christmas tradition for many, one that I've never been able to participate in because I've never lived in a house with a fireplace.  So I decided to make my own.  This is also a perfect way to get the holiday vibe if you're not a fan of open flames.

Materials:

*Foam board
*Box cutter
*Red cardstock
*Orange cardstock
*Yellow cardstock
*Black cardstock
*Glue
*Gluestick
*Pencil
*Ruler

Directions:

*Decide what size you would like your fireplace to be.  If you'd like to see flickering flames in your fireplace, perhaps size it so that it can be taped to the edges of your TV or computer monitor.

*With a pencil and ruler, mark out the dimensions you would like your fireplace to be.


*Cut out the fireplace shape using a box cutter.


*Determine what dimensions you would like your bricks to be.  Cut out appropriately sized brick shapes from the red cardstock and arrange along the foam board.  Once you're satisfied with the arrangement, glue down.


*If you're not planning on placing your fireplace over a TV or monitor, you'll need a fire to go in your fireplace.  Start by gluing together as many sheets of black cardstock as you need to fill in the opening in your fireplace.

*Sketch or trace flame shapes onto the orange and yellow cardstock.

*Cut out flame shapes and glue them to the black cardstock.

*Glue the black cardstock to the fireplace such that you are able to see the flames when looking at the fireplace.


Tuesday, December 12, 2017

DIY "Ugly" Christmas Cat Sweater: Now with Ornaments!


     In my "ugly" Christmas cat sweater craft instructions, I mentioned that you could add mini ornaments to the cat's garland.  I finally got around to getting some for my own sweater a few hours before the physics department holiday party.  The ornaments I got came with strings rather than hooks.  I didn't want to tie the ornaments onto the sweater because permanently affixing them would make it difficult to wash the sweater, so I needed to come up with ornament hook substitutes.  What did I use?  Staples.  Read on to find out how to make mini ornament hooks from staples.

Directions:

*Separate one staple from the rest of the staples it is affixed to.

*Slide the mini ornament over one end of the staple.

*Fold the staple over, closing the mini ornament inside.

*Fold the other end of the staple down a little to create a hook that you can use to hang up the ornament.  Now your ornament is ready!

Thursday, December 7, 2017

Santa Bats


     These little bats are here to spread some holiday cheer.  What, you didn't picture bats as Santa's helpers?  Bats get a bad rap, but these cuties are more than happy to add some whimsy to your Christmas decor.
     I wish I could take credit for this idea, but I didn't come up with it.  I walked into my department's main office earlier in the week and lo and behold, there were bats with Santa hats on the walls:


They were so adorable, I decided I had to make some of my own.  Here's how I made my variant.

Materials:

*Black cardstock
*White cardstock
*Red cardstock
*Scissors, pencil, and X-acto knife (or Silhouette CAMEO)
*All purpose adhesive

Directions:

*Print out a copy of the bat template below (or import it to Silhouette Studio; for directions on how to cut out my templates using Silhouette Studio see this post).  The bat template minus the hat could also be used if you're looking for some cutesy Halloween decor.


*Cut out the pieces of the template.  Trace the bat shape onto black cardstock, the main hat piece onto red cardstock, and the other two hat pieces onto white cardstock.

*Glue together the hat pieces and then glue the hat onto the bat.

Thursday, November 30, 2017

DIY "Ugly" Christmas Cat Sweater


Materials:

*Sweatshirt
*Tinsel ribbon
*Felt in the color of your choice (for the cat)
*Small beads (for the cat's eyes)
*Needle
*Thread
*Scissors
*Metallic marker
*Safety pins
*Mini ornaments (optional)
*Mini LED light string (optional)

Directions:

*Trace the cat silhouette given in the template below (or any cat silhouette of your choice) onto the felt and then cut out the cat shape.


*Sew the beads onto the felt to give the cat eyes.

*Wrap tinsel ribbon around the cat.

*Pin the cat onto the sweatshirt using safety pins.  Try on the shirt to make sure you like the placement of the cat before you begin sewing.

*Sew the cat onto the shirt.

*Optional: Hang mini ornaments from the tinsel ribbon.  I'm hoping to pick some up over the weekend to add to mine.

*Optional: Thread a mini LED light string through the tinsel.  For mine, I placed the battery pack in my back pocket, wrapped the lights around my waist once, and then pulled them through the ribbons wrapped around the cat.


Saturday, November 25, 2017

Felt Pokemon Magikarp Plushie


     Looking for a DIY holiday gift for a Pokemon fan?  Why not try this felt Magikarp plushie?  For other DIY Pokemon gifts, check out my Meowth plushie, Snorlax plushie, Zubat plushie, and Vaporeon hair bow.

Materials:

*Orange felt
*White felt
*Yellow felt
*Black felt
*Pink felt
*Needle
*Black thread
*White thread
*All purpose adhesive
*Stuffing
*Metallic marker or chalk

Directions:

*Print out two copies of the Magikarp pattern below:


*Cut the various pieces of the template out and trace onto the appropriate colors of felt corresponding to the picture at the top of this post.  For everything except for Magikarp's "crown," bottom fin, and the oval shape that's separated from the rest of the template (which is used to make Magikarp's mouth), you'll need two copies, one for either side of Magikarp's body.

*Using black thread, stitch detailing onto Magikarp's fins, as shown below:


*Sew on Magikarp's eyes, side fins, and whiskers (not pictured) with white thread.


*Place the two Magikarp halves together, right side facing in, with the crown and bottom fin sandwiched in between, the pointy sides of the fins facing one another, and sew together from the top of Magikarp's mouth to the beginning of its tail, and the same thing from the bottom of Magikarp's mouth to the beginning of its tail.  Do not sew the mouth or tail closed.

*Fit the black oval inside Magikarp's mouth and sew it on.  You may have to trim the oval a bit to get a good fit.


*Turn Magikarp right side in.  It should look something like this:


*Add stuffing.

*Place the two tail fins inside the orange outer tail piece and sew closed.


*Glue on pupils.

*For Magikarp's lips, I started with the lip shape that is faintly outlined in the template at the top of this post.  I traced two lip shapes, meeting together in the middle.  I then cut this out and glued it to Magikarp's mouth.

Thursday, November 16, 2017

DIY Quote Jar


     Whether you need a good laugh or motivation, a quote jar may be for you.  Fill with your favorite humorous phrases from family and friends, inspirational or motivational quotes, or whatever else you would like to read.  Pull from the jar daily, when you need a good chuckle, or whenever you see fit.

Materials:

*Glass jar
*Printed or handwritten quotes
*Paper, markers, and whatever else you would like to make a label
*Scissors
*Mounting tape

Directions:

*Print out or write down quotes.

*Cut out the quotes and fold them in half, and then in half again.

*Place quotes inside the jar.

*Design a label.  Tape it to the jar.

Sample quote from my jar:

“I make as much sense as squash, mutated squash that eats people” – Brian

Wednesday, November 8, 2017

DIY RC Roomba for Mini Shark Cat


     I'm excited to present to you one of my favorite crafts I've made.  If you've seen my Halloween costume contest cat trophies, you've seen my original shark cat.  I liked it so much that I decided to make myself a shark cat.  When I made its Roomba, I mentioned to Brian that it would be cool if the Roomba actually moved.  He told me that we probably could make that happen and that's how shark cat came to be.  Before we get to the instructions, here's a video I made of my shark cat a an homage to the original video that inspired my craft.  I didn't have a toy duck, so I let shark cat chase around a wind up Easter chick.  I hope you enjoy!


Materials:

*Small remote control car (such as this one)
*Metal jar lid
*Silver paint
*Black paint
*Paintbrush
*Mini magnets (such as these ones)
*Screwdriver
*Cat figurine with shark costume (I give a rough sketch of how to make the costume in this post)

Directions:

*Paint the top of the jar lid silver.  Let dry.

*Add accents with black paint to make the lid look like a Roomba.  Let dry.

*With the RC car turned off, unscrew the screws attaching the top of the car to the bottom.

*Screw the screws into the screw posts on the bottom part of the car, in the opposite direction of the way in which they were screwed in originally.

*Place one magnet on top of each screw.

*Place the jar lid over the bottom of the RC car.  The magnets should hold it in place.

*Now your shark cat is ready to roll!

Thursday, October 26, 2017

Last Minute Costume: The Yellow Ribbon


     Looking for an easy, last minute Halloween costume?  All you need for this one is a ribbon.  Alternately known as "The Yellow Ribbon," "The Green Ribbon," and "The Red Velvet Ribbon," this classic scary story has frightened generations of kids.  There are at least two variations, examples of which I've linked to here and here.  Since the costume itself is fairly simple, in this post I'm going to tell you about how I came up with my concept of the girl wearing the yellow ribbon and then I'll show you some pics from the "Yellow Ribbon" photo shoot I did with Brian.
     The girl wearing the ribbon has different names in different variants, but I'll call her Daisy throughout this post.  In the versions of the story I've read, Daisy's character is never really developed, so there is a lot of room for interpretation.  I see her as very feminine, so when I was looking for something to wear, I went for florals and light colors, lots of pink and white.  You can't see my earrings clearly in these photos, but they're cameos.  I don't have any light colored pants or leggings, so the black ones were the best I could do, although I'll probably stop by Target over the weekend to see if I can find some white leggings before I reveal my costume in real life.
     Since *spoiler alert* Daisy's head has been cut off and is held on only by the ribbon, I figured there would be no blood circulating through her head, so she would look pale.  I have a Temptu airbrush makeup kit and I opted for the palest foundation shade it had.  I thought that darker lips would accentuate the paleness, so I went with e.l.f.'s matte lip color in "wine."  Brian does my makeup for me when I go for full face, so I let him pick the rest.  We've come up with an eyeliner look that I think works really well.  He'll use e.l.f.'s liquid black liner above my upper lash line and then he will start from the inner corner of my eye above the black line he's just created and add a swipe of white glitter liner.
     I was planning on taking a couple of pictures in the "backyard" so I'd have one for this post, but Brian suggested that, since I was all dolled up, we might as well go to the UMaine ornamental gardens to try to get a few pictures.  We ended up taking hundreds of photos (and that's not an exaggeration).  There were lots that I liked, but the following fifteen pictures I thought worked well together to create an origin story for Daisy.  Maybe one of these days I'll write up a story to accompany them.

The Yellow Ribbon: Origins


     What's Daisy afraid of at the end there?  I guess you'll have to stay tuned.  Maybe next year I'll come up with a new installment in Daisy's saga.

"Just for Fun" Photos

     Here are some pics that I liked that I didn't think would fit as well into the overarching narrative I constructed.  I had so much fun with these and I thought some of you might get a kick out of them as well.


     Being a ghost with Shuppet:  Of course I had to get a photo with a ghost type Pokemon while I was all Halloween ready.


     I really liked these "crawling out of the grave" photos.


     Another zombie-like photo.  Daisy is supposed to seem perfectly ordinary with the exception of the ribbon she always wears, so I felt like I couldn't include the zombie photos with the main story, but they were a lot of fun to shoot.  I did manage to sneak one kind of zombie-like one into the main story, though.