Showing posts with label Christmas. Show all posts

Thursday, December 9, 2021

Making a Life-Sized Holiday Barbie 2021 Dress Part 2: Adding Details to the Bodice


My journey in making my own Holiday Barbie 2021 dress continues.  Last week, I painted the white corset I had chosen for the bodice silver.  This week, I began adding embellishments.  It turns out, sewing on a ton of rhinestones and faux pearl strings is pretty time consuming, so I'll have to update you on the rest of the embellishing in next week's post, but we're making progress.

Materials:

*Silver corset (if you need to paint a corset, see this post)

*The largest rhinestones you can find

*Faux pearl garland

*All-purpose adhesive

*Sewing needle

*White or silver thread

Directions:

Note: The largest rhinestones I was able to find were about 30 mm high.  Thus, I was not able to replicate the pattern on Holiday Barbie's dress.  I used her pattern for some inspiration and then filled in the remaining space with designs of my own.

*Secure a small group of rhinestones to the corset using all-purpose adhesive.  Let dry.

*Sew the rhinestones into place to ensure that they stay on the bodice.  The all-purpose adhesive I use is reasonably sturdy, but for something like a clothing item which you'll be pulling on and off, I definitely recommend securing them with some thread to make sure they stay in place.

*Repeat the gluing and sewing with another small cluster of rhinestones.

*Keep repeating until the central panel is done.

*Next, take your pearl ribbon and glue it onto the corset.  Let dry.

*Sew the ribbon down for extra stability.  I basically sewed every third or fourth string section between pearls.

*The pearl ribbon maps out where the rest of the rhinestones will go.  Arrange your rhinestones, glue down, and sew them in place.

And that's what I've done so far, although the bodice is still far from complete.  Tune in next week to see the next phase of decorating the bodice.

Thursday, December 2, 2021

Making a Life-Sized Holiday Barbie 2021 Dress Part 1: Painting the Bodice


This holiday season, I have a rather large project I'd like to try my hand at.  Instead of doing one grand reveal, I wanted to try breaking it up into smaller pieces and posting about my progress as I go.  This could go really well or the project could go disastrously and then I've documented my failure for you all, but either way, it will be a learning experience.  Also, this way I hopefully won't put it all off until the last minute.  If I need weekly content, I'll presumably have to work on it a little here and there so that I can share something with you.

As a kid, I loved Barbie.  I remember seeing Holiday Barbie in stores in her beautiful dresses and wanting a doll of my own, but I never actually had one.  I also loved the holiday Barbie ornaments, but again, didn't have one.  Well, I ended up stumbling across images of Holiday Barbie 2021, and I was in awe of her dress.  I'm like, I'm a grown adult, I can buy myself a Holiday Barbie AND Holiday Barbie ornament and fulfill a childhood dream.  But then I thought to myself that it would be even cooler to become Holiday Barbie.

I scoured the internet for a dress like Holiday Barbie's, but to no avail.  And then I thought, maybe I could make myself a Holiday Barbie dress.  I spent hours combing the internet for the perfect supplies.  I debated and debated whether it was actually a good idea to take on this project, and eventually I hit submit.  And here we are.

Now I know what you're probably not thinking, but absolutely should be: But Amber, you hate sewing.  And I kind of do.  I don't make a point of this, and I love what sewing can do for me, but the actual sewing process I do not really enjoy.  So why make myself a dress?  Well, once I have an idea in my head, sometimes it's very hard to nix it, and I just could not get over the idea of how cool it would be to have Holiday Barbie's glamorous dress.  This may prove to be a spectacularly bad idea.  Or a great idea.  I'm leaning toward bad idea, based on preliminary results, but only time will tell.

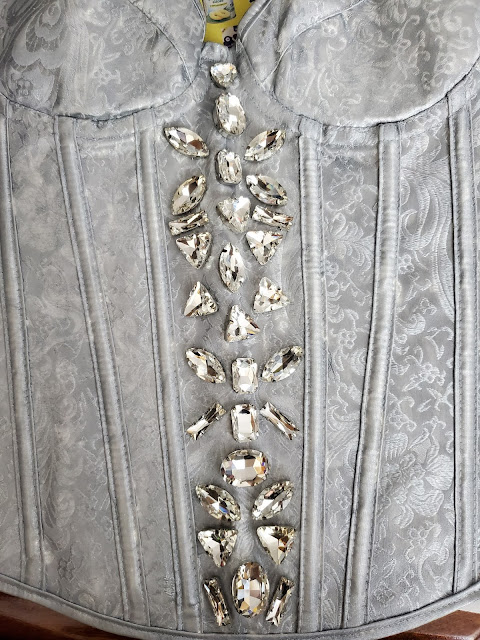
Holiday Barbie's dress has a beautiful silver bodice.  To minimize the amount of sewing I would have to do, I picked up a corset which I will be modifying to make the bodice.  I could not find an affordable silver corset with either a back or side closure, so I ended up buying a white one that I could paint silver.  Today we'll be focusing on that part of the process.

Materials:

*White corset

*Silver paint

*Textile medium

*Paintbrush

Directions:

*Cover your workstation in newspaper or some other protective layer to keep it from getting covered in paint.

*Lay the corset down on the newspaper.


*Mix together the paint and textile medium in the proportions given on the textile medium bottle.  Mine was two parts paint to one part textile medium.  This will essentially turn your acrylic paint into fabric paint.  You're supposed to iron it to set the paint, but I don't think this corset is ironable, so I'll just use the corset very carefully.  Once the rhinestones are on, it will be a challenge to wash anyway.

*Once the front is dry and has been set, paint the back.


 *Optional: Paint the inside of the corset.  I painted the inside of the straps, since I was worried about that portion being visible.

Now we have a silver corset.  It's kind of pretty, but it's not very Holiday Barbie.  Next I'll be adding some rhinestones in hopes that this will make it a little more like Barbie's dress.

The big issue I'm having at the moment is that the corset arrived folded in half, and there is a significant crease in that location.  I should have tried tackling that before painting, but I didn't, and so now I'm trying to press it out using a heavy textbook.  But I have a feeling it's there to stay.  So not super optimistic, but we'll see how that goes.

Wednesday, November 17, 2021

Little Debbie Christmas Tree Cake Earrings


Little Debbie Christmas Tree Cakes are back in stock, which means it's time for yet another snack cake-themed craft.  This year, I decided to add some earrings to my holiday wardrobe.  Need some more snack cake-themed craft ideas?  Check out my Christmas Tree Cake Felt Ornament, Swiss Roll Ornament, Christmas Tree Cake Throw Pillow Technique #1, Felt Gingerbread Ornament, Christmas Tree Cake Dress, Christmas Tree Cake Throw Pillow Technique #2, and Christmas Tree Cake Nail Art.

Materials:

*White oven-bake clay
*Red acrylic paint
*White acrylic paint
*Green acrylic paint
*Ultra fine nail art brush or paintbrush
*Ear wires
*Two sets of jewelry pliers
*Jump rings (optional)

Directions:

*Create two Christmas Tree Cake shapes out of clay.

*Poke holes in the tops of each wide enough for your ear wires to fit through.  I forgot about the curvature of the ear wire loops when I was poking my holes, so mine ended up not being quite wide enough.  Hence the jump rings.

*Bake following the directions on the clay's packaging.  Let cool.  You should end up with shapes something like this:

*If your clay is a little off-white after baking or there are visible specks in the clay, paint white.  Let dry.  If you're happy with the look of your clay shapes, you can skip this step.

*Paint on red bands to mimic the stripes on Christmas Tree cakes.  Let dry.

*Paint on little green specks for the sugar sprinkles.  Let dry.

*Now it's time to add the ear wires.  If you've made the holes large enough, you should be able to open up the ear wire loop, slide it through the earring hole, and close it.  If not, you may need to add a couple of jump rings first, or even slide a headpin through the hole and then bend it into a triangle.

Wednesday, December 23, 2020

DIY Christmas Tree Cake Nail Art


Here's one final holiday nail design idea, perfect for all you snack cake fans.

Materials:

*Red nail polish (or other base color)
*Nail polish base coat
*Clear nail polish top coat
*White acrylic paint
*Red acrylic paint
*Green acrylic paint
*Very fine nail art brush 

Directions:

*Apply nail polish base coat.  Once dry, apply base color.


*Using white acrylic paint and a very fine nail art brush, draw on a Christmas Tree Cake shape.


*Add stripes with red acrylic paint.


*Paint on sprinkles using green acrylic paint.


*Seal nail design with a clear top coat.

I hope you all have a fun and safe holiday season!

Wednesday, December 16, 2020

DIY Christmas Tree Nail Art


Looking for a fun, festive nail design?  These tree nails are adorable and the design is relatively straightforward to create.  The trick to getting the perfect triangle shape?  Painter's tape.

Materials:

*White nail polish
*Light green nail polish
*Dark green nail polish
*Nail polish base coat
*Nail polish clear top coat
*Small star rhinestone
*Painter's tape

Directions:

*Add your base coat and then paint the nail or nails you would like your tree on white.  Let dry for at least a few hours, although it may be best if you paint your nails white in the evening and let them dry overnight.

*Add painter's tape over the edges of your nails to form a triangular shape.

*Use your dotting tool to add dots of the lighter green polish in the triangle shape, leaving white space for the darker green polish.

*Use the dotting tool to add dots of the darker green polish into the white spaces, and then peel off the painter's tape.

*Use some clear nail polish to attach a small, star shaped rhinestone to the top of the tree.  Seal the nail design with a clear top coat.


Wednesday, December 9, 2020

DIY Book Ornament


Now that I've finished my PhD, I've finally had the chance to get back into reading, and have been chipping away at the edits on my novel, which has been in the works for a while now.  I thought it would be fun to make a book ornament for my tree to celebrate my writing progress as well as my return to reading.  I used scrap paper to make the pages for my ornament, and since the scrap paper happened to have text from my work in progress, I decided to make a mock cover for my work in progress.  Now my novel is actually a horror novel, so this mock cover does not at all give the right impression, but I didn't have a lot of time to work on it and there's a good amount of symbolism in it, so it worked for me.  I've included my mock cover below in the directions section, in case you wanted to use it, but if you google miniature book cover, you can find tons of printable book covers that are free for personal use.

Materials:

*Matte photo paper
*Scrap or plain printer paper
*Two jump rings
*Two pairs of jewelry pliers
*Sewing needle
*Ribbon or thread
*Glue
*Ruler
*Pencil
*Scissors

Directions:

*Print out a copy of your cover design onto matte photo paper.  I'm including the mock cover I made below, but you can also find tons of printable mini book covers online that are free for personal use.

*Cut out your book cover image and fold it into a cover shape.

*Using a ruler and pencil, section your paper into strips.  Mine were a little over 1.5" wide, the width of the ruler, but you may want to make yours larger or smaller, depending on the desired size of your ornament.  (I messed up on the first strip, so that's why there's a set of double lines.)

*Cut out your strips and accordion fold them to fit inside your book.

*Use a sewing needle to poke a hole in the spine of the cover and link two jump rings through the hole.

*Cluster your accordion folded pages together and glue them into the spine of the book.

*Slide some ribbon or thread through the top jump ring and tie it off to form a loop so you can hang up your ornament.

And that is how you can make your very own book ornaments.  I'm excited for this new addition to my tree, and hopefully in a few years I'll be able to make a different one with the actual cover for this novel :)

Wednesday, December 2, 2020

DIY Little Debbie Christmas Tree Cake Throw Pillow: Another Technique

Have you ever wanted a Christmas Tree Cake that you could hug?  Just me?  Anyway, I know last year I showed you how to make a Christmas Tree Cake throw pillow.  However, while the one I made last year turned out fine, I didn't love it.  I wanted one that looked more like the Christmas Tree Cake ornament I made, so I bought a large sheet of white felt and some green rhinestones I could use for sprinkles, and decided to give it a shot.

Two Christmas Tree Cakes :)

Materials:

*Large sheet of white felt
*9"x12" sheet of red felt
*Green rectangular or square rhinestones
*White thread
*Red thread
*Green thread
*Sewing needle
*Pillow stuffing

Directions:

*Print out and assemble the Christmas Tree Cake template from this post.

*Cut out two copies of the large tree shape from white felt.

*Cut out the stripes from red felt.

*Sew the stripes onto one of the white Christmas tree shapes using red thread.

*Sew on green rhinestones with green thread to make the "sprinkles."

*Cut off a strip of white felt about 2" wide and 30" long.

*Sew this strip to one of the tree shapes.  Basically, this strip is going to be what makes your pillow three-dimensional.  Align it so that it sits along the edge of the tree shape perpendicular to the shape, so that the strip and the tree form a right angle.  Sew it along the edge using a blanket stitch.

*Once you've sewn it all the way around the edge, snip off any excess part of the strip and sew the two ends together.

*Sew the other piece of the tree on by placing it so that it is perpendicular to the strip and using a blanket stitch.  Leave an opening for stuffing.

*Stuff and sew closed.

Thursday, November 26, 2020

DIY Little Debbie Christmas Tree Cake Dress


I love Christmas Tree Cakes.  They're a tradition in my family.  When I was a kid, my dad would buy a box or two at Christmas time for us to enjoy, and now as an adult, Brian and I make sure to snag some every year.  If I had to pick one flavor to represent Christmas, it would be Christmas Tree Cakes.

If you followed my craft blog last year, you may recall that I posted several Little Debbie snack cake themed crafts: this Christmas Tree Cake ornament, this Swiss Roll ornament, this Christmas Tree Cake throw pillow, and this gingerbread ornament.  I adore how most of those came out, but I still needed more Christmas Tree Cake fun in my life, so I figured, why not become a Christmas Tree Cake?

Materials:

*A white dress or romper that does not stretch (this is important!)
*Red ribbon
*Red thread
*Green thread
*Sewing needle
*Green rectangular rhinestones

Directions:

*Pick up a white dress or romper that does not stretch.  This is important.  I did not do this, and because the ribbon I used doesn't stretch, this means that it bunches awkwardly when I move certain ways.

*Using red thread, sew ribbons on the dress in diagonal stripes.

*Using green thread, sew on randomly placed rhinestones to look like sprinkles.  You'll notice that I didn't sew rhinestones onto the bottom part of the skirt.  That's partly because I was running out of rhinestones (okay, mostly because I was running out of rhinestones).  But also, if I do end up adding more rhinestones, I plan to glue them on instead of sewing them so that I won't have to worry about the thread showing through.

I'm not sure yet if I'm going to do all snack cake crafts again this holiday season, or if I'll try a few different things.  What kind of snack cake crafts would you like to see?  What other sort of holiday crafts would you like to see?  Let me know in the comments, or tag me on social media with your ideas.

Monday, December 23, 2019

Little Debbie Felt Gingerbread Christmas Ornament


     For our final snack themed Christmas decoration of 2019, I decided to make a gingerbread ornament inspired by the Little Debbie gingerbread cookies.  If you love snack cakes, you may also want to check out my Little Debbie Christmas Tree Cake ornament, Swiss Roll ornament, and Christmas Tree Cake throw pillow.


The three snack ornaments all together.

Materials:

*Light brown felt
*White felt
*Red and green seed beads
*Sewing needle
*White thread
*Light brown thread
*Red thread
*Green thread
*Scissors
*Metallic marker
*Stuffing

Directions:

*Print out the template below.


*Cut out two copies of the large gingerbread shape from light brown felt and one copy of the small gingerbread shape from white felt.

*Sew red and green seed beads onto the white felt to look like colored sugar crystals.

*Using a back stitch and white thread, attach the white felt to one of the brown felt gingerbread shapes.

*Cut off a narrow strip of scrap brown felt and fold it in half to create a loop.  Sew the loop to the back of the undecorated felt gingerbread shape.

*Place the two felt gingerbread shapes wrong sides together and stitch around the edge using a blanket stitch and light brown thread.  Leave an opening for stuffing.

*Add stuffing and sew closed.

Thursday, December 19, 2019

DIY Christmas Tree Cake Throw Pillow


     This Christmas season, I let my love of snack cakes inspire my decor.  If you're a fellow snack cake fan and you haven't seen my previous posts in this series yet, be sure to check out my Christmas Tree Cake ornament and my Swiss Roll ornament tutorials.  Plus, stay tuned for one final snack cake themed craft next week!


For size comparison, here's me with my Christmas Tree Cake throw pillow, my Christmas Tree Cake ornament, and a real Christmas Tree Cake.

Materials:

*White flannel
*Red felt
*Green felt
*White thread
*Red thread
*Green thread
*Stuffing
*Metallic marker
*Scissors
*Tape

Directions:

*Print out the templates below, each one on an 8 1/2" x 11" piece of paper.


*Cut out the four tree pieces and tape together to form a tree shape.

*Cut out two copies of the tree shape from white flannel and one copy of each stripe from red felt.

*Sew the stripes to one of the tree shapes with red thread.  Use the template as a placement guide.

*Cut out small rectangles from green felt to form the sugar crystals.  Sew on felt rectangles with green thread.

*Place the two tree pieces right sides together and sew around the edge using a blanket stitch and white thread.  Leave an opening at the bottom for stuffing.

*Add stuffing and sew closed using a ladder stitch.

Thursday, December 12, 2019

DIY Swiss Roll Ornament


     Friends, I think I have found my calling: making snack cake ornaments.  Okay, so I'm kidding (mostly), but look how adorable these are.  The Swiss Roll ornament is simple to make and relatively inexpensive, so if you're looking for a sweet treat to add to your tree, why not give it a try?

Materials:

*Dark brown felt
*White felt
*Metallic marker or fabric pen
*Scissors
*Needle and thread
*Ruler
*All purpose adhesive

Directions:

*Cut out a strip of white felt and a strip of brown felt the long way that are about 3" wide.


*If the felt squares you're working with are initially the same size, cut about half an inch off the end of the strip of white felt and layer it on top of the brown felt, making sure the front and side edges align.


*Carefully roll your two felt strips together to form the cake roll shape.

*Glue the overhanging edge of the brown felt down.  By now your ornament should be looking a lot like a Swiss Roll, minus its chocolate outer coating.


*To create the ornament loop, run a needle through the geometric center of the ornament, starting at the bottom of the ornament and going through the top.  Find the center carefully, as if you're off by even a small amount, your ornament may hang at an angle (thanks, physics).

*Poke the needle back through in a spot very close but not identical to the original spot.

*Tie the ends of the thread together at the bottom of the ornament.  If you don't want this knot a the bottom showing, you can add the thread before gluing down the overhanging brown felt and go through all but the outermost bottom layer of the brown felt,.  You can then use the overhang to hide the knot.  As long as you don't hang this ornament at the top of your tree, though, you probably won't have to worry about the knot being too visible.

Thursday, December 5, 2019

Little Debbie Christmas Tree Cake Felt Ornament


     I have loved Little Debbie Christmas Tree Cakes ever since I was a child.  They were a special treat my dad would buy for us at Christmas time, and they have become a Christmas tradition that I share with Brian.  I thought it would be fun to try making a Christmas Tree Cake ornament to add to my tree.  Check out the video below for a video tutorial, or keep reading for a written tutorial.  If you love snack cakes, stay tuned because I have several snack cake themed Christmas projects in store for you.


A real Christmas Tree Cake next to my Christmas Tree Cake ornament.


DIY Christmas Tree Cake ornament video tutorial.


Materials:

*Red felt
*White felt
*Green seed beads
*Scissors
*White thread
*Red thread
*Green thread
*Metallic marker
*Stuffing

Directions:

*Print out a copy of the template given below:


*Trace two copies of the tree shape onto white felt.  Trace one copy of each stripe onto red felt.  Cut out the tree shapes and stripes.

*Sew the stripes onto one of the tree shapes using red thread, using the template as a guide.  I used a blanket stitch for this step.

*Sew green seed beads on to look like the green sugar granules using green thread.

*Cut off a small segment of white felt, about 1/4" thick and 2" long.  Fold the ends of this strip together to make a loop.  Sew this loop to the back of the blank tree shape using white thread.

*Cut off two strips of white felt that are about 1/2" thick and 9" long.  Sew the ends together to form one long strip of felt.

*Using a blanket stitch and white thread, sew the strip of felt to the striped tree shape.  The strip of felt will likely be longer than you need it to be, so when you reach the place where you started, cut off the excess felt and then sew the two ends together.

*Sew the bottom tree to the strip of felt using a blanket stitch.  Leave a small opening at the bottom.

*Add stuffing and sew closed.

Friday, November 29, 2019

DIY Felt Christmas Light Garland


     Brighten up your home this holiday season with this fun, festive garland.  While I opted for a rainbow color scheme, you can use whatever colors of felt you would like to make this DIY your own.

Materials:

*Sheets of felt in colors of your choosing.  Since I used seven different colors of felt for the "light bulbs," I only needed one sheet of each color.  However, if you are using fewer colors, you may need more sheets of each color.
*Gray felt
*Metallic marker
*Scissors
*Thread in colors of your light bulbs
*Silver or gray thread
*Stuffing
*Ribbon to string the lights together

Directions:

*Print out a copy of the light bulb template given below:


*Cut out the whole template as one, leaving the light bulb cap attached to the rest of the bulb

*Determine how many lights you would like to have on your garland.  Trace and cut out twice as many felt pieces as you would like lights, one piece for the front of each bulb and one piece for the back of each bulb.

*Trace and cut out twice as many copies of the light bulb cap as you would like lights from gray felt.

*Take two light bulb pieces and two light bulb caps and sew the caps to the light bulb pieces using a back stitch and gray or silver thread.

*Place the two light bulb pieces wrong sides together and sew together using a blanket stitch.  Leave an opening at the top for stuffing.

*Add stuffing and sew closed.

*Repeat the sewing process until you have sewn all of your bulbs together.

*Sew the bulbs to a piece of ribbon to complete your light garland.