Showing posts with label Wedding. Show all posts

Wednesday, June 23, 2021

Our Vow Renewal


When Brian and I got married in May of 2020, we had to significantly change our plans due to the pandemic.  We initially hoped to have a small ceremony in 2020 and then a bigger event in 2021, but with the pandemic still an active threat, we had to scale back our plans for the vow renewal too.  However, we still had a lovely day, and I wanted to take a moment to share it with you.

Thanks so much to Corey Butler of Revolution Summer Photography for these lovely photos.  If you're in northern New England and are looking for a wedding or engagement photographer, I highly recommend checking him out.  Click here to go straight to his site.  You can also find him on Facebook at Revolution Summer Photography and on Insta @rsummerphoto.

My sis Katie and Brian had to put on my heel covers for me because they have more muscles than I do.  You can see the card soldiers I made for my wedding in the backgroun.  There was a very strong chance of rain this time around, so I kept the card soldiers at home, but I made sure they still had a part in the day.

Putting the finishing touches on my makeup.

Katie fastening my belt.  My wedding dress was a DIY project that I threw together.  Basically, I took an old romper of mine and created a belt and a tulle overskirt to make it more gown-like.  You can learn more about it in this post.  I had made the belt with snap closures, but on the wedding day, the snaps popped open any time a bent down or moved in just the wrong way.  I ended up making a new belt for the vow renewal by sewing hook and bar closures to a piece of ribbon, and that worked really well.  The belt stayed closed this time.

Entering the gardens.

Now that we're vaccinated, dad was able to walk me down the "aisle."  Also, here you can see my DIY bouquet, which you can learn more about in this post.

Brian winging his vows.

Me reading my vows.

Yay, we're still married.

Chatting with grammie.  This ended up being one of my favorite pictures of the day.  Grammie couldn't be there in person for our wedding, but I was glad she could be there for the vow renewal.

For health and safety reasons, as well as to comply with our venue's policies, we had to severely restrict the guest list, inviting only in state family members.  But we were able to include a few people who couldn't be there in person for the wedding, which was nice.

This is another one of my favorite pictures.

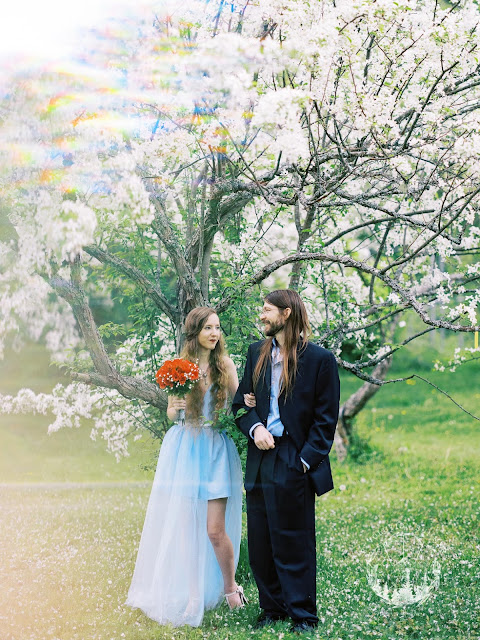
The flowering trees are one of my favorite things about the gardens.  I love when they are in full bloom, so it was nice to be able to snag some pictures with them.

If I had to pick a favorite picture from the day, this one is probably it.  It looks like we're in an enchanted forest.

And one more picture with flowers.

We had Subway for dinner with Little Debbie Birthday Cakes for dessert.

One of our friendly neighborhood squirrels, Chip, decided to stop by for a treat.

A close up of Chip.

And that's it.  I hope you enjoyed this peek into our vow renewal.

While this wasn't the wedding I had envisioned when I first started wedding planning in 2019, it was actually preferable in a lot of ways.  The only thing I would have changed would have been the guest count.  I wish we could have had more friends and family members there to celebrate with us.  But everything else about the day was just right.

Is there anything else you want to know about our wedding and vow renewal?  The pandemic has made wedding planning even more challenging, so if there are any insights you'd like from my experiences, I'd be happy to share.  Drop your questions in the comments, and I'll address them if I can, either in a reply to your comment or in a follow up post.

Next week, we'll be switching gears completely and diving into Halloween season.  I'm close to having four months of spooky crafts planned out for you all (but not all of them made yet, of course), and I can't wait to share them with you.

Wednesday, March 17, 2021

DIY Wedding Table Numbers

Here is another wedding craft that we didn't get to use.  I've included a video tutorial below.  I made it last year before the world went to heck, and I had much higher hopes for my wedding crafting then.  I never got around to making the SVG files, but I do have some PNG files.


Here are the templates I made.  You'll note that the circular base is not included b/c I didn't get around to making a PNG template for it, but you just have to cut a circle larger than the base of the numbers and cut a slit in the middle to insert the number through.  


Wednesday, March 10, 2021

DIY Decorative Letters (for Weddings, Parties, etc)


Here's one of the crafts I made with the intention of using for our wedding last spring that we did not get to use, thanks to a certain virus.  I was hoping that we would have some sort of celebration this year instead, but that's looking pretty improbable at this point in time.  However, I still wanted to share some of these craft ideas with you, in case you might find inspiration from them for your celebration.  I've included a video tutorial of how I made these glittery letters below.


Thursday, July 23, 2020

Turning a Romper into My Wedding Dress


     For our final wedding post of the season, I've saved the best for last - my wedding dress.  When Brian and I started talking seriously about getting married in October of last year, I immediately started thinking about what I wanted to wear.  At the time, he and I were both grad students, so buying a traditional wedding dress would have strained our budget, and I've never been a white dress gal.  I had been debating whether to go for an Alice in Wonderland themed or Halloween themed wedding, and ultimately settled on Alice in Wonderland.  I thus decided that I would look for something blue to wear.
     I started googling blue prom rompers, and while there were some pretty ones, they were still pricey and there were none that I adored.  What seemed to set apart many of the prom rompers from the less fancy rompers was a tulle overskirt.  I had a pretty blue romper I had used for Alice in Wonderland Disneybounding, and I thought, I bet I could make a tulle overskirt.  So I did.
     As someone who is still relatively new to sewing, the making of this overskirt was a bit of a process, with plenty of hiccups along the way.  However, while the garment is far from perfect, I think I 100% made the right choice in constructing my own dress.  It added an extra touch of specialness to be wearing something that I had made, and I felt so beautiful in it on the day of.  I've actually worn both pieces of the look since for Disneybounds, and I still feel beautiful when I put it on.
     Here's a video of the overskirt making process.  While you could use it as a tutorial, there are probably far better tutorials out there on making an overskirt, so I would recommend watching it more as a sneak peek into my wedding dress journey.  I'm so excited to be sharing this with you, and I hope you enjoy this post!


     If you're looking for more photos of the dress, don't worry, I've got plenty :)


These first two pictures were taken right after the ceremony.  It was very bright out, so we had some trouble finding the best lighting.


We came back in the evening to take a few more pictures.  Here you can see the dress in a few different lighting situations.


     The last picture is from an Alice in Wonderland Disneybound shoot I did on my birthday.  I've reused both the romper (okay, technically the wedding romper's identical twin) and the overskirt a few times since the wedding.  Some people might find this tacky, but I'm all for reusing clothes.  Why would I want to wear something this pretty only once?
     That concludes the wedding posts.  Next week we'll be diving right into Halloween content.  I hope you're as excited for Halloween crafting as I am!

Thursday, July 16, 2020

DIY Alice in Wonderland Card Soldiers


     We were originally planning on having these little pals guarding our guest book, but when our plans had to change, they became the perfect decorations for the ceremony.  Huge shout out to Katie and Jacob for staking them into the ground for us with skewers and copious amounts of packing tape as we rushed to start the ceremony in time.  Unfortunately I didn't think to get any pictures of the soldiers side by side, but I made one left handed (for Brian) and one right handed (for me).  These could be great for any sort of Alice themed celebration.


     I didn't manage to get a good picture of the second card soldier during our wedding, so here she is doing a Queen of Hearts Disneybound with me.  Yes, I stole her scepter for this look.

Materials:

*White foam sheet
*Red poster paper
*Red cardstock
*White cardstock
*Scissors or die cutting machine
*Glue
*Wooden dowel
*Gold acrylic paint
*Red felt
*White felt
*Red heart shaped rhinestones

Directions:

*To construct the head for your card soldier, begin by cutting out a large heart from red cardstock.  This heart should take up most of the sheet of cardstock.

*Cut out a smaller heart from white cardstock, sized to fit inside the red heart (see picture a few lines down of the assembled head for reference).

*Cut out two smaller hearts from red cardstock of unequal sizes (see pic a few lines down).  These will form the mouth and eyes of your card soldier.

*Glue together the four hearts, as shown below:


*For the body of the card soldier, cut out playing card numbers and hearts.  For example, for the "2" card, I cut out two 2's, one to go in either diagonal corner, two small hearts denoting the suit to go in the corners with the numbers, and two bigger hearts to form the arrangement in the center of the card.

*Glue down your shapes in an arrangement like the one shown below:


*Glue the card soldier's head to its body.


*Cut arms from red poster paper.

*Glue the arms to the back of the card soldier and trim any excess cardstock that sticks out around the soldier's "shoulders."


*To make the scepter, begin by painting a wooden dowel gold.  Let dry.

*Cut out four hearts from red felt, and four slightly smaller hearts from white felt.

*Glue the white hearts to the red hearts.

*Glue some red heart shaped rhinestones to the white felt.

*Glue the centers of the hearts to the wooden dowels at equally spaced intervals, so the center of each heart will be spaced 1/4 of the way around the dowel from the next heart's center.  The hearts will be pushing against each other and overlapping at this stage.

*Glue together the edges of neighboring hearts.

Thursday, July 9, 2020

DIY Faux Flower Bouquet


     Wedding flowers can be expensive.  However, if you're able to go the DIY route and buy your artificial flowers at the right time (Joann was having a buy one, get two free deal when I bought my wedding flowers), you can save a ton of money.  The other upside to using artificial flowers is you can preserve your bouquet, and while some people may say they don't look as nice as the real deal, I think they're still pretty and most people aren't going to be close enough to your bouquet to notice.
     I didn't have all the proper supplies for bouquet making (i.e., I didn't have floral tape), but I threw together a couple of bouquets for me and my MOH, and I think they came out pretty well.  Here's how I made my bouquet.  If you're looking for a different vibe than the one I ended up with, replace the flower selection I used with flowers of your choice.


Me with my bouquet on my wedding day.


Me and Katie with our bouquets.

Materials:

*3 bundles of artificial red roses (I think each bundle had about six flowers)
*3 bundles of artificial baby's breath
*Green duct tape (or floral tape)
*Wire cutters
*Ribbon
*All purpose adhesive

Directions:

*Bundle together the roses with some green duct tape.


*Cut apart the baby's breath branches using wire cutters.


*Add baby's breath at even intervals around the bouquet and secure using duct tape.


*Cut off more baby's breath pieces and continue placing around the bouquet and securing with duct tape.  Repeat until your bouquet is as full as you would like it to be.


*Wrap ribbon around the bouquet to cover the duct tape.  Secure the ends of the ribbon with some glue.

Thursday, July 2, 2020

Whimsical Alice in Wonderland Wedding Sign


    This wedding craft didn't actually make an appearance in our wedding (maybe next year), but it was too fun not to share.  With some slightly different labels for your arrows, you could easily repurpose this idea for an Alice in Wonderland tea party, as well as all sorts of other events.  This one was a lot of trial and error, so I've included just the video tutorial, as I think it shows my crafting process better than I could articulate in words.


Thursday, June 25, 2020

Alice in Wonderland Wedding Cake Toppers


     Even before COVID, when I was planning a much fancier iteration of my wedding, I had thought about using Little Debbie snack cakes during my reception.  Maybe not at the main cake (although I wasn't opposed to that idea), but I thought about having a couple of cake stands with different Little Debbie treats for my guests to enjoy.  Also, this is not sponsored.  I just love snack cakes, which shouldn't come as too much of a surprise, given my Christmas crafting last year.
     Which is why, when I realized we were going to have to majorly scale back the in person component of our wedding, I wasn't upset to make the switch to Little Debbie Fancy Cakes.  We wanted to have something prepackaged, so that our handful of in person guests wouldn't have to worry about other people coming into contact with their food.  Snack cakes seemed like the perfect option, and if you're having a wedding or another celebration during COVID, I'd definitely recommend going the individually packaged cake route.
     I made two types of cake toppers: a couples set for Brian and me (pictured above) and "Eat Me" toppers for our guests.  It was a fun little touch to make snack cakes feel a little more personal.  I did a video tutorial for the "Eat Me" toppers, which I'll include below, and this post has a written tutorial for the couples (Alice and the Hatter's Hat) toppers.  If you're going for more traditional couples toppers (e.g., bride and groom, bride and bride, spouse and spouse, etc.), you may need some different clip art, but the construction process would be similar.  These toppers could be great not only for weddings, but also for Alice in Wonderland themed parties, and with the right clip art, you could use this technique to make toppers to fit any party theme.


Couples Cake Topper

Materials:

*Medium to heavy weight white paper
*Computer and printer
*This Autumn in Wonderland clip art pack
*This Alice in Wonderland clip art pack
*Toothpicks
*School glue
*Scissors

Directions:

*Open up the Alice or other clip art design of your choosing.  The Autumn in Wonderland pack offers Alice with three different hair colors and two skin tones, but there may be other clip art packs that have an image or symbol that you like better.

*Copy the image and paste it into a word document.

*Shrink the image until it is the size that you would like your topper to be.

*Copy the image and flip it horizontally, so that you have your image in its original orientation and now a second image that is the mirror image of the first.

*Print out the images.

*Cut out the images.  You can either cut close to the images, as I did, or leave a border around them.  Leaving a border will require less precision, and you can always decorate the edges if you'd like.

*Glue the toothpick to the blank side of one of the images.  Glue the other image to the back of the first, blank sides together.

*To make the second topper, repeat the steps above with the hatter hat clip art, or another image of your choice.  Note that when you mirror the hatter hat, the 10/6 will be backward.  This means that when placing the hatter hat on your cake, you'll want to pay attention to which side is facing outward.

Thursday, June 11, 2020

Key Necklace Maid of Honor Gift


     My sister has been such an important person in my life for as long as I can remember.  Literally.  I was so grateful to have her at my wedding as my Maid of Honor.  I wanted to give her a small token of appreciation to remind her how much I value having her in my life.  Since I was wearing a key necklace for the wedding, I thought it would be fun to make her a key necklace as well.


Katie and me at the wedding.  You can kind of see the necklace in this picture.

Materials:

*Necklace chain (I bought one that already had a clasp attached)
*Jump rings
*Jewelry pliers
*Key shaped charm

Directions:

*Open jump ring using jewelry pliers.

*Slide the key charm onto the jump ring.

*Place the jump ring around the necklace chain.

*Use pliers to close the jump ring.

Thursday, June 4, 2020

Alice in Wonderland Heart Wedding Nails


     For my wedding nails, I wanted a design that was relatively simple, but still had an Alice in Wonderland feel.  I opted for this heart nail design.  With perhaps some modifications to the base color, this heart design could work well for weddings, Alice in Wonderland parties, Valentine's day, etc.


Here's what my "other hand" looked like.  The hearts are a little more lopsided, but in my opinion, not too bad.

     I have both a photo and video tutorial for this video.  The video tutorial is included immediately below, but for a photo tutorial, keep scrolling.


Alice in Wonderland Inspired Heart Wedding Nails

Materials:

*Light blue nail polish
*Clear nail polish base/top coat
*Red acrylic paint
*Sparkly red nail polish
*Ultra fine nail art brush

Directions:

*Paint on nail polish clear base coat.

*Paint nails with light blue nail polish.  Let dry.  Add a second coat if needed.


*Using the red acrylic paint and nail art brush, draw red hearts onto your nails.  Let dry.


*For the ring finger nail, go over the heart shape with sparkly red nail polish to create an accent nail.

*Seal with a clear top coat.