Showing posts with label Spring. Show all posts

Thursday, April 2, 2020

Dandelion Puff Nail Art


     Make a wish with these adorable dandelion puff nails.


     I generally don't show pictures of my "other hand" (as Simply Nailogical would call it) because I'm very dominantly right handed, so the nail art I do with my left hand usually doesn't come out as nice looking.  However, I'm really pleased with how the dandelion puff came out on my right hand.  It's a bit of a different from the left hand stylistically, a little messier, but I like it.

Materials:

*Sky blue nail polish
*Black acrylic paint
*White acrylic paint
*Ultra fine nail art brush
*Medium dotting tool
*Black nail gem
*Clear nail polish base coat/top coat

Directions:

*Paint on a clear base coat.  Let dry.

*Paint each nail with a coat of sky blue nail polish.


*Dip the dotting tool into black acrylic paint and place a dot of it in the center of your ring finger nail.


*Using your nail art brush, paint a black stem attached to the black dot.


*Use white acrylic paint to draw lines emanating from your dot, like this:


*Add little "fringes" protruding from the ends of the white lines, like this:


*Continue adding lines with fringes.


*Add lines with fringes until you have filled in the whole dandelion head.


*Using the ultra fine nail art brush and white paint, paint a couple of dandelion seeds on your middle finger nail and one seed on your index finger nail.

*Seal nails with a clear top coat.

*Add a black nail art gem over the black dot at the center of your dandelion head.  Cover with another clear top coat.

Thursday, March 26, 2020

Springy Sunflower Nail Art


     Welcome spring with these bright, sunny nails.  Sunflowers are probably my second favorite flowers, my first being red roses.  These sunny flowers put a smile on my face when I see them, so I decided to add them to my nails.

Materials:

*Sky blue nail polish
*Clear base/top coat
*Yellow acrylic paint
*Brown acrylic paint
*Black acrylic paint
*Ultra fine nail art brush
*Various sizes of dotting tools, ranging from large to very small

Directions:

*Apply clear base coat to nails.  Let dry.

*Apply light blue polish to nails.  Let dry.


*Paint on yellow flower shapes using yellow paint.  To make the flower shape, I began by painting a plus sign on the nail.  I then painted an "x" through the plus sign to make something resembling an asterisk.  I then painted on a line between each of the lines already on my nail.  I've tried to illustrate the process with the image below, with the index finger showing the plus sign stage, the middle finger the plus sign with the x through it, and the ring finger showing the completed flower shape.  Let dry.


*Dip a large dotting tool in brown paint and add brown centers to each of the flower shapes.


*Mix together black and brown paint and use a medium sized dotting tool to add a bit of this color to the center of each flower.


*Mix yellow and brown acrylic paints together to create a light brown paint.  Using a very small dotting tool, add dots around the brown ring of the sunflower.


*Seal with a clear top coat.

Sunday, May 26, 2019

Flower Crown


Materials:

*Floral wire
*Artificial flowers
*Floral tape
*All purpose adhesive
*Wire cutters
*Ribbon in colors of your choice

Directions:

*Create a loop of wire that sits comfortably on your head.

*Add flowers to the loop.  If your flowers don't come already affixed to wire, as mine didn't, you can place the flowers on bits of floral wire and use that to attach them to the loop.  If the flowers fit loosely on the wire, use a little glue to hold them in place.

*Add as many flowers as you like, leaving some space at the back of the crown for the ribbon.


*Wrap with floral tape.

*Cut a length of ribbon double the length you want it to be on your crown.

*Fold the piece of ribbon in half.

*Place the folded ribbon so that the top of the ribbon (where the fold is) is beneath the crown.

*Pull the ends around the crown and through the loop created between the ribbon and crown.

*Repeat with other strands of ribbon.

Thursday, April 11, 2019

Spring Cherry Blossoms and Bumble Bee Nail Art


     As I write this post, it looks like January outside.  Everything is covered in snow.  Maybe if I paint my nails with snowflakes, the snow will go away?
     At any rate, here's how you can get some cute spring nails, whether or not it looks like spring outside for you.

Materials:

*Yellow nail polish
*White nail polish
*Light blue nail polish
*Pink nail polish
*Black nail art pen
*Small dotting tool
*Pink glitter polish
*Makeup sponge

Note: The bee was left over from my nail art from a previous week.  It was still in good shape, so I couldn't bring myself to remove it and decided to incorporate it into my nails this past week.  I didn't take pictures of the process because I wasn't planning on posting it, but I'll describe the process to the best of my abilities.

Directions for the bee:

*Paint one nail yellow.  Let dry.

*Draw on a bumble bee using a nail art pen.

*Use a small dotting tool and white nail polish to add wings.

Directions for the cherry blossoms:

*Paint one nail blue.  Let dry.


*Draw on a branch shape using a nail art pen.


*Using the small dotting tool and pink nail polish, create flowers by stamping four dots close together.


Directions for the glitter nail:

*Paint nail pink.  Let dry.

*For a thicker glitter coating, apply glitter polish to a makeup sponge and sponge onto the nail.  You may need to do a few coats to get the nail sufficiently glittery.

Friday, April 5, 2019

Monarch Butterfly Nail Art


     It is snowing as I write this post, but someday spring will be here.  Right?  Until then, I'll be enjoying spring via nail art.
     I love butterflies, and monarch butterflies have always been my favorites.  My sister and I had a couple of pet butterflies growing up.  I believe our "tightrope walking" butterfly (it walked upside down along a piece of string) was a monarch butterfly.  Here is some nail art that reminds me of spring and all of the beautiful butterflies I've encountered over the years.

Materials:

*Orange nail polish
*White nail polish
*Black nail art pen
*Small dotting tool

Directions:

*Paint nails orange.

*Draw on butterfly wing shapes using a black nail art pen.


*Add white spots with white nail polish and the dotting tool.


Thursday, March 28, 2019

Floral Nail Art


     Spring is here, at least technically.  While the flowers are not yet blooming here in Maine, you can still add some springiness to your look with these floral nails.

Materials:

*White nail polish
*Pink nail polish
*Red nail polish
*Black nail polish
*Green nail polish
*Medium sized dotting tool
*Small dotting tool
*Fine nail art brush
*Base coat

Directions:

*Paint nails with a base coat.  Let dry.

*Paint nails pink, with the exception of your ring finger nail, which you'll want to paint white.  Let dry.


*Using the medium dotting tool, add pink and red dots to the white nails.  Let dry.


*Using the small dotting tool, add black dots to the centers of the pink and red dots.  Let dry.


*Using the nail art brush, paint on green leaves.  This was the part of the process that I had trouble with.  None of my nail art brushes are super fine, so painting on leaf shapes was difficult.  I ended up using the brush basically as a stamp after some point in time and that worked out okay, but I would definitely recommend using a very fine brush if you can.

Friday, March 22, 2019

Alice in Wonderland Tea Party


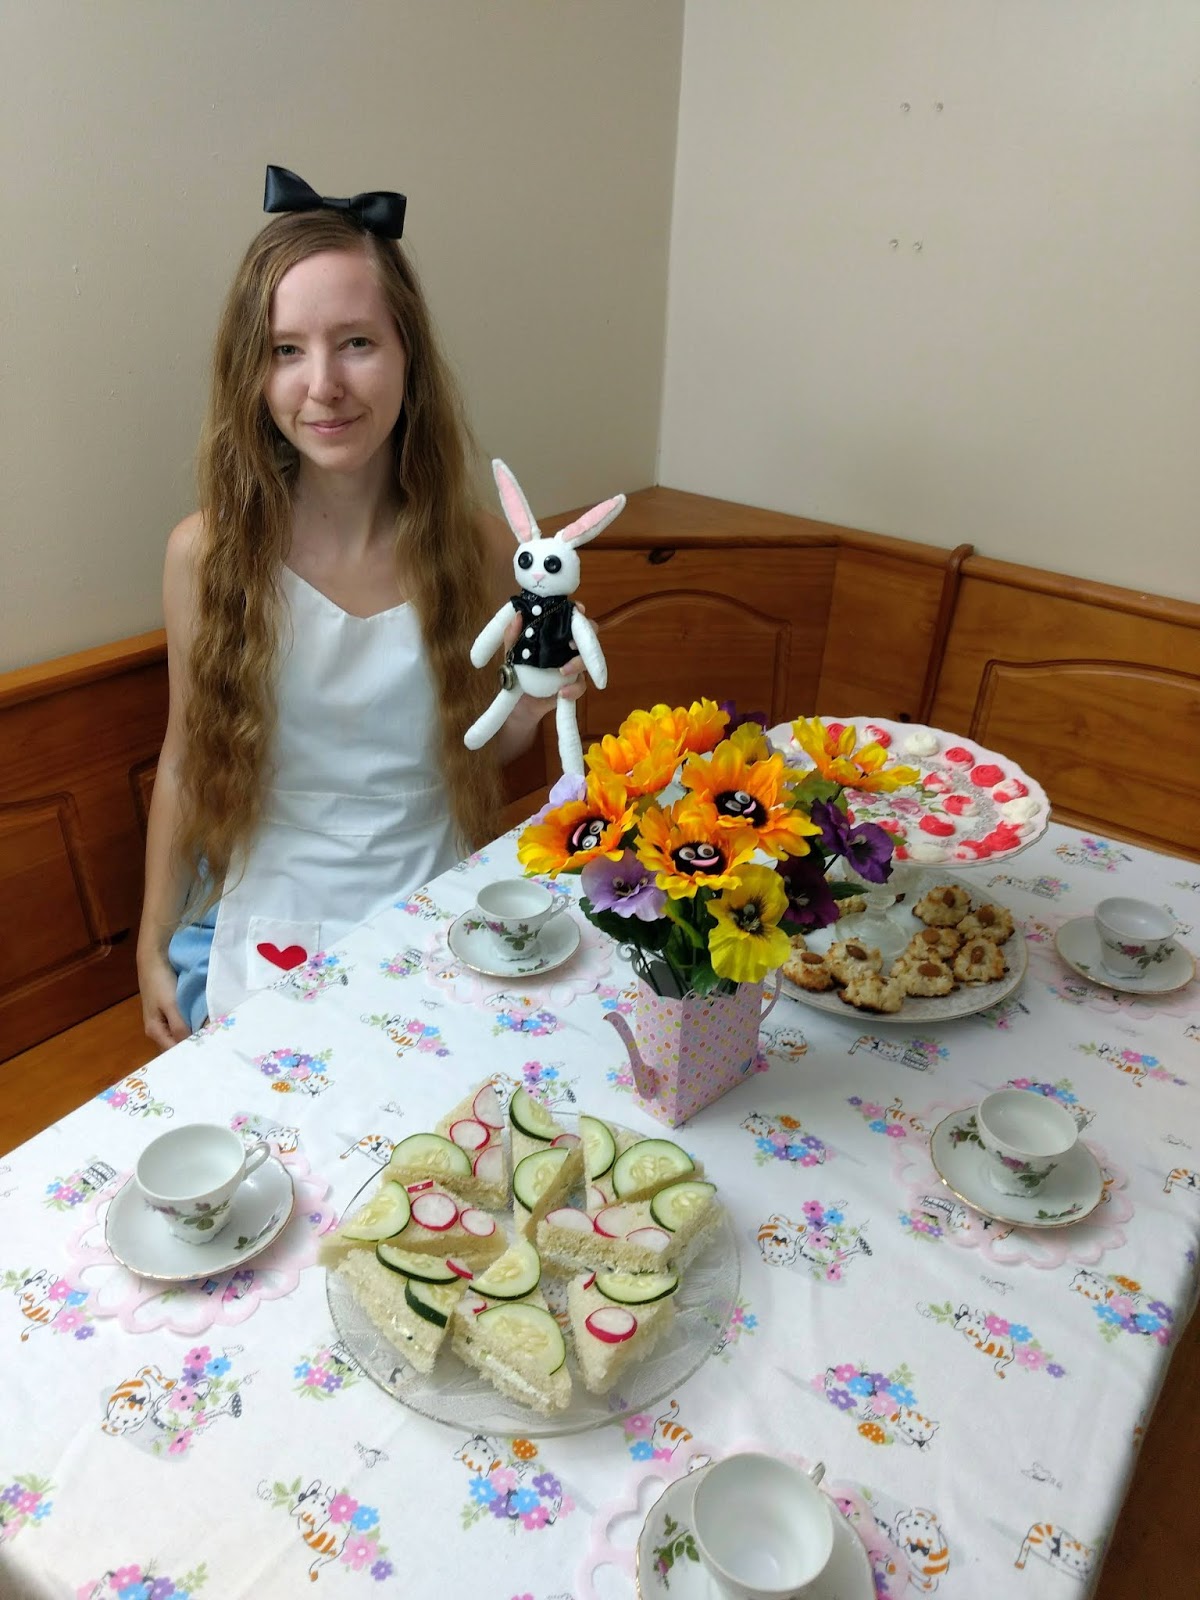
     Here is the Alice in Wonderland tea party post I've been promising.  Brian and I held this tea party at the end of last summer, so you won't see the jumbo mushrooms or roses anywhere around.  I didn't end up making those until October, but they would have fit in well with this party.  Here are some tips for throwing a bash of your own.  Check out my Alice in Wonderland birthday party post for some additional decor and dessert ideas.

The Tablescape


     The tablecloth was an old one I sewed for my Alice in Wonderland birthday party a few years back.  The "flowers with faces" centerpiece was also from that party.  Check out this post to see how to make it.  The mini teacups came from Goodwill.  I had planned on getting mismatched teacups because that seemed more fitting for a Mad Tea Party, but when Brian found a set of mini teacups for me, I couldn't resist.  It's hard to tell from this picture, but the teacups are resting on the coffee filter doilies.  See this post for making the coffee filter doilies and this post for dyeing them.
     For the dessert stand, I placed a fancy looking goblet between two nice-ish plates.  I didn't use any sort of adhesive to hold them together, which meant the arrangement was a little more precarious than I would have preferred, although things seemed to work out just fine.  If you have accident prone guests, I would recommend going with something less breakable, though.

Food


     These mosaic sandwiches are pretty and fun to eat.  Prepare your favorite tea sandwich filling and place between two slices of bread.  Cut off the edges, if you'd like.  Cut slices of cucumbers and radishes (or other colorful veggies of your choice) and place atop the sandwiches.  Cut sandwiches into triangles.


     For dessert, macaroons can make a tasty treat.  I can't remember which recipe I used, so use whichever one sounds best to you.  You'll want to keep an eye on the macaroons, though, as some ovens cook faster than others.  When using the recipe I found, I originally tried cooking the macaroons for the amount of time the recipe called for, which left the macaroons a little singed on the bottom.  For successive batches, I put them in for less and less time, but they still ended up a little dark.


     Why not finish your tea party with these "painting the roses red" cream cheese candies?  I used this recipe, with some slight modifications.  I replaced the mint extract with vanilla extract because I'm not too much of a mint person.  I also ended up having to use more confectioner's sugar than the recipe called for, although I didn't record how much more I used.  I live in a really humid environment, so if you live in a drier climate, the original amount of confectioner's sugar may work just fine.
     Once you've prepared the mixture and are satisfied with the consistency, separate the mixture into two equal pieces.  Combine one with some red food coloring, while leaving the other as it is.  Using a silicone rose mold, add red and white mixtures to the mold to create your roses.  Leave uncovered to dry.  Store in a sealed container.

Costumes

     Add some extra wonder to your tea party by encouraging your guests to come as their favorite Wonderland characters.  Looking for some Alice costume ideas?  See this post for a DIY Alice hair bow and this post for how to make your own pinafore apron.  Need a hat for your Hatter?  Check out this post and this post.  Some ears for the Cheshire Cat?  See this post.  Don't have someone to be the White Rabbit?  Add a White Rabbit plushie (see this post).

Thursday, April 6, 2017

Mini Easter Basket


     Transform an old medicine cup into an adorable mini basket.

Materials:
*Plastic medicine cup
*Twine
*All purpose adhesive
*Green tissue paper
*Mini foam eggs
*Ribbon rose
*Scissors

Directions:
*Cut three lengths of twine long enough that they could reach from the bottom of the medicine cup, loop up to form a handle, and reach down to the bottom on the other side.
*Braid the three pieces of twine together and then glue on to form the handle.
*Wrap twine around the medicine cup, gluing down as you go.  Let dry.
*Once you've finished gluing down the twine, embellish with a ribbon rose or other decoration of your choice.
*Wad up some paper (tissue paper would work fine, but you could also use scrap paper) and stuff it in the bottom of the medicine cup.
*Cut very thin strips of green tissue paper to create the Easter "grass."  Layer it atop the paper,
*Add a few teeny eggs and you're ready for your very own mini egg hunt.


Happy egg hunting!

Thursday, March 16, 2017

Mini Fairy House


     Wait, don't throw that container out!  Empty plastic bottles such as toothpick containers, rounded makeup containers, and aspirin bottles are perfect for making tiny fairy houses.

Materials:
*Empty plastic container (e.g. toothpick holder)
*Toothpicks
*Gold seed bead
*Lots of teeny pebbles
*All purpose adhesive
*Brown paint
*Gray paint
*Red paint
*White paint
*Paintbrush
*Clay


Directions:

*Paint the container gray.  This way, if you end up with small gaps between rocks that are hard to fill in, it will look like there is grout or cement or something similar between the rocks.

*Snip the ends off of three toothpicks and then cut each toothpick in half.  Paint five or six of these toothpick halves brown and set aside to dry.

*Once dry, glue on the painted toothpicks to form a door.

*Glue a gold seed bead onto the toothpicks for a doorknob.

*Glue rocks onto the container, filling in as much of the space as you can.

*Craft a mushroom shaped roof from clay.  Bake or dry following the directions given on the packaging.

*Paint the roof red and then let dry.  Once dry. paint on white spots.  Set aside to dry.

This is what the two pieces looked like before I glued them together.  The mushroom roof really does add to the fairy house's aesthetic.

*Once the roof is completely dry, glue it to the top of the container.

*To make an owl fairy inhabitant, punch two butterfly shapes from cardstock and glue to the back of the bead such that one wing sticks out on either side of the owl bead.

Thursday, March 9, 2017

Perler Fuse Bead Floral Wreath Coasters


Materials:
*Fuse beads (e.g. Perler beads)
*Small hexagonal peg board
*Iron

Directions:
*Design your creation by arranging beads on a hexagonal peg board as shown below:


*Cover the designs with a sheet of waxed paper and iron the first side.  Make sure to iron the edges especially well, as the beads may not stick together and may fall off if you don't.

*Remove the fuse bead project from its peg board, cover with waxed paper, and iron the other side.

Thursday, March 2, 2017

Spring Shapes Cinnamon Sugar Tortilla Bites


     While spring may still be weeks away, and perhaps even further here in Maine, that doesn't mean that you can't make things feel springy inside.  Bring some spring cheer to your snacking with these cinnamon sugar tortilla bites, which are as tasty as they are adorable.

Materials:
*Spring shaped cookie cutters
*Flour tortilla
*Butter
*Cinnamon
*Sugar

Directions:
*Preheat your oven to 350 degrees F.
*Cut spring shapes from your flour tortilla and place these shapes on a baking sheet.
*Melt butter and brush it across your shapes so that each one has a light coating.
*Sprinkle on some cinnamon sugar.
*Bake in the oven for about 5 minutes, or until golden brown.

Thursday, May 26, 2016

Tissue Paper Flower Garland


Materials:
*20" x 20" sheets of tissue paper in 3 colors of your choice, four sheets of each color for a total of 20 sheets.
*Twine
*Stapler
*Scissors

Directions:
*Cut each sheet of tissue paper into four 10" x 10" squares.  Each set of four squares will make one flower.
*Fold four sheets together accordion style, using 1.5" folds and then staple the midpoint of the folded paper.


*Shape the ends.  I used three different styles for the ends to get three different floral looks (the rounded edges are used for this tutorial; see the other styles toward the bottom of this post), but feel free to experiment with different cuts.


*Spread out one side like this:


*Carefully peel up the first layer of tissue paper, pulling it toward the staple.


*Then lift the second layer.


*Next lift the third layer.


*Finally push up the bottom layer a bit.


*Repeat the process with the other side.  Fluff and spread the layers/petals until you have an arrangement you're happy with,


*Here are the other two petal styles and their resultant flower shapes:


*Once you've made all of your flowers, staple the backs to the twine.


*Once all of the flowers are attached, string them up.  Now you have a flower garland.