Showing posts with label Recycled Crafts. Show all posts

Wednesday, July 14, 2021

Toilet Paper Tube Spooky Eyes

Looking for an inexpensive way to provide some Halloween ambiance?  These spooky eyes are made from empty toilet paper tubes.  This craft first appeared in my Halloween 2020 'zine, but I figured I'd post it here too, in case you missed it.  

If you're a Halloween lover and haven't checked out the 'zine yet, I'd definitely recommend it.  There are crafts, recipes, activities, a quiz, and more.  While some of my projects are rather elaborate, the ideas you'll find in here err on the simpler side to make it more accessible for a wider audience.  There's fun for the whole family, assuming the whole family loves Halloween!

Materials:

*Toilet paper tubes
*Pencil
*X-acto knife or box cutter
*Glow sticks
*Waxed paper
*Black duct tape

Directions:

*Draw a spooky face onto a toilet paper tube.

*Carefully cut out the face using an X-acto knife or box cutter.

*Tape a toilet paper tube to either end of the tube with the face using black duct tape.

*Snap a glow stick so that it lights up and wrap it in waxed paper.  Slide the glow stick and the waxed paper into the tube.  The waxed paper helps diffuse the light from the glow stick.

*Tape the ends shut with duct tape.  This will help prevent light leakage, so that the glow comes only through the face and not from the ends.

Wednesday, December 9, 2020

DIY Book Ornament


Now that I've finished my PhD, I've finally had the chance to get back into reading, and have been chipping away at the edits on my novel, which has been in the works for a while now.  I thought it would be fun to make a book ornament for my tree to celebrate my writing progress as well as my return to reading.  I used scrap paper to make the pages for my ornament, and since the scrap paper happened to have text from my work in progress, I decided to make a mock cover for my work in progress.  Now my novel is actually a horror novel, so this mock cover does not at all give the right impression, but I didn't have a lot of time to work on it and there's a good amount of symbolism in it, so it worked for me.  I've included my mock cover below in the directions section, in case you wanted to use it, but if you google miniature book cover, you can find tons of printable book covers that are free for personal use.

Materials:

*Matte photo paper
*Scrap or plain printer paper
*Two jump rings
*Two pairs of jewelry pliers
*Sewing needle
*Ribbon or thread
*Glue
*Ruler
*Pencil
*Scissors

Directions:

*Print out a copy of your cover design onto matte photo paper.  I'm including the mock cover I made below, but you can also find tons of printable mini book covers online that are free for personal use.

*Cut out your book cover image and fold it into a cover shape.

*Using a ruler and pencil, section your paper into strips.  Mine were a little over 1.5" wide, the width of the ruler, but you may want to make yours larger or smaller, depending on the desired size of your ornament.  (I messed up on the first strip, so that's why there's a set of double lines.)

*Cut out your strips and accordion fold them to fit inside your book.

*Use a sewing needle to poke a hole in the spine of the cover and link two jump rings through the hole.

*Cluster your accordion folded pages together and glue them into the spine of the book.

*Slide some ribbon or thread through the top jump ring and tie it off to form a loop so you can hang up your ornament.

And that is how you can make your very own book ornaments.  I'm excited for this new addition to my tree, and hopefully in a few years I'll be able to make a different one with the actual cover for this novel :)

Thursday, January 2, 2020

Easy Earring Holder


     Looking for a way to store your earrings?  This earring holder is easy to make and inexpensive.  It's also a good way to reuse a cardboard box you in all likelihood already have on hand.  The lid of the box can be used for storing lots of stud earrings, while the inside of the box can hold larger earrings or other jewelry items.

Materials:

*Cardboard box with lid (whether the lid is a flap closure or a detachable lid)
*Thumbtack
*Optional: paint or other decorating supplies

Directions:

*Punch holes in the lid of the cardboard box using a thumbtack.  Make sure that the holes are spaced far enough apart that your earrings can fit side by side.

*Optional: you can paint or decorate the box if you'd like.  My box was already a nice shade of blue, so I decided to leave it as it was.

*Arrange your stud earrings in the holes on the lid.  Place longer earrings or other jewelry items inside the box.

Also, if you haven't seen it already, my first Hey, Day video went live today on YouTube.  If you want to follow that series, you may want to either follow my Facebook page, where I will be posting about it, or my YouTube channel.  Also, if people would be interested, I could do an end of the week round up post containing all the Hey, Day videos from the week, but I don't want to overwhelm you with content if that's not what you're interested in.  I've included the first video in the series below, in case you wanted to check it out.


Thursday, February 21, 2019

Paper Mache Mushroom


     Spring may still be weeks away, but it's not too soon to start planning spring crafts.  For the next few weeks, I'll be posting a series of crafts culminating in a Wonderland tea party.  While I used this oversized mushroom for Halloween rather than for a tea party, an oversized mushroom or two could add some whimsy to any Wonderland themed bash.

Materials:

*Tall oatmeal canister or two
*Scrap cardboard
*Newspaper
*Paper mache mixture of your choice (mine was just watered down glue, but there are other recipes out there that might work better)
*Paint in red and white or colors of your choice
*Paintbrush
*Duct tape
*All purpose adhesive
*Heavy rock (optional)

Directions:

*Place a heavy rock at the bottom of the oatmeal container.  This will weigh it down so that it will be less likely to tip over.

*If one canister isn't tall enough, tape two oatmeal containers together to form your mushroom's stem.

*Cut out a cardboard circle as large as you would like your mushroom to be at its widest point.

*Glue or tape the cardboard circle to the oatmeal container.

*Cut off a strip of cardboard that is several inches longer than the diameter of the circle.  Curve it to form an arch and then tape the ends of the arch to either side of the circle.


*Add wadded up newspaper to form the mushroom top shape.


*Cover the top of the mushroom with strips of duct tape.


*Next comes to paper mache part.  I just mixed some glue with water, dunked strips of newspaper into the mixture, and then plastered the strips of newspaper to the mushroom.  The strips I used were way too big, so the surface of my mushroom ended up being rougher than I would have liked, so I would recommend using smaller strips.  Let dry.

*Paint your mushroom.  It might be a good idea to spray paint the whole mushroom white and then, once the white paint has dried, paint the top of the mushroom whatever color you would like.

Saturday, January 27, 2018

Zombie Newspaper Luminaries


     It's harder keeping up my posting schedule during the apocalypse than I expected!  Candles provide a cozy vibe for any Valentine's Day celebration (and once we run out of batteries for the flashlights, candles are what we'll have to work with anyway).  As an added touch, if you have any newspaper left on hand, make some luminaries for your tablescape.  If you want to shy away from zombie themed cutouts for obvious reasons, you can always cut hearts or other Valentine's Day related shapes from the newspaper.


Materials:

*Newspaper
*X-acto knife
*Scissors
*Candle
*Pencil
*Tape

Directions:

*Cut off a strip of newspaper that is as wide as you would like your luminary to be.

*Sketch the design you'd like for your luminary.

*Cut out the design.

*Tape the ends of the newspaper strip together to form a cylinder.  Make sure the candle fits inside with some extra room to spare.

*Once everything is ready, light the candle and then place the luminary over it.

Friday, January 19, 2018

Zombie Valentine's Day Paper Doll Chain


     Looking for some way to decorate for Valentine's Day now that the world has been thrown into chaos?  If you haven't burnt the newspaper left over from last week's tablecloth DIY for warmth, why not make some paper doll chains.  I made mine into zombies as an homage to my pre-apocalyptic Valentine's Day crafting tradition, but if you don't have the stomach for zombies anymore (totally understandable), then you may just want to make regular paper dolls.

Materials:

*Newspaper
*Scissors
*Pencil
*Pen
*Black marker
*Crimson paint (optional)
*Paintbrush (optional)

Directions:

*Take a strip of newspaper and fold it accordion style.

*Sketch half the outline of a person along one edge of the paper.  The figure's arm should be outstretched and should reach roughly the center of the paper.  Draw a second half outline which is holding hands with the first.  You may want to sketch the silhouettes in pencil and then go over them with a pen.


*Cut out the silhouettes and then unfold to reveal the paper doll chain.

*Draw on faces with a marker.

*If you're going for the zombie look, add blood splatters and maybe snip off some limbs.

Thursday, January 11, 2018

Zombie Valentine's Day Recycled Tablecloth


     Welcome to Amber's Post-Apocalyptic Craft a Week Blog.  I know a lot has changed in a short amount of time, but we can't let the hordes of invading zombies stop us from being our craftiest!  Valentine's Day is a little over a month away now, and what better way to celebrate than with a romantic candlelight dinner with your special someone?  Or a candlelight galentines dinner with friends? Or a relaxing candlelight dinner for one because few of us have consistent access to electricity anymore.
     The main thing you'll need for this craft is newspaper.  Where we live, The Weekly is mailed to everyone for free.  Or it was, until . . . you know.  The postal service hasn't been keeping up since the zombies came.  Anyway, a lot of people toss their copies of The Weekly into recycling immediately.  Brian and I had scavenged some copies so we could burn them for warmth, but then I realized that they also had a lot of crafting potential.  If you don't have any newspapers on hand, check your local supermarket or your neighbors' houses.  In a pinch, magazine or book pages could work as a newspaper alternative.
     You'll also need some candy wrappers, which I imagine you have an ample supply of now.  If not, head to your nearest convenience store immediately (with some well armed friends) and start stocking up on them before they're gone.  Red or pink wrappers are ideal, but really, any will do. If your valentine criticizes you for using non-Valentines colors in your tablecloth, you should probably turn them over to the zombies.
     The other supplies you'll need are tape, scissors, and glue.  If you don't have these on hand, head on down to your nearest craft supply store (with your well armed friends) and grab some.  There's a good chance no one has thought to raid their candy section yet either.


Materials:

*Newspaper
*Candy wrappers
*Scissors
*Tape
*Glue

Directions:

*Tape together as many sheets of paper as you need to cover your table.  Don't be too worried about lining everything up perfectly.  No one's going to see it very well by candlelight anyway.

*Cut out heart shapes from candy wrappers.

*Glue the hearts to the newspaper.

Now you're well on your way to having the post-apocalyptic Valentine's Day of your dreams!  Come back next week and I'll show you how to make a centerpiece or decorate with body parts, depending on how my week goes.

Thursday, August 3, 2017

Pet Sematary Inspired Halloween Potion Bottles


     I was planning on waiting until the end of the month to start posting Halloween crafts, but everything I've wanted to make recently has been Halloween related, so here we are.  Now that Brian has his dark sorcerer costume, it's probable that he and I will be dressing up as a dark sorcerer and witch for my Halloween party for the foreseeable future.  I thought it was about time to start making my house look more like a witch's abode, which would require some potions.
     Graveyard dirt/dust is a pretty standard Halloween potion, one that I've made a potion bottle for in the past.  I originally planned on filling a vial with dirt to make a standard "graveyard dust" bottle.  The dirt from my front yard doesn't look much like the richer soil one would find digging several feet underground, so it seemed inadequate for a bottle of graveyard dirt, but it works fine for dirt from a pet cemetery.  Or from Pet Sematary.  One of the taglines for the book and movie is, "sometimes dead is better," so the slogan at the bottom of the vial is a play on that.
     In the book/movie, Jud Crandall says to Louis Creed, "The soil of a man's heart is stonier, Louis."  "Soil of a man's heart" sounded like something you might find in a witch's cabinet, so I decided to make it into one of my potions.

Pet Sematary Graveyard Dirt

Materials:

*Glass jar
*Cat figurine
*Hot glue
*Black paint
*Red paint
*Paintbrush
*Toothpick
*Dirt
*Coffee stained paper
*Colored pencils (optional)

Directions:

*Fill the jar with dirt.

*Glue the cat figurine to the lid of the jar.

*Paint the cat figurine and lid black, except for the cat's eyes.  Paint the cat's eyes red (I used a toothpick for this).

*Using some coffee stained paper (for staining directions, see this post) that is relatively flat, size and print the label below:


*Color in the label if you wish.

Soil of a Man's Heart

Materials:

*Glass jar
*Rocks
*Dirt
*Coffee stained paper
*All purpose adhesive
*Colored pencils (optional)

Directions:

*Fill the jar with some ratio of rocks to dirt that seems appropriate.

*If you find a neat looking rock, you can glue it to the lid for some added decoration.

*Using some coffee stained paper (for staining directions, see this post) that is relatively flat, size and print the label below:


*Color in the label if you wish.

Thursday, May 18, 2017

DIY Denim Cutoffs, with Tips for Getting Bloodstains out of Clothes


Warning: if period talk makes you uncomfortable, turn back now.  I have 298 non-period related posts that you might enjoy more.  Also, there are pictures of bloodstained clothes, so if the sight of (dried) blood bothers you, this is not the post for you.

Warning: The bloodstain removal tips are intended to remove visible blood from periods and minor accidents like scraped knees.  It is not intended to be a method to remove all traces of DNA from clothing.  If you have murdered someone and are looking for ways to get their blood out of your clothes, leave this page and turn yourself into the police immediately.

     I was initially hesitant to write this post because I'm kind of embarrassed to admit that even though I've been  dealing with periods for fifteen years, I still bleed through from time to time.  This most recent incident was particularly messy because it began as I was about to teach a two hour lab section, so I didn't have the opportunity to clean up until I was back at home.  Usually I'll throw a little OxyClean into the wash and it'll come right out, but this time it didn't work.  I didn't bother to check them until the jeans were already dry because OxyClean is usually effective, and by then it was too late.  I had set-in bloodstains not just on the crotch of my jeans, but also by the knee?


     I'd been wanting to try making rainbow cutoffs, so this seemed like the perfect opportunity.  I cut the legs off my jeans to make them into cutoffs.  I know you can sand them and whatnot to make them fray more and give them more of a worn look, but I figured that if I wear them a few times, they'll eventually fray on their own, so I literally just cut the legs off and wound up with this:


     My next step was bleaching the shorts.  I put them in some water and Brian threw in some bleach.  Bleach is a harsh base which can damage fabrics and Brian was insistent that we err on the side of caution, so we started out with only two capfuls of bleach mixed in with the water.  We let the shorts sit and nothing happened.  We added more bleach and a little more, eventually reaching a concentration of maybe 1 part bleach to 3 or 4 parts water.  I let that sit for half an hour.  I still wasn't seeing any changes, but I decided to put them through the wash to see if maybe the washing process would remove some of the color.  The dye did not come out, but the bloodstain did, leaving me with a nice pair of denim cutoffs.

Bloodstain Removal Tools

*Hydrogen peroxide - works well for fresh bloodstains.  Put stained clothes in a tub of cold water (hot water helps set the stains) and add a few capfuls of hydrogen peroxide.  Alternately, you could put the clothes in the wash and throw a little peroxide in with them.

*OxyClean - works well for fresh bloodstains.  The active ingredient in OxyClean is hydrogen peroxide, but I've had better luck removing stains with OxyClean than with hydrogen peroxide on its own.  Add some to the wash and your clothes will most likely come out clean, as long as the blood is fresh and there isn't too much of it.

*Bleach - works for set in stains.  Bleach really should be used as a last resort because of the potential it has to damage your clothes.  Start out using only a small concentration of bleach, probably no more than 1 part bleach to 4 parts water.  Let set for half an hour and then wash immediately.  Denim is a fairly rugged material, so if you're cleaning something less robust, start with even more dilute concentrations of bleach and keep them in the bleach water for an even shorter amount of time.  No matter how cautious you are, you are risking bleaching out the fabric and perhaps even damaging the fibers of the item, so be aware of that.

Thursday, May 11, 2017

DIY Fringed Crop Top


     Wanting something new to wear this summer?  Look no further than your wardrobe.  With a little time and effort, you can transform existing clothes that have become worn or damaged (the hem of this shirt had unraveled and the bottom of the shirt had gotten stretched out) into something that you'll want to wear.

Materials:
*Shirt that you want to turn into a crop top
*Scissors
*Metallic marker or chalk

Directions:
*Cut off the bottom hem of the shirt.  If you know you want relatively short fringes, you can cut off a bit more of the bottom of the shirt too, but if you're not sure you can always keep the length at the outset and crop it more later.


*Put on the shirt inside out and draw a line going across the shirt marking where you want the fringes to end.

*Cut the lower portion of the fabric into thin, vertical strips.


*Knot neighboring strips together in pairs, going all the way around the shirt.

*Knot neighboring strips in pairs, tying together neighbors that you did not tie together the previous time.


*Trim fringes to desired length, if necessary.

Thursday, April 13, 2017

Mason Jar Pencil Holder


     Okay, so I don't know if this technically counts as a Mason jar.  It's a Zhena's tea jar, but you could craft a similar container from a Mason jar, albeit without the nice little pencil sharpener attachment (which is where the tea's wooden measuring spoon was stored).  That loop where I have my pencil sharpener also works well as a space to set the colored pencil you're working with if you want to put it down for a second.

Materials:
*Zhena's tea jar (or other glass jar)
*Jump ring
*Pencil sharpener with loop at the end
*Two pairs of pliers

Directions:
*Open up the jump ring and loop it through both the loop on the tea container and the loop on the pencil sharpener.  Close the jump ring.
*Add some pencils.  That's it!


Thursday, April 6, 2017

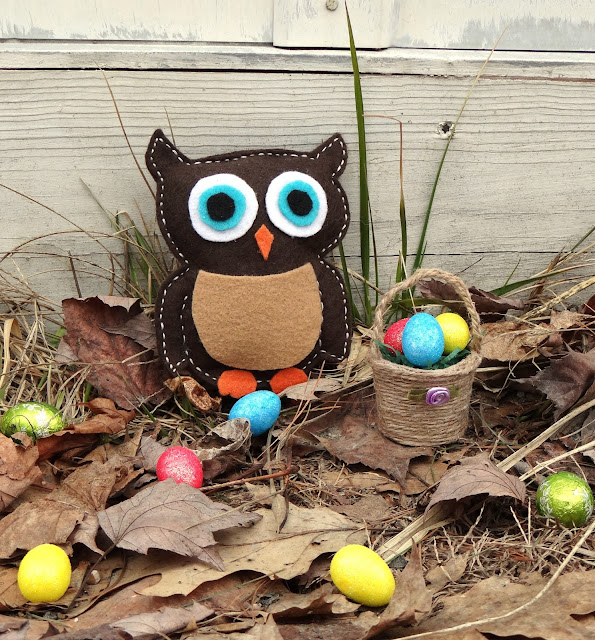
Mini Easter Basket


     Transform an old medicine cup into an adorable mini basket.

Materials:
*Plastic medicine cup
*Twine
*All purpose adhesive
*Green tissue paper
*Mini foam eggs
*Ribbon rose
*Scissors

Directions:
*Cut three lengths of twine long enough that they could reach from the bottom of the medicine cup, loop up to form a handle, and reach down to the bottom on the other side.
*Braid the three pieces of twine together and then glue on to form the handle.
*Wrap twine around the medicine cup, gluing down as you go.  Let dry.
*Once you've finished gluing down the twine, embellish with a ribbon rose or other decoration of your choice.
*Wad up some paper (tissue paper would work fine, but you could also use scrap paper) and stuff it in the bottom of the medicine cup.
*Cut very thin strips of green tissue paper to create the Easter "grass."  Layer it atop the paper,
*Add a few teeny eggs and you're ready for your very own mini egg hunt.


Happy egg hunting!

Thursday, March 16, 2017

Mini Fairy House


     Wait, don't throw that container out!  Empty plastic bottles such as toothpick containers, rounded makeup containers, and aspirin bottles are perfect for making tiny fairy houses.

Materials:
*Empty plastic container (e.g. toothpick holder)
*Toothpicks
*Gold seed bead
*Lots of teeny pebbles
*All purpose adhesive
*Brown paint
*Gray paint
*Red paint
*White paint
*Paintbrush
*Clay


Directions:

*Paint the container gray.  This way, if you end up with small gaps between rocks that are hard to fill in, it will look like there is grout or cement or something similar between the rocks.

*Snip the ends off of three toothpicks and then cut each toothpick in half.  Paint five or six of these toothpick halves brown and set aside to dry.

*Once dry, glue on the painted toothpicks to form a door.

*Glue a gold seed bead onto the toothpicks for a doorknob.

*Glue rocks onto the container, filling in as much of the space as you can.

*Craft a mushroom shaped roof from clay.  Bake or dry following the directions given on the packaging.

*Paint the roof red and then let dry.  Once dry. paint on white spots.  Set aside to dry.

This is what the two pieces looked like before I glued them together.  The mushroom roof really does add to the fairy house's aesthetic.

*Once the roof is completely dry, glue it to the top of the container.

*To make an owl fairy inhabitant, punch two butterfly shapes from cardstock and glue to the back of the bead such that one wing sticks out on either side of the owl bead.

Thursday, January 5, 2017

Creative Storage Solutions

     The beginning of a new year is a great time to take stock of what you have and get your house in order.  Here are some clever ways to clean up the clutter.

Shoe Organizer Makeup Storage


     Shoe organizers aren't just for shoes.  Use them to store makeup, hair accessories, socks and slippers, and any number of other items.

Jewelry Box Nail Polish Storage


     Jewelry boxes can be a good place to store nail polish and nail art tools.

Food Container Office Supply Storage

     You may already have seen my posts on organizers made from aluminum cans, ice cream tubs, pickle jars, and oatmeal tubs.  Here are some other food containers you can use to organize your space.


     This office supply container is an Andes Mint container I decorated with SpongeBob duct tape.


     Use the bottom of an empty cardboard soda 12 pack to hold colored pencils, rulers, or other supplies.  You could decorate it if you'd like, but no decorating is necessary.

Floss Organizer Perler Bead Storage


     Floss organizers are the perfect size for storing separate colors of Perler beads.  I like using the big compartments on the end for holding yet unsorted colors.

Thursday, December 29, 2016

New Year's Confetti Popper


     Here's a great way to use up some of the tissue paper left over from opening presents this holiday season.

Materials:
*Tissue paper
*Toilet paper tube
*X-acto knife
*Pencil
*Wrapping paper or more tissue paper
*Twist ties (optional)
*Ribbon
*Scissors
*All purpose adhesive
*Tape

Directions:
*Cut long, thin segments from tissue paper in your chosen colors.  You won't need a ton of tissue paper, especially if you're using lots of colors, so by taking a thin strip from the edge you can still reuse the rest of the tissue for gift packaging if you'd like.


*Cut long fringes into the bottom of the tissue paper.


*Cut horizontally across the fringes to create confetti.


*Repeat the above process until you have enough confetti to fill the toilet paper tube.


*Take the tube and draw a line around the middle of the tube.


*Using your X-acto knife, cut most of the way along the line you drew.  You don't want to cut the tube in half or so much so that you lose structural integrity, but you need only leave a very small amount of cardboard intact to achieve this.


*Stuff the tube with the confetti and then glue tissue paper to the ends to keep the confetti from falling out.


*Wrap the tube in either tissue paper or very thin wrapping paper.  If the paper is too thick, it won't tear when you're trying to break open the popper.


*Tie off the ends.  I used twist ties first and then covered them with ribbons, but you could go straight to the ribbons if you'd like.