Friday, November 29, 2019

DIY Felt Christmas Light Garland


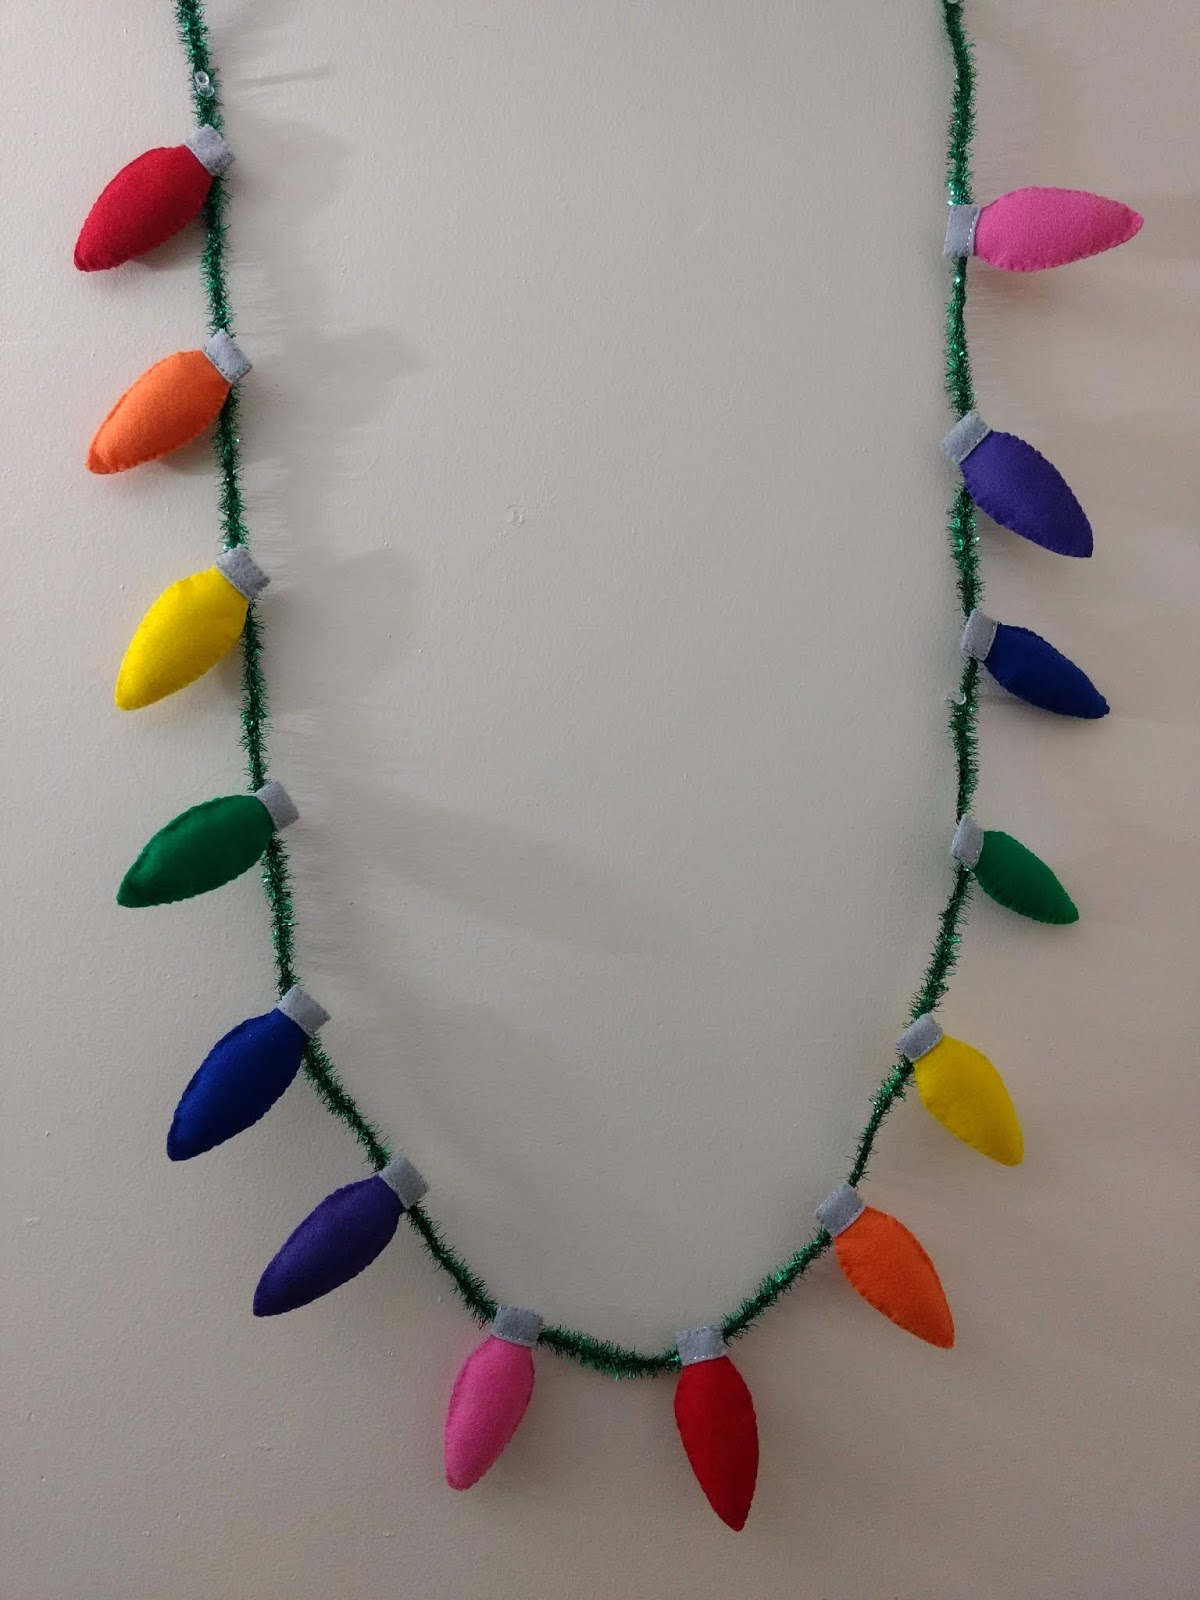
     Brighten up your home this holiday season with this fun, festive garland.  While I opted for a rainbow color scheme, you can use whatever colors of felt you would like to make this DIY your own.

Materials:

*Sheets of felt in colors of your choosing.  Since I used seven different colors of felt for the "light bulbs," I only needed one sheet of each color.  However, if you are using fewer colors, you may need more sheets of each color.
*Gray felt
*Metallic marker
*Scissors
*Thread in colors of your light bulbs
*Silver or gray thread
*Stuffing
*Ribbon to string the lights together

Directions:

*Print out a copy of the light bulb template given below:


*Cut out the whole template as one, leaving the light bulb cap attached to the rest of the bulb

*Determine how many lights you would like to have on your garland.  Trace and cut out twice as many felt pieces as you would like lights, one piece for the front of each bulb and one piece for the back of each bulb.

*Trace and cut out twice as many copies of the light bulb cap as you would like lights from gray felt.

*Take two light bulb pieces and two light bulb caps and sew the caps to the light bulb pieces using a back stitch and gray or silver thread.

*Place the two light bulb pieces wrong sides together and sew together using a blanket stitch.  Leave an opening at the top for stuffing.

*Add stuffing and sew closed.

*Repeat the sewing process until you have sewn all of your bulbs together.

*Sew the bulbs to a piece of ribbon to complete your light garland.

Thursday, November 21, 2019

Thanksgiving or Autumn Pie Garland


     For many of us, the best part about Thanksgiving (aside from spending time with loved ones) is the food, and what better a way to show this than by adding a pie garland to your seasonal decor?  One great thing about this pie garland is that it is easy to customize.  I opted for apple, pumpkin, and chocolate pudding pie, all classics in my family, but if you have a different pie you'd like to include, such as cherry, all you need to do is use a different color of cardstock.
     This craft is adapted from a craft by Martha Stewart.  For her version, see this post.

Materials:

*1 sheet dark brown cardstock
*1 sheet light brown cardstock
*1 sheet orange cardstock
*2 sheets cream colored cardstock
*Scissors and pencil or die cutting machine
*Glue
*Hole punch
*Ribbon
*Large white pom poms

Directions:

*Use the template below to cut out 4 dark brown triangles, 4 light brown triangles, 4 orange triangles, and four cream colored lattice grids.


*Glue the lattice shapes over the light brown cardstock triangles.


*Punch holes in the top corners of each triangle and string the triangles onto the ribbon.  Use a dab of glue to hold each triangle in place along the ribbon.


*Cut the cream colored cardstock into strips that are about 1/2" wide.  Fold strips accordion style, making little handles at either end to use to attach the strips to the pies.


*Glue the ends as well as the bottoms of each fold to the pie shapes.


*Glue white pom poms to selected pieces of pie.  Let dry.

*Once your garland is dry, it's ready for display.


Thursday, November 14, 2019

Fall Leaves Felt Table Runner


     Add a fun, seasonal touch to your table with this fall leaves table runner.

Materials:

*Felt in colors of your choice
*Thread in corresponding colors
*Sewing needle
*Metallic marker or fabric pen
*Scissors

Directions:

*Print out leaf templates of your choice, such as the ones included below:


*Trace leaf templates onto the felt sheets using a metallic marker or fabric marker.  The number of leaves you need may vary, depending upon the size of your table.  I used 10 leaves to complete mine.


*Cut out leaf shapes and arrange them on your table in a sequence that you find pleasing.


*Choose a color of thread corresponding to the color of felt of the leaf that you want to go at one end of your table runner.  Begin sewing using a running stitch at the bottom of the leaf.  At first you will be sewing just this one leaf, but once you reach where the stem of the next leaf begins, you will sew the stem to the back of the leaf you are sewing, like this:


*Once you reach the end of your top leaf (the one you started sewing first), tie off the thread.

*Select a color of thread corresponding to the leaf you attached to your first leaf via its stem and begin sewing in the same fashion as you sewed your first leaf.

*Repeat procedure to sew all of your leaves together.

Thursday, November 7, 2019

Creating a Digital Wardrobe


     As the end of 2019 approaches, many of us will be looking for new year's resolutions.  Since becoming more organized is a common resolution, I thought I'd share an organizational project I've been working on with you: creating a digital wardrobe.  If you have a lot of clothes and have a tendency to lose track of some of them or forget that they exist, then a digital wardrobe may be the solution you need.  I've included a video tutorial walking you through the process of creating a digital wardrobe below.  I've also included some written instructions, although the video tutorial is more thorough.


Creating a Digital Wardrobe

Materials:

*Camera
*Computer

Directions:

*The first step to creating a digital wardrobe is choosing a location for your digital wardrobe to exist in.  I created a folder on my Google Drive called "Wardrobe" to store the digital images of my clothes in so that I would have access to the images from multiple devices, but creating a folder on your computer could work just as well.

*Once you've created your folder, choose a clothing storage location (e.g. your closet, a dresser drawer) to work on and photograph every item in that location.

*Inside your wardrobe folder, create folders for each category of clothing in the storage location that you photographed.  For example, you might have shirts and rompers hanging in your closet, so you would want to create a folder for shirts and a folder for rompers.  You may want to create more folders inside those respective categories.  For example, you may want to have separate folders for short sleeved shirts and long sleeved shirts, or you may want separate folders for formal rompers and more casual rompers.

*Place each photograph into its corresponding folder (e.g.. a T-shirt may go in your short sleeved shirts folder) and add a description.  The description should include a basic description of the item (e.g., red T-shirt) as well as the item's location in your wardrobe (e.g., closet).  The location is especially important if you have similar types of garments stored in separate locations, as it gives you a way to keep track of which garments are in which location.

*Repeat the process until you've cataloged all of your clothes.  You may also want to create folders for accessories, if those are an essential component of your wardrobe.

*I also have been cataloging my outfits as I wear them.  I have a folder in my "Wardrobe" folder called "Outfits" where I keep a photograph of each day's outfit.  Doing this gives me a chance to see what clothes I'm wearing often and which ones I'm not wearing.  It also reminds me which garments look good together and which don't and gives me inspiration for future outfits.