Wednesday, November 17, 2021

Little Debbie Christmas Tree Cake Earrings


Little Debbie Christmas Tree Cakes are back in stock, which means it's time for yet another snack cake-themed craft.  This year, I decided to add some earrings to my holiday wardrobe.  Need some more snack cake-themed craft ideas?  Check out my Christmas Tree Cake Felt Ornament, Swiss Roll Ornament, Christmas Tree Cake Throw Pillow Technique #1, Felt Gingerbread Ornament, Christmas Tree Cake Dress, Christmas Tree Cake Throw Pillow Technique #2, and Christmas Tree Cake Nail Art.

Materials:

*White oven-bake clay
*Red acrylic paint
*White acrylic paint
*Green acrylic paint
*Ultra fine nail art brush or paintbrush
*Ear wires
*Two sets of jewelry pliers
*Jump rings (optional)

Directions:

*Create two Christmas Tree Cake shapes out of clay.

*Poke holes in the tops of each wide enough for your ear wires to fit through.  I forgot about the curvature of the ear wire loops when I was poking my holes, so mine ended up not being quite wide enough.  Hence the jump rings.

*Bake following the directions on the clay's packaging.  Let cool.  You should end up with shapes something like this:

*If your clay is a little off-white after baking or there are visible specks in the clay, paint white.  Let dry.  If you're happy with the look of your clay shapes, you can skip this step.

*Paint on red bands to mimic the stripes on Christmas Tree cakes.  Let dry.

*Paint on little green specks for the sugar sprinkles.  Let dry.

*Now it's time to add the ear wires.  If you've made the holes large enough, you should be able to open up the ear wire loop, slide it through the earring hole, and close it.  If not, you may need to add a couple of jump rings first, or even slide a headpin through the hole and then bend it into a triangle.

Wednesday, November 10, 2021

Halloween 2021 Wrap Up


I hope you all had a wonderful Halloween season.  I know Halloween has been over for nearly two weeks now, but I thought it would be fun to give you a little window into what Halloween looked like for Brian and me.  Let's start with our day-of costumes.

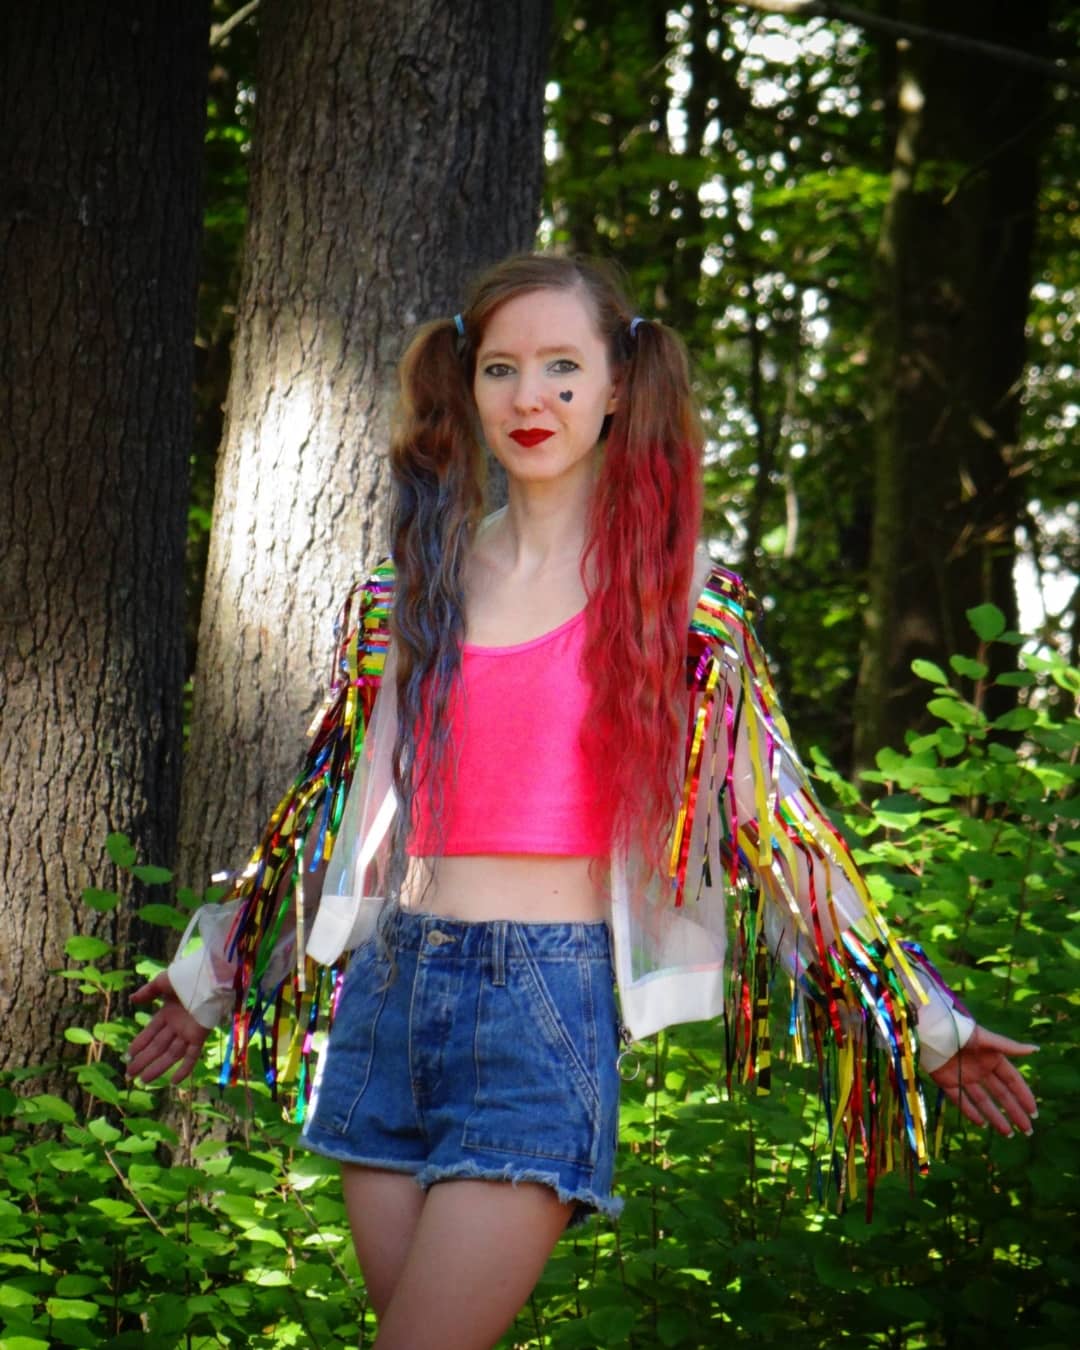
I went as a scarecrow.  I put together a look similar to this one during October of 2020 (I dress up all throughout October) and liked it so much that I wanted to make it my Halloween day look this year.  Since Brian and I do a couples costume for Halloween day, I needed a corresponding costume for Brian, and I thought a crow would be the perfect counterpart.

This was another costume idea that originated in October 2020.  If you've seen my 15 Halloween Costumes from My Closet post, you may recall that I included a scarecrow and crow couples costume as a bonus idea.  That time, the crow look was fairly simplistic, essentially just a black paper cone beak.  This year, I wanted to make Brian a crow mask.  I freehanded some feathery shapes on black felt and came up with this design.  I'm planning on including the crow mask template and directions in my Halloween 2022 lineup, so if you like this mask and want to make one of your own, keep your eyes out around August or September of next year.  I'll probably include a scarecrow makeup tutorial then as well.

Now let's turn to decorating.

I didn't do a lot of decorating this Halloween season, but I did deck out the front lawn a little to spread some holiday cheer.  When I was little, my dad used to have us paint pumpkins as opposed to carving them because carved pumpkins rot faster.  Also, no pumpkin guts to contend with if you paint.  Last year, I ended up painting a pumpkin for our doorstep as part of a Halloween challenge, and I had enough fun with it that I wanted to try it again this year.

I had this idea of painting a silhouetted nighttime cemetery scene.  I don't really do a ton of art, so I was kind of expecting this to go disastrously, especially since I just kind of winged it.  But I'm pretty pleased with how it turned out.

The other piece of my Halloween setup was my cemetery.  This is my favorite Halloween setup each year.  Six of the headstones I carved myself, and I have tutorials here, here, here, here, and here if you'd like to see how I made them.  It has a special place in my heart, and if I could only set up one thing for Halloween each year, this would be it.

We decided to set out premade Halloween goodie bags again this year.  We placed them in the graveyard this time around and once again, they were a big hit.  We only had four left over at the end of the night.  Even if things are safer next year, I'm thinking about putting the treats outside.  Not everyone likes being social or feels comfortable interacting with strangers, and some folks may worry about being judged for being "too old" to trick-or-treating.  If more people are able to enjoy Halloween this way, I'm all for it.

Let's move on to the treat bags themselves for a sec.


Since we've started making treat bags, I like to include a mix of chocolate, non-chocolate, and non-candy options.  That way, hopefully there's something for everyone.  Here's a look at some of the candy.

And here are some of the non-candy treats.  Aren't they adorable?  I had to keep reminding myself that these were for the trick-or-treaters, not for me.

We also made an instructional sign, since the bags did blend in a bit with the leaves.  I used one of the free templates in Canva, and it took me under five minutes to make.

Here's a close up on the sign.

And that's a wrap!  Hopefully you enjoyed this little tour of our Halloween setup.  I know it wasn't as elaborate as it has been in the past, but hopefully next year I'll be a little less busy and also have the motivation of a Halloween party again.  Also, Halloween is not a one-day affair in our household, so even though I didn't have as much of a setup, I still celebrated all through October with spooky costumes and outfits as well as spooky reads.  And editing my horror novel, which I'm *almost* done with, for now.

How did you celebrate Halloween?  Are you missing Halloween, or are you ready to move on to other holidays?  Things will be taking a Christmas-y turn on my blog here soon, but if you're looking for more Halloween content, I post almost exclusively Halloween content August through October.  Sometimes May through October if I have a spooky-themed birthday party.

Wednesday, October 27, 2021

Halloween Rag Doll Nail Art


Halloween is almost here.  Need a Halloween manicure idea?  These rag doll nails are the perfect addition to a creepy doll look.

Materials:

*Nail polish in a variety of colors of your choosing

*Nail art dotting tool

*Ultra fine nail art brush

*Black acrylic paint

*Painter's tape

*Scissors

*Nail polish base coat

*Clear nail polish top coat

Directions:

*Paint nails with a base coat.  Use a regular base coat, not a peel off base coat (or the painter's tape will peel up your polish).  Let dry.

*Choose three colors for each nail and plan out your color scheme for each one.

*Paint nails in a variety of colors.  You probably want to start by painting each one using the lightest color you'll be applying to each nail.  This will end up being the middle color in your pattern, though, so choosing the lightest may not always make the most sense.

*Let dry for several hours.  I usually recommend painting the base color in the evening and letting the nails dry overnight.  You're going to be applying painter's tape on top of this coat, and you don't want to risk peeling up some of the polish.

*Cut wedges of painter's tape and place over the middle portion of each nail.

*Paint the tops and bottoms of the nails different colors.  Make sure these colors are also different from the base color on that nail.

*Carefully peel off the painter's tape.

*Using an ultra fine nail art brush and black acrylic paint or a black nail art pen, paint on lines separating the different colors.

*Paint x's over the lines to look like stitching.

Wednesday, October 20, 2021

Simple Chucky Makeup Tutorial


Makeup can be a great tool to help a store-bought costume stand out.  The great thing about this Chucky makeup is that it doesn't require any specialized makeup, just two shades of eyeshadow and an eyeliner pencil.  You can also use this technique for other characters with scars, such as Frankenstein's monster.

Materials:

*Red eyeshadow

*Deep purple eyeshadow (like the color of a dark bruise)

*Black eyeliner pencil

*Eyeshadow brushes

Directions:

*If you normally wear makeup, apply light, natural makeup as you usually would.

*Pull up an image of Chucky's scarring.  Using the red eyeshadow, map out the scar pattern on your face.

*Next, follow the lines you drew in red with the deep purple eyeshadow.  You may want to use a slightly thinner brush for the purple so that you don't cover up the red completely.  You should end up with something like this:


 *To finish this look off, go over the lines with a black eyeliner pencil.  Use the pencil to draw straight lines across some of the cuts to look like stitching.  You should end up with something like this:

And that's it!  If you want the look to hold up for longer, you can set it with some setting spray.  I didn't find it to be necessary because I wasn't going anywhere, but if you're going to be out and about for a while, it may be a good idea.

Wednesday, October 13, 2021

Harley Quinn Birds of Prey Jacket

 
So this is one of those crafts that I don't want to post a tutorial of my own for because I went about this one in the wrong way.  You see, I bought a mesh jacket for this project, which meant I couldn't adhere the streamers to the sleeves with hot glue.  So I used packing tape.  Which worked for a few pictures, but left a lot to be desired.  So instead, I'm linking you to the tutorial that inspired this project.  If you want to attempt a Harley jacket of your own, definitely check out that tutorial.

I do want to try this jacket again sometime, though.  This iteration was thrown together over the course of a couple of hours the night before I needed it.  Which meant I didn't have the time to fill out the sleeves like I wanted to.  But hey, for a last minute project, it came out okay.  I would just not recommend following my example here.

Any Halloween costume plans yet?  This year I'm trying to put together Halloween costumes, cosplays, bounds, and looks for each day of October.  You can see what I've come up with so far over on Insta @all_of_my_outfits.

Thursday, October 7, 2021

Zombie Candy Corn Earrings


Looking for a spooky accessory that's almost good enough to eat?  Why not try these zombie candy corn earrings?

Here's a comparison of the clay earrings with a variation I made using actual candy corn.  The candy corn was a bit harder to work with, but I was ultimately pretty pleased with how both versions came out.

Materials

*White oven bake clay

*Sculpting tools, e.g., toothpick, nail art dotting tool

*Orange acrylic paint

*Yellow acrylic paint

*Red acrylic paint

*White acrylic paint

*Black acrylic paint

*Brown acrylic paint

*Ultra fine nail art brush

*Ear wires

*Jump rings (I used head pins and bent them into a loop, but jump rings would probably be easier) 

*Pliers

Directions:

*Shape white clay into two candy corn shapes.

*Insert a jump ring into the top of each candy corn.  Use a toothpick or a similar implement to smooth clay over the top of it, so that the jump ring is buried about halfway in the  clay.

*Use a nail art dotting tool to create eye sockets in the candy corn pieces.

*Use a toothpick or similar implement to carve mouths into the candy corn shapes.

*Create two eyes for each candy corn by rolling little spheres of white clay.

*Place one eye into an eye socket on each candy corn piece.

*For the other eye, take a little piece of white clay and roll it into a long, thin line.  Attach one end to the eye socket and the other to the end of the eyeball so that the eye is dangling out of its socket.

*Bake clay in the oven following the directions on the packaging.  When you're finished, the candy corn should look something like the upper candy corn shapes in this photo:


*From here, it's a matter of painting.  Use an ultra fine nail art brush to paint candy corn, following the colors shown in the picture at the top of the page.  Let dry.

*Use pliers to open up the bottoms of the ear wires and loop them through the jump rings.  Now your earrings should be finished.

Wednesday, September 22, 2021

Comic Style Nail Art


Considering a comic-themed Halloween costume this year?  Why not paint your nails to match?

Here was an attempt of mine at cartoon makeup.  The nails go quite well with the look, in my opinion.

Materials:

*Nail polish base color (in my case red, but could be any color)

*Nail polish base coat

*Black nail art pen or black acrylic paint

*White acrylic paint

*Ultra fine nail art pen

*Nail polish top coat

Directions:

*Apply nail polish base coat.  Let dry.

*Apply nail polish base color.  Let dry.

*Using a black nail art pen or black acrylic paint, paint around the perimeter of your nails.  Let dry.

*Using white acrylic paint, add white highlights to look like light reflecting off of the nails.  Let dry.

*Seal with a clear top coat.  I only have glossy top coats, but a matte top coat might work better here so you don't have actual glinting light on your nails in the photos.