Showing posts with label Scrapbooking and Paper Crafts. Show all posts

Wednesday, November 14, 2018

DIY Hand Turkeys


     I have been super busy lately between teaching intro physics and working on my own research, so the craft ideas just haven't been coming to me lately.  Luckily, this week I didn't have to come up with an idea of my own.  Deanna, who keeps the physics department's main office looking festive throughout the year, called on the grad students to make some hand turkey decorations.  I had some paper feathers left over from masquerade mask making and thought they would add a nice touch to the traditional hand turkeys.  This craft is relatively easy to make and works well for crafters of all ages.

Physics department hand turkeys.

Materials:

*Brown cardstock (or whatever color you want your turkey to be)
*Red, yellow, and orange cardstock (or whatever colors you want the feathers to be)
*Scissors
*Glue
*Googly eyes
*Pencil

Directions:

*Trace your hand (or help your crafter trace their hand) onto the brown cardstock and cut out.

*Cut out feather shapes from red, orange, and yellow cardstock (if you search for feather template, you can find all sorts of feather shapes you could use).

*Glue feathers over the fingers of the hand template.

*Glue a googly eye to the thumb.

*Cut out beak and wattle shapes from orange and red cardstock and glue onto the thumb.

Saturday, June 23, 2018

Oozing Steps


Materials:

*Green cardstock
*Pencil
*Glue or double sided tape
*Packing tape
*Scissors

Warning: If you have painted steps, tape may feel off the paint.  Adhere at your own risk.

Directions:

*Sketch slime drip shapes onto pieces of cardstock, making sure that the end of one sheet overlaps with the beginning of the next.  The number of sheets needed will vary based on the width of your steps.

*Cut out the slime shapes and connect them using glue or double sided tape.

*Adhere the slime to your steps using packing tape.  Make sure your steps are relatively clean first, or else the tape won't stick.  If you have concrete steps like I do, you may want to place some tape over the area you are planning to stick your slime to and peel it off to remove any excess dirt.  If you have painted steps, you may want to try using some sort of adhesive that won't damage paint instead of packing tape to hold up the slime.

Saturday, June 9, 2018

Mock Goosebumps Cover Design Contest


     Looking for a fun, easy activity for your Goosebumps themed party?  Host a cover design contest.  Print out copies of the template given below and hand them out to your guests along with some colored pencils and then sit back and watch the creativity flow.

Template


     Note that if you print this template at the size of an actual Goosebumps cover, it will come out a little pixelated.  Scholastic used to offer a free, printable template on their website, but when I went there while I was planning my party, I couldn't find it anymore.  I threw this together and even though it's a little fuzzy, that pixelation didn't seem to detract from the activity any.

Sample Covers


     These are the cover designs my guests came up with.  When it came time for us to vote, many of us had trouble ranking them because they were all so good.  Katie's Cat Got Your Tongue (pictured at the top of the post) scored a very narrow victory.

Thursday, March 1, 2018

50 Reasons


     This post was inspired by a project that my local UMaine chapter of Active Minds put together.  During the fall semester, members of Active Minds asked students to write down positive things that tomorrow could bring on squares of paper.  They collected 1,100 squares, one for each student in the U.S. who dies by suicide each year, and assembled the squares into a quilt.  According to Sarah, President of the UMaine chapter of Active Minds, the goal of creating the quilt was to, "inspire hope, positivity, and optimism for the endless possibilities of tomorrow.  It's finished project symbolizes at least 1,100 reasons to stick around for another day."  The quilt, which was displayed at Fogler Library, provided a powerful visual reminder of what good the future could bring.  Some of my personal favorite suggestions were Halloween, cats, and playing Pokemon GO, but there were all sorts of ideas from foods to activities to goals that people could look forward to.


The quilt on display at Fogler Library

     Filling out some squares was cathartic for me and I thought it might be nice to adapt a smaller scale version of this project for my craft blog.  All of us have our rough days and it can be nice to have a visual reminder of the things we have to look forward to.  I came up with a list of 50 things I like and goals I have, but you could come up with any number of reasons that works for you.  I originally wanted to arrange the squares in a quilt, but I didn't have enough space on my wall, so I arranged them around existing artwork.  You could arrange them in any pattern you'd like.

Materials:
*Sticky notes
*Marker or pen

Directions:

*Write things that you like or goals that you have on sticky notes.  You can do this yourself or with a group of friends.

*Arrange the sticky notes in whatever pattern you would like to.

Thursday, February 8, 2018

How to Survive a Zombie Attack Poster


     Okay, so this one isn't so much of a craft as it is a printable PSA.  During these difficult times, it's essential that we all know how to protect ourselves.  There are a lot of nicer looking posters out there (I have zero artistic skills, so I skipped the graphics), but the info on this should be pretty solid.

Materials:

*Paper
*Printer (if available.  Otherwise a pen will do)

Directions:

*Print a copy or copies of the above "How to Survive a Zombie Encounter" poster.  If you don't have access to a printer/electricity, grab a pen and jot these tips onto any spare paper you can find.

*Post or distribute wherever you think they're needed.  Give one to your Valentine(s).  Make the world a safer place for us humans.

Saturday, January 27, 2018

Zombie Newspaper Luminaries


     It's harder keeping up my posting schedule during the apocalypse than I expected!  Candles provide a cozy vibe for any Valentine's Day celebration (and once we run out of batteries for the flashlights, candles are what we'll have to work with anyway).  As an added touch, if you have any newspaper left on hand, make some luminaries for your tablescape.  If you want to shy away from zombie themed cutouts for obvious reasons, you can always cut hearts or other Valentine's Day related shapes from the newspaper.


Materials:

*Newspaper
*X-acto knife
*Scissors
*Candle
*Pencil
*Tape

Directions:

*Cut off a strip of newspaper that is as wide as you would like your luminary to be.

*Sketch the design you'd like for your luminary.

*Cut out the design.

*Tape the ends of the newspaper strip together to form a cylinder.  Make sure the candle fits inside with some extra room to spare.

*Once everything is ready, light the candle and then place the luminary over it.

Friday, January 19, 2018

Zombie Valentine's Day Paper Doll Chain


     Looking for some way to decorate for Valentine's Day now that the world has been thrown into chaos?  If you haven't burnt the newspaper left over from last week's tablecloth DIY for warmth, why not make some paper doll chains.  I made mine into zombies as an homage to my pre-apocalyptic Valentine's Day crafting tradition, but if you don't have the stomach for zombies anymore (totally understandable), then you may just want to make regular paper dolls.

Materials:

*Newspaper
*Scissors
*Pencil
*Pen
*Black marker
*Crimson paint (optional)
*Paintbrush (optional)

Directions:

*Take a strip of newspaper and fold it accordion style.

*Sketch half the outline of a person along one edge of the paper.  The figure's arm should be outstretched and should reach roughly the center of the paper.  Draw a second half outline which is holding hands with the first.  You may want to sketch the silhouettes in pencil and then go over them with a pen.


*Cut out the silhouettes and then unfold to reveal the paper doll chain.

*Draw on faces with a marker.

*If you're going for the zombie look, add blood splatters and maybe snip off some limbs.

Thursday, January 11, 2018

Zombie Valentine's Day Recycled Tablecloth


     Welcome to Amber's Post-Apocalyptic Craft a Week Blog.  I know a lot has changed in a short amount of time, but we can't let the hordes of invading zombies stop us from being our craftiest!  Valentine's Day is a little over a month away now, and what better way to celebrate than with a romantic candlelight dinner with your special someone?  Or a candlelight galentines dinner with friends? Or a relaxing candlelight dinner for one because few of us have consistent access to electricity anymore.
     The main thing you'll need for this craft is newspaper.  Where we live, The Weekly is mailed to everyone for free.  Or it was, until . . . you know.  The postal service hasn't been keeping up since the zombies came.  Anyway, a lot of people toss their copies of The Weekly into recycling immediately.  Brian and I had scavenged some copies so we could burn them for warmth, but then I realized that they also had a lot of crafting potential.  If you don't have any newspapers on hand, check your local supermarket or your neighbors' houses.  In a pinch, magazine or book pages could work as a newspaper alternative.
     You'll also need some candy wrappers, which I imagine you have an ample supply of now.  If not, head to your nearest convenience store immediately (with some well armed friends) and start stocking up on them before they're gone.  Red or pink wrappers are ideal, but really, any will do. If your valentine criticizes you for using non-Valentines colors in your tablecloth, you should probably turn them over to the zombies.
     The other supplies you'll need are tape, scissors, and glue.  If you don't have these on hand, head on down to your nearest craft supply store (with your well armed friends) and grab some.  There's a good chance no one has thought to raid their candy section yet either.


Materials:

*Newspaper
*Candy wrappers
*Scissors
*Tape
*Glue

Directions:

*Tape together as many sheets of paper as you need to cover your table.  Don't be too worried about lining everything up perfectly.  No one's going to see it very well by candlelight anyway.

*Cut out heart shapes from candy wrappers.

*Glue the hearts to the newspaper.

Now you're well on your way to having the post-apocalyptic Valentine's Day of your dreams!  Come back next week and I'll show you how to make a centerpiece or decorate with body parts, depending on how my week goes.

Thursday, December 21, 2017

Gift Genie: DIY Last Minute Gift Finder


     Need a last minute gift?  Unsure what to get?  Let the gift genie decide!  Better yet, if the recipient is indecisive, give them their very own gift genie to make their future holiday shopping a breeze.


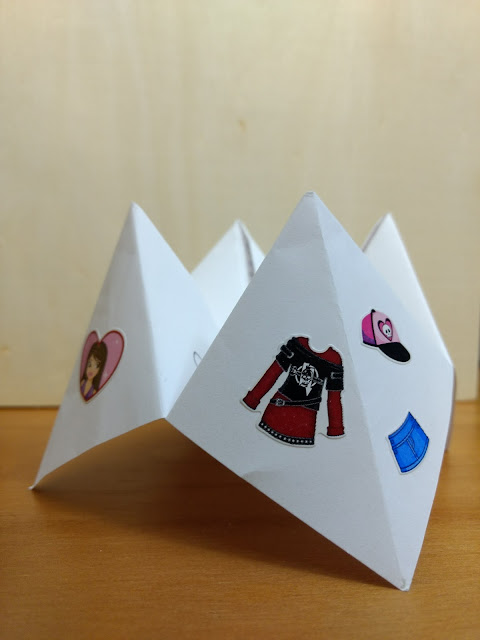
     The "gift genie" may look like your run of the mill "cootie catcher," but it has the power to help you choose some gifts or at least get a few chuckles.  I got this idea from the "It's Different Every Day" calendar.  They had a foldable "psychic gift guide," which I had to play with.  I actually ended up ordering one of my sister's Christmas presents based on the guide's suggestion.  It was such a cute and fun idea, I thought, why not make one of my own?  My gift genie is actually a re-gift genie and it's meant more for laughs than serious suggestions.  However, if you need serious suggestions, the gift genie can provide that too.  See the end of this post for possible gift ideas your gift genie could include.

Materials:

*Paper
*Pencil
*Stickers (optional)

Directions:

*Begin by folding the sheet of paper diagonally.


*Cut off the excess paper that goes beyond the fold.


*Unfold so that your paper forms a square and then fold in half diagonally going between the opposite corners of the original diagonal fold.


*Unfold the paper.


*Fold one of the corners to the center of the paper.


*Fold the remaining corners to the center in the same fashion.


*Flip the paper over and fold one corner to the center of the paper.


*Fold the remaining corners to the center.


*Number the triangles created by the folding 1-8.  Lift up the flaps and write a gift idea under each number.  Fold the flaps back to the center.

*Fold in half.


*Decorate the resulting squares using words, stickers, colors, or other things you can spell out.  I used stickers corresponding to different gift categories: clothes, shoes, makeup, and music (although these did not match the gift ideas beneath the flaps).

*Slide your fingers under the flaps and use as you would a "cootie catcher."

Ideas for gifts:

*Gift card to a favorite store
*Jeans
*Sequin top
*DVD with Jiffy Pop, popcorn seasonings, movie theatre candy
*Boots
*Craft scissors, if they're a crafter
*Concert tickets or other experience related gifts (see here for other experience ideas)
*DIY coupons (e.g. for a nice dinner, a back rub, a day trip, see here for design ideas)
*E.L.F. gift card
*Framed quote (see here for DIY idea)
*Pokemon themed gifts (see herehere, here, here, and here for DIY ideas)
*Lip balm (a good stocking stuffer; see here, here, and here for DIY ideas)
*Earrings (see here for DIY clay owl earrings)

Ideas for re-gifts:

*A rusty paperclip
*Out of season hand towel
*Holiday card with previous recipient's name scratched out
*Strongly scented lotion that has been sitting under the bathroom sink for at least three years
*Unusable nick knack that is at least one foot tall
*Well circulated state quarters
*Item from the back of your closet
*Half used candle

Thursday, December 7, 2017

Santa Bats


     These little bats are here to spread some holiday cheer.  What, you didn't picture bats as Santa's helpers?  Bats get a bad rap, but these cuties are more than happy to add some whimsy to your Christmas decor.
     I wish I could take credit for this idea, but I didn't come up with it.  I walked into my department's main office earlier in the week and lo and behold, there were bats with Santa hats on the walls:


They were so adorable, I decided I had to make some of my own.  Here's how I made my variant.

Materials:

*Black cardstock
*White cardstock
*Red cardstock
*Scissors, pencil, and X-acto knife (or Silhouette CAMEO)
*All purpose adhesive

Directions:

*Print out a copy of the bat template below (or import it to Silhouette Studio; for directions on how to cut out my templates using Silhouette Studio see this post).  The bat template minus the hat could also be used if you're looking for some cutesy Halloween decor.


*Cut out the pieces of the template.  Trace the bat shape onto black cardstock, the main hat piece onto red cardstock, and the other two hat pieces onto white cardstock.

*Glue together the hat pieces and then glue the hat onto the bat.

Thursday, November 16, 2017

DIY Quote Jar


     Whether you need a good laugh or motivation, a quote jar may be for you.  Fill with your favorite humorous phrases from family and friends, inspirational or motivational quotes, or whatever else you would like to read.  Pull from the jar daily, when you need a good chuckle, or whenever you see fit.

Materials:

*Glass jar
*Printed or handwritten quotes
*Paper, markers, and whatever else you would like to make a label
*Scissors
*Mounting tape

Directions:

*Print out or write down quotes.

*Cut out the quotes and fold them in half, and then in half again.

*Place quotes inside the jar.

*Design a label.  Tape it to the jar.

Sample quote from my jar:

“I make as much sense as squash, mutated squash that eats people” – Brian

Thursday, October 19, 2017

Horror DVD Wall Art


     Looking for a fast, easy, and inexpensive Halloween decor idea?  If you have some horror DVDs with cover art you'd be willing to remove from the case, this may be the craft for you.

Materials:
*Horror DVD cover art
*Black cardstock
*Document sized or 8" x 10" black matching photo frames
*Mounting tape or gluestick
*Pencil
*Scissors

Directions:

*Cut cardstock to fit inside the frame.

*Cut the front cover portion of the DVD cover off from the rest of the cover.

*Center the front cover on the cardstock.

*Glue or tape down.

*Place the cardstock and cover art inside the frame.

This year I decided to go with a Stephen King movie theme.  For this, I used cover art from Creepshow 2, Pet Sematary, The Mist, Storm of the Century, Rose Red, and Sleepwalkers.  I have tons of horror movies, though, so maybe I'll switch things up next year.

Here's a closer look at a few of the frames.

Thursday, July 27, 2017

Legendary Pokemon Articuno Paper Earrings


     This past weekend Pokemon GO released the first of the legendary Pokemon, including Team Mystic mascot Articuno.  Articuno is my favorite legendary bird, so I knew I had to make some craft to mark this event.  These earrings are made from cardstock, so they're not the most durable, but they're great for a costume or party favor.

Materials:
*Light blue cardstock
*Dark blue cardstock
*Ear wires
*All purpose adhesive
*Pencil
*Coin (I used a half dollar, but my earrings are pretty large, so you may want to use a smaller coin)
*Scissors
*Needle

Directions:

*Using the template below, cut out two Articuno shapes from the lighter blue cardstock.  This will work a lot better if you have a Silhouette CAMEO or other die cutting machine, but you could cut and trace.


*Trace your coin onto the darker blue cardstock to create two circle shapes.

*Cut out the circle shapes and glue the Articuno silhouettes to the circles.

*Use a needle to poke a hole in the top of each of the circles.

*Slide the ear wires through the holes.


Friday, July 7, 2017

A Different Kind of Scrapbook


     When I was a kid, my mom used to clip the comics from the Bangor Daily News and paste them into notebooks.  She created many volumes in this fashion.  My siblings and I got a kick out of reading them and they provided a source of comfort when we were home from school sick.  These collections of comics were a form of scrapbook.
     While many of us today associate with scrapbooking the art of preserving pictures, historically scrapbooks have been collections of "scraps" and memorabilia.  Articles, images, anything the scrapbooker thought was worth preserving could be pasted inside a book for safekeeping.  While some are themed, others, like mine, are a hodgepodge of collected tidbits.
     To get started, all you need is a notebook, a glue stick, and some "scraps" to paste into your book.  My book is still a work in progress and so far it includes comics, newspaper clippings, tear off calendar pages, cat memes, and infographics, among other things.

Materials:
*Notebook
*Glue stick or mounting squares
*"Scraps" such as comics, articles, images, etc.
*Markers or other decorating tools (optional)

Directions:
*Glue "scraps into your notebook.  Decorate as you wish with markers or other embellishments.

Thursday, June 15, 2017

DIY Starry Sky Streamers and Garland


     Starry streamers are a perfect decorations for sleepovers (or un-slumber parties), space themed parties, and many more.  They are inexpensive to make, but a bit time consuming (it took me hours to glue on all those stars), so be aware of the time investment before you get started.

Starry Sky Streamers

Materials:
*Black streamers
*Silver star sequins
*All purpose adhesive
*Scissors
*Tape measure
*Tape

Directions:
*Measure the width of your door and the width of your streamers and divide the width of the door by the width of the streamers to figure out how many streamers you'll need.
*Measure the height of your entryway and cut out streamers that are approximately this height.
*Glue on stars.  Originally I was gluing on diagonal stripes of three, one star at one side, the next higher up and in the middle, and the last still further up and at the other side.  However, this proved to be very time consuming, so I switched to alternating stars from one side to the other spaced as far apart as I thought I could get away with.
*Let dry.  Tape finished streamers above the entryway.

Star Garland

Materials:
*Silver glitter cardstock
*Pencil
*Scissors
*Black ribbon

Directions:
*Find a star template online, resize to the desired size, print, and cut out.
*Trace the template onto the back of the glitter cardstock to create as many stars as you'd like for your garland.
*Glue the stars to the ribbon.  Let dry.

Thursday, June 8, 2017

DIY Slumber Party Photo Booth Props


     Photo booth props make most any event more fun and DIY ones cost little to make.  With sleep masks and nail polish bottles, plus fun favorites like crowns and star glasses, these props are bound to be a hit at your next slumber party.  If you have a Silhouette CAMEO, load the templates into Silhouette Studio and you'll finish these props in a flash.

Materials:
*Cardstock in various colors
*Bamboo skewers or wooden dowels
*Scissors
*X-acto knife
*Rhinestones
*Duct tape
*Pencil
*All purpose adhesive

Directions:

*Resize and print out the templates given below:


*Cut out the templates and trace onto colors of cardstock of your choosing.

*Cut out and glue together the pieces of each prop.

*For the crown, once you've cut out the crown shape, glue on some rhinestones.

*Attach the bamboo skewer using duct tape.

Thursday, April 20, 2017

Quick and Easy Card Scrapbook


     For me, cards have long posed a storage challenge.  If you've been following my blog for some time, you've probably seen my various card scrapbooking attempts.  Each one has its charm, but I needed something fast and easy that would work for oversized and musical cards.  I have some antique family photo albums on which my ancestors glued photos to black paper and I decided to use the same idea here.

Materials:
*Cardstock in a color of your choice
*All purpose adhesive
*3-ring binder
*3-hole punch
*Cards

Directions:
*Take a sheet of cardstock and punch one of the long edges so that it will fit into your binder.
*Glue on cards and other mementos.  My dad rarely signs his cards, so I included envelope pieces as well on many of the pages.
*If you have cards that you can't glue down or don't want to glue down, stick them in the pockets of the binder.


Friday, February 24, 2017

Zombie Paper Snowflake


     Here in Maine, we're still in the throes of winter, with no end in sight, so I figured I might as well make something wintery.  I was scrolling through Pinterest when I saw this zombie snowflake.  It looked really neat, but also like it would require amazing fine motor coordination to make without the aid of a paper cutting machine.  While I do have my trusty Silhouette CAMEO, I know many who read my blog don't, and I wanted to see if it would be feasible to make a zombie snowflake by hand.  Here are my results.

Materials:
*Printer paper
*Scissors
*X-acto knife
*Pencil

Directions:

*Cut out a circle the size you would like your snowflake to be and fold it into sixths, following the directions in six-pointed paper snowflake tutorial.

*Draw on your zombie design.


*Cut out what portions you can using scissors.


*Use an X-acto knife to cut out fine details, which in this case was the x-eyes.  I also decided to add some more details after the fact, so that's why there's a new pencil line on this picture.