Showing posts with label Christmas. Show all posts

Thursday, December 20, 2018

DIY Winter Hat Ornaments: Two Techniques


     These winter hat ornaments are easy to make and if you already have some yarn on hand, they cost next to nothing to make.  They're the perfect craft for holiday parties or family time.

Materials:

*Yarn
*Toilet paper tube (or cardstock)
*Ruler
*Scissors
*Pom pom (needed for one technique, but not the other)
*All purpose adhesive (needed for one technique, but not the other)

Directions:

*Cut a 1/2" tall ring from the toilet paper tube.  If you don't have an empty toilet paper roll handy, cut off a 1/2" thick strip of cardstock and glue or tape the ends together such that the cardstock forms a ring with about the same diameter as a toilet paper tube.


*Cut off a 10" length of yarn and fold it in half.

*Insert the yarn into the ring such that the loop pokes out from the bottom of the ring like this:


*Slide the ends of the yarn through the loop like this:


*Pull tight so you end up with something like this:


*Repeat until the ring is full:


*Cut off another piece of yarn and tie it around the other strands of yarn like this:


*Turn the other way:


*To finish, glue on a pom pom.

Alternate Technique

*Once you have finished tying on all the pieces of yarn, flip the other way.


*Cut off an additional length of ribbon and tie around the hat.


*Trim above the place where you tied the additional piece of yarn to create the pom pom shape.


Thursday, December 13, 2018

DIY Harry Potter Inspired Magic Wand Ornaments


     These magic wand ornaments are inexpensive and easy to make and are great gifts for magic lovers of all ages.  In addition to ornaments, these could serve as wands for dolls or stuffed animals (see this post for a different miniature wand tutorial).  If you put up a Halloween tree, these ornaments could be great for that too.

Materials:

*Toothpicks
*Clay
*Paint
*Jump rings
*Thread or thin ribbon
*Paint brush

Directions:

*Take your toothpick and form a handle covering the end of it using clay.

*Insert the jump rings into the end of the handle such that about half of the ring is embedded in the clay.  This will be where you hang your ornament from, so make sure it's in securely.

*Add details to the clay if you would like to.  You don't want to do the detail work before adding the jump rings, or you may squish your design in the process.

*Once you're satisfied with the design, bake clay in the oven following the directions on the packaging.  I baked mine for about 8 minutes at 225° F.

*When the ornaments have cooled sufficiently, paint the wands in whatever colors you would like.  Let dry.

*Loop some ribbon or thread through the jump rings so you can hang your wand from your tree.

Thursday, December 6, 2018

Christmas Lights Nail Art


Materials:

*Gold nail polish or other "background" color
*Nail polish in the colors you would like the lights to be
*Black nail art pen
* Clear base/top coat
*Very fine nail art brush

Directions:

*Paint your nails gold or whatever color you chose for your "canvas."

*Using your nail art pen, draw two lines that oscillate up and down on each nail.

*Draw 4-5 lines perpendicular to each wavy line, with the first one pointing up, the second one pointing down, the third one pointing up, etc.  These are where your light bulbs will go.

*Using the nail art brush, paint the bulbs.  It's okay if they're not lopsided or not perfectly bulb shaped.  If you look at my nails up close, you can see many imperfections and asymmetries, especially on my right hand.  People will still get the idea.

Thursday, November 29, 2018

Homemade Holiday Photo Cards


     Holiday card printing services can be expensive, particularly if you have a long list of people to send cards to.  Printing cards from home can be a cheaper alternative.  Here's how to create nice looking holiday cards from home.

Materials:

*Computer with photo editing program such as Adobe Photoshop
*Digital photos for your card
*Holiday-themed scrapbooking paper (optional)
*Color printer
*Matte photo paper in the dimensions that you would like your cards to be
*Glitter or metallic gel pens (optional)
*Glitter cardstock (optional)

Directions:

*Design your card in your photo editing program.  Brian constructed our card, so I can't adequately explain the process, but this tutorial shows you how to create photo cards in Photoshop.

*Insert matte photo paper into the printer and print your card.  You can use cardstock if you're in a pinch, but the pictures won't be as crisp and the colors may be a bit muted.  Here is a comparison:


*Glitter and shiny embossing are two features that can really make holiday cards stand out.  Add some shimmer to your cards by tracing the text with glitter gel pens.


*Create a frame for your photos from glitter cardstock to give your cards some extra sparkle.


Friday, November 23, 2018

DIY Ornament Throw Pillow


     Here's a craft I've been wanting to make for years, ever since I stumbled across it on Pinterest.  For a while, it sat in a pin board, and I would admire it every time I scrolled past it, thinking, "Maybe someday."  I didn't trust my sewing skills enough to imagine that I could succeed at making something like that.  However, after sewing a romper by hand earlier this year, I realized that I'm actually okay at sewing and decided to take the plunge.  My ornament throw pillow didn't turn out picture perfect, like the ones I saw online, but it still looks pretty decent.
     Since I got the idea and template from Studio DIY, I'll leave it to them to explain how to craft this pillow.  I will, however, describe some of the issues I faced in crafting my pillows explain what worked for me.  So, head on over to Studio DIY for the directions and template, and then head back here to learn a little more about what I found tricky when making my pillow and how I overcame the issues that cropped up.

Tips:

*If you are not used to working with slippery fabric, I strongly caution against using it here.  Yes, it makes for a lovely pillow, but it can be a pain to work with.  Every time I tried pinning it, something slipped somewhere and I ended up with one end kind of lined up while the other was completely not.

*If you're struggling with pinning, try using painter's tape to hold the edges together.  It is still a pain to work with, as it does not adhere to the fabric well, but I had much better luck when I switched over to painter's tape.

*Instead of removing the painter's tape as you go, you may find it helpful to see through the tabe and then cut the tape off at the end, rather than peeling it as you go.

*The ends of the rope I used to make the ornament hook were uneven and a bot frayed, so instead of hot gluing the ends directly to the ornament cap, I cut small slits in the topper so I could slide the ends of the rope inside and then glued them in place.  I'm not sure if that worked out better or worse than hot gluing the ends to the ornament cap, but that's how I did it.

Friday, December 29, 2017

Sequined Glitter Ornaments


     Step up your glitter ornament game with some fun sequins.

Materials:
*Plastic or glass ball ornaments
*Ultra fine glitter
*Shaped sequins
*Glitter It adhesive

Directions:
*Layer your work space with newspaper.
*Uncap your ornament and pour in some Glitter It.  Swirl the adhesive around until it has coated the entirety of the inside of the ornament.
*Pour excess adhesive back into the bottle.  Let the adhesive drain out for about 15 seconds.
*Pour some sequins into the ornament.  They will likely stick where they land, so i
f you pour them straight into the bottom of the ornament, you'll have a lot of sequins clustered toward the bottom of the ornament.
*Shake the ornament gently to move sequins onto the sides of the ornament.
*Open a container of glitter and pour into the ornament.  Swirl the glitter around inside the ornament until it has coated the entire ornament, adding more glitter as necessary.
*Pour any excess glitter back into the container.
*Place the top back on the ornament.


Thursday, December 21, 2017

Gift Genie: DIY Last Minute Gift Finder


     Need a last minute gift?  Unsure what to get?  Let the gift genie decide!  Better yet, if the recipient is indecisive, give them their very own gift genie to make their future holiday shopping a breeze.


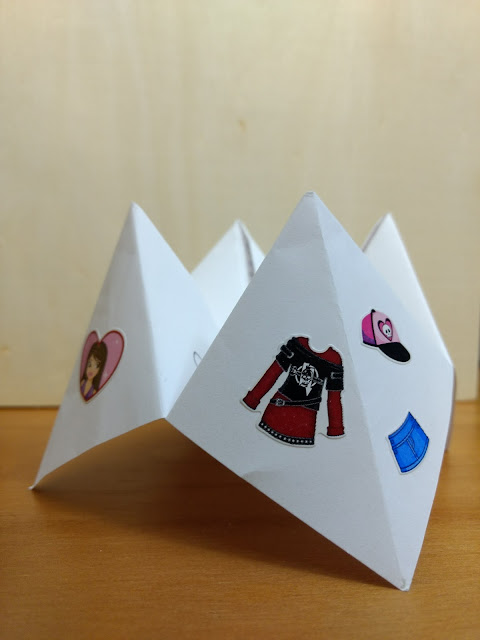
     The "gift genie" may look like your run of the mill "cootie catcher," but it has the power to help you choose some gifts or at least get a few chuckles.  I got this idea from the "It's Different Every Day" calendar.  They had a foldable "psychic gift guide," which I had to play with.  I actually ended up ordering one of my sister's Christmas presents based on the guide's suggestion.  It was such a cute and fun idea, I thought, why not make one of my own?  My gift genie is actually a re-gift genie and it's meant more for laughs than serious suggestions.  However, if you need serious suggestions, the gift genie can provide that too.  See the end of this post for possible gift ideas your gift genie could include.

Materials:

*Paper
*Pencil
*Stickers (optional)

Directions:

*Begin by folding the sheet of paper diagonally.


*Cut off the excess paper that goes beyond the fold.


*Unfold so that your paper forms a square and then fold in half diagonally going between the opposite corners of the original diagonal fold.


*Unfold the paper.


*Fold one of the corners to the center of the paper.


*Fold the remaining corners to the center in the same fashion.


*Flip the paper over and fold one corner to the center of the paper.


*Fold the remaining corners to the center.


*Number the triangles created by the folding 1-8.  Lift up the flaps and write a gift idea under each number.  Fold the flaps back to the center.

*Fold in half.


*Decorate the resulting squares using words, stickers, colors, or other things you can spell out.  I used stickers corresponding to different gift categories: clothes, shoes, makeup, and music (although these did not match the gift ideas beneath the flaps).

*Slide your fingers under the flaps and use as you would a "cootie catcher."

Ideas for gifts:

*Gift card to a favorite store
*Jeans
*Sequin top
*DVD with Jiffy Pop, popcorn seasonings, movie theatre candy
*Boots
*Craft scissors, if they're a crafter
*Concert tickets or other experience related gifts (see here for other experience ideas)
*DIY coupons (e.g. for a nice dinner, a back rub, a day trip, see here for design ideas)
*E.L.F. gift card
*Framed quote (see here for DIY idea)
*Pokemon themed gifts (see herehere, here, here, and here for DIY ideas)
*Lip balm (a good stocking stuffer; see here, here, and here for DIY ideas)
*Earrings (see here for DIY clay owl earrings)

Ideas for re-gifts:

*A rusty paperclip
*Out of season hand towel
*Holiday card with previous recipient's name scratched out
*Strongly scented lotion that has been sitting under the bathroom sink for at least three years
*Unusable nick knack that is at least one foot tall
*Well circulated state quarters
*Item from the back of your closet
*Half used candle

Thursday, December 14, 2017

Faux Fireplace


     Hanging stockings above a fireplace is a Christmas tradition for many, one that I've never been able to participate in because I've never lived in a house with a fireplace.  So I decided to make my own.  This is also a perfect way to get the holiday vibe if you're not a fan of open flames.

Materials:

*Foam board
*Box cutter
*Red cardstock
*Orange cardstock
*Yellow cardstock
*Black cardstock
*Glue
*Gluestick
*Pencil
*Ruler

Directions:

*Decide what size you would like your fireplace to be.  If you'd like to see flickering flames in your fireplace, perhaps size it so that it can be taped to the edges of your TV or computer monitor.

*With a pencil and ruler, mark out the dimensions you would like your fireplace to be.


*Cut out the fireplace shape using a box cutter.


*Determine what dimensions you would like your bricks to be.  Cut out appropriately sized brick shapes from the red cardstock and arrange along the foam board.  Once you're satisfied with the arrangement, glue down.


*If you're not planning on placing your fireplace over a TV or monitor, you'll need a fire to go in your fireplace.  Start by gluing together as many sheets of black cardstock as you need to fill in the opening in your fireplace.

*Sketch or trace flame shapes onto the orange and yellow cardstock.

*Cut out flame shapes and glue them to the black cardstock.

*Glue the black cardstock to the fireplace such that you are able to see the flames when looking at the fireplace.


Tuesday, December 12, 2017

DIY "Ugly" Christmas Cat Sweater: Now with Ornaments!


     In my "ugly" Christmas cat sweater craft instructions, I mentioned that you could add mini ornaments to the cat's garland.  I finally got around to getting some for my own sweater a few hours before the physics department holiday party.  The ornaments I got came with strings rather than hooks.  I didn't want to tie the ornaments onto the sweater because permanently affixing them would make it difficult to wash the sweater, so I needed to come up with ornament hook substitutes.  What did I use?  Staples.  Read on to find out how to make mini ornament hooks from staples.

Directions:

*Separate one staple from the rest of the staples it is affixed to.

*Slide the mini ornament over one end of the staple.

*Fold the staple over, closing the mini ornament inside.

*Fold the other end of the staple down a little to create a hook that you can use to hang up the ornament.  Now your ornament is ready!

Thursday, December 7, 2017

Santa Bats


     These little bats are here to spread some holiday cheer.  What, you didn't picture bats as Santa's helpers?  Bats get a bad rap, but these cuties are more than happy to add some whimsy to your Christmas decor.
     I wish I could take credit for this idea, but I didn't come up with it.  I walked into my department's main office earlier in the week and lo and behold, there were bats with Santa hats on the walls:


They were so adorable, I decided I had to make some of my own.  Here's how I made my variant.

Materials:

*Black cardstock
*White cardstock
*Red cardstock
*Scissors, pencil, and X-acto knife (or Silhouette CAMEO)
*All purpose adhesive

Directions:

*Print out a copy of the bat template below (or import it to Silhouette Studio; for directions on how to cut out my templates using Silhouette Studio see this post).  The bat template minus the hat could also be used if you're looking for some cutesy Halloween decor.


*Cut out the pieces of the template.  Trace the bat shape onto black cardstock, the main hat piece onto red cardstock, and the other two hat pieces onto white cardstock.

*Glue together the hat pieces and then glue the hat onto the bat.

Thursday, November 30, 2017

DIY "Ugly" Christmas Cat Sweater


Materials:

*Sweatshirt
*Tinsel ribbon
*Felt in the color of your choice (for the cat)
*Small beads (for the cat's eyes)
*Needle
*Thread
*Scissors
*Metallic marker
*Safety pins
*Mini ornaments (optional)
*Mini LED light string (optional)

Directions:

*Trace the cat silhouette given in the template below (or any cat silhouette of your choice) onto the felt and then cut out the cat shape.


*Sew the beads onto the felt to give the cat eyes.

*Wrap tinsel ribbon around the cat.

*Pin the cat onto the sweatshirt using safety pins.  Try on the shirt to make sure you like the placement of the cat before you begin sewing.

*Sew the cat onto the shirt.

*Optional: Hang mini ornaments from the tinsel ribbon.  I'm hoping to pick some up over the weekend to add to mine.

*Optional: Thread a mini LED light string through the tinsel.  For mine, I placed the battery pack in my back pocket, wrapped the lights around my waist once, and then pulled them through the ribbons wrapped around the cat.


Thursday, December 22, 2016

Felt Soda Bottle Ornament


     Are you or one of your loved ones as much of a soda fiend as I am?  These felt soda bottle ornaments make a great gift or addition to your tree and are inexpensive, customizable, and relatively easy to make.

Materials:
*Felt in the colors you'd like your soda bottle and label to be
*Needle and thread
*All purpose adhesive
*Sequins or other embellishments (optional)
*Metallic markers or chalk
*Stuffing

Directions:
*Resize the below template to the desired size and print.


*Trace two copies of the soda bottle onto the felt in the color that you would like your soda bottle to be and one copy of the label onto the color of felt you would like the label to be.  Cut out the bottle and label shapes.

I forgot to take a pic of the shapes before I decorated the label, so that's why it's already decorated in this pic.

*Decorate the label as you see fit.  I haven't done much embroidery before, but figured now was as good a time as any to try my hand at it.  I didn't appropriate adequate space for everything I wanted, as you can see, so some of the lettering/designs ended up getting squished together, as you can see.  If embroidery seems intimidating, but you'd like to add letters to your label, fabric paint could be a good alternative.


*Glue the label onto one of the bottle shapes.


*Place the two bottle shapes together, label side facing out, and stitch together using the blanket stitch.  Leave an opening at the bottom for adding stuffing.

*Add stuffing and sew closed.

*Tie some thread to the top of the bottle to create a loop for hanging up your ornament.

Thursday, December 15, 2016

DIY Pet Stocking


     Include your favorite four footed family member in your holiday celebrations with this adorable mini stocking.  (Looking to make a full sized stocking?  See this post.)  This tutorial also works for a stocking ornament.  For the record, Beans is not actually my cat; he belongs to my brother and his girlfriend, but as Beans's "aunt," it is my duty to spoil him.  Don't tell him, but he's getting a l-a-s-e-r p-o-i-n-t-e-r for Christmas :).

Materials:
*Red felt
*White felt
*Needle and thread
*Fabric paint or glitter glue
*All purpose adhesive
*Metallic marker or chalk

Instructions:
*Draw a stocking shape or find a free printable stocking template online and size to your desired size, then print.
*Trace two copies of the stocking shape onto the red felt and cut out.
*Trace only the upper part of the stocking onto white felt to create the name band for the stocking.  Cut out.


*Glue the white parts of the stocking to the top of the red parts.  Let dry.


*Fold the two stocking shapes together such that the white part faces in and stitch together, leaving the top edge unsewn.


*Turn the stocking right side in, starting from the toe and working your way up.


*Write your pet's name on the white band of the stocking using fabric paint or glitter glue.  Let dry.


*If you'd like to hang the stocking from the mantle or tree, thread the needle and slide it through the upper corner at the top of the stocking.  Tie the ends together to create a loop.  Cut off the needle part and excess thread and then turn the thread until the knot hits the inside of the stocking, hidden from sight.  Now the little stocking is finished!

For size comparison, here is Beans's stocking next to mine.  As you can see, it's rather tiny, just big enough to fit a l-a-s-e-r p-o-i-n-t-e-r.