Friday, April 20, 2018

Alice in Wonderland Hair Bow + Costume Ideas


     My old Alice in Wonderland hair bow has served me well since high school, but I figured that with my new Alice look, it was about time to change things up.  Here's how I made my hair bow, plus a peek at my new Alice look.  Let me know how you think it compares to my old Alice look (see also the bottom of this post for a more recent pic).

Materials:

*Black ribbon as wide as you'd like your bow to be
*Thinner black ribbon
*Black headband
*All purpose adhesive
*Needle and thread (optional)

Directions:

*Cut a strip of black ribbon a little more than twice as long as you'd like the bow to be.

*Glue together the ends of the ribbon.

*Pinch the middle of the ribbon to form a bow shape.

*For me, it was helpful to put a couple of stitches into the pinched part of the ribbon to get it to retain its shape.  If your ribbon is really stiff like mine was, this step may be helpful, but if not, feel free to skip to the next step.

*Take the thin ribbon and glue one end to the back of the bow at the location of the pinch.  Wind it around and then glue down the other end along the back of the bow.  Let dry.

*Glue the bow to the headband.  Let dry.

Get This Look

     If you're hoping to use some pieces from my Alice look (pics below in the photo shoot section), I've linked to the parts of my look that I can.  Unfortunately some of the items are old or were gifts, so I don't have links for everything.  The faux suede notched romper I got from Charlotte Russe, although it looks like they might not have it in blue anymore.  Just be aware if you buy it that it has no padding whatsoever.  The locket I got as a gift and I have no idea where it came from.  It's hard to see in these pictures, but it's a key shaped pendant with a heart shaped locket attached to the top part of the key.  The letter "A" is engraved into the heart, perfect for Alice as well as Amber.  The boots I also have no idea where they came from.  I didn't have a lot of shoe option that I thought worked with the rest of the outfit.  I'm probably going to keep my eyes out for some more Alice-like shoes.  The silver fishnets came from Amazon.  My pearl earrings came from G. M. Pollack & Sons, which is sadly no longer in business.  The pearl cat ring came from Kay Jewelers.
     For makeup, we just did my eyes and lips (plus some e.l.f. translucent powder.  I think this is the one, although the packaging looks different from mine, which is older).  The makeup style we went with was similar to the one I used for my Yellow Ribbon photo shoot, except I opted for blue eyeshadow instead of purple.  Almost all the makeup was from e.l.f., but there are more details in my Yellow Ribbon post.  For my nails, I painted them using the technique outlined in this blog post.

Photo Shoot

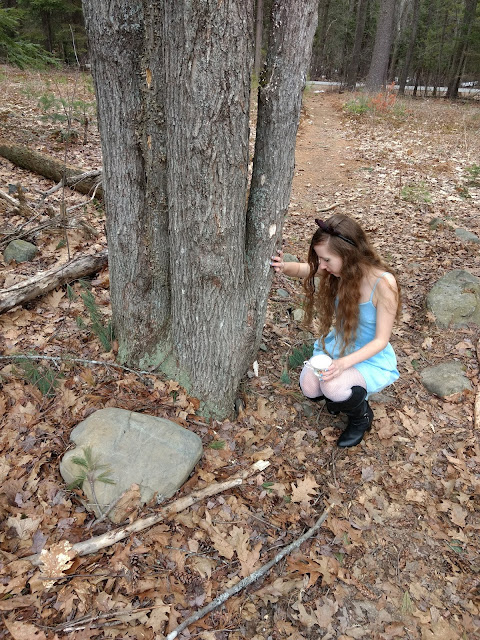
     I wanted to show off my new hair bow with my Alice look, so I convinced Brian to do a photo shoot for me.  We live in Maine, so even though it's technically spring here, the weather refuses to do anything remotely spring-like.  It was about 31 degrees F outside, so not pleasant to be standing around in a romper in, but I decided to brave it anyway.  Here are some of the pictures Brian took.


     And lastly a selfie, so you can see my nails with the romper.


Sunday, April 15, 2018

Alice in Wonderland Inspired Nails


     I just got a new romper that looks like something Alice in Wonderland would wear, so I decided to put together an Alice in Wonderland look.  Next week I'll show you the outfit, but today we'll focus on the nails.

Materials:

*Light blue nail polish
*White nail polish
*Black nail art pen
*Glitter top coat
*Base coat
*Clear top coat

Directions:

*Paint nails with the base coat.  Let dry.

*Place masking tape over the upper portion of your nails where you want the white polish to go.

*Paint the exposed portion of your nails blue.  Let dry.

*Paint the exposed portion of your nails with the glitter coat.  Let dry.

*Peel off the masking tape and paint the tips of you nails white.  Let dry.

*Once the polish is dry, use the nail art pen to draw a line between the white and blue parts of your nails.  Let dry.

*Seal with a clear top coat.

Sunday, April 8, 2018

DIY Blood Splattered Nails


     Celebrate Friday the 13th with these blood splattered nails.  To be honest, I had completely forgotten about Friday the 13th until Brian mentioned it.  I saw splatter paint nails online and realized I could use the same technique for blood splattered nails because of course that's where my mind went.  It was only after I had painted my nails that Brian mentioned Friday the 13th, so I would have had blood splattered nails in the middle of April anyway, but if you need an excuse to join me, now you have one.

Materials:

*Base coat
*Top coat
*White nail polish
*Crimson nail polish
*Thin straw or coffee stirrer
*Nail polish remover or clean up pen

Directions:

*Paint nails with the base coat.  Let dry.

*Paint nails with white (or other light colored) nail polish.  Let dry.

*Dip the end of the straw into the crimson nail polish.  Over a well covered work space, blow the nail polish onto your nails one at a time.  Repeat until each nail is sufficiently bloody looking.  Let dry.

*Seal with a top coat.  Let dry.

*You will probably have a ton of excess nail polish on your hands at this point in time.  Clean up with nail polish remover and/or a nail polish clean up pen.

Sunday, March 25, 2018

Pastel Easter Egg Nails


     Get ready for Easter with these Easter egg inspired nails.

Materials:

*Pastel nail polish in five colors
*White nail art nail polish
*Nail art dotting tool
*Glitter nail polish
*Base coat
*Top coat

Directions:

*Paint nails with base coat.  Let dry.

*Paint each nail on a given hand a different pastel color.  Let dry.

*Using the nail art brush, paint one nail on each hand with horizontal stripes and another with diagonal stripes.

*Using the dotting tool, add dots to one nail on each hand.

*Add a glitter coat to one nail on each hand.

*Let nails dry.

*Seal with a clear top coat.

Saturday, March 17, 2018

Sparkly Bottle Cap Refrigerator Magnets


Materials:

*Bottle caps
*Paint in color of your choice
*Glitter nail polish
*Magnet
*All purpose adhesive
*Paintbrush

Directions:

*Paint bottle caps in a color of your choice.  Let dry.

*Paint over dry paint eitw glittery nail polish.  Let dry.

*Add magnets to the insides of the bottle caps with all purpose adhesive.

Saturday, March 10, 2018

Alice in Wonderland Playing Card Nail Art


     Looking for a fun but subtle way to incorporate Alice in Wonderland style into your look?  Or perhaps you need some ideas for an Alice in Wonderland costume?  Try these Alice-inspired playing card nails.

Materials:
*White nail polish
*Red nail polish
*Black nail polish
*Base coat
*Top coat
*Black nail art pen
*Thin nail art brush
*Plastic lid
*Cleanup pen (optional)

Directions:

*Paint nails using the base coat.  Let dry.

*Paint nails white.  Let dry.

*Paint nail tips alternating black and red.  I used a small amount of polish to paint a line going across the nail to mark out where I wanted to paint and then used more polish to color in the tips.  Let dry.

*Using nail art pens or a nail art brush, paint a playing card symbol onto your fingernails and A's onto your thumbnails.  The white polish I used had a nail art brush, which made it easy for me to clean up the edges of the diamonds.  I highly recommend using a thin brush for touching up mistakes.  Let dry.

*Seal with a top coat.  I've found that by touching up the edges of my nails with the top coat as small chips start to form, I can keep the polish intact for about a week.  With these ones, I also ended up touching up the tips with red as needed.  The picture of me as Alice (below) was taken six days after I painted my nails and you can see they still look mostly fine.


Thursday, March 1, 2018

50 Reasons


     This post was inspired by a project that my local UMaine chapter of Active Minds put together.  During the fall semester, members of Active Minds asked students to write down positive things that tomorrow could bring on squares of paper.  They collected 1,100 squares, one for each student in the U.S. who dies by suicide each year, and assembled the squares into a quilt.  According to Sarah, President of the UMaine chapter of Active Minds, the goal of creating the quilt was to, "inspire hope, positivity, and optimism for the endless possibilities of tomorrow.  It's finished project symbolizes at least 1,100 reasons to stick around for another day."  The quilt, which was displayed at Fogler Library, provided a powerful visual reminder of what good the future could bring.  Some of my personal favorite suggestions were Halloween, cats, and playing Pokemon GO, but there were all sorts of ideas from foods to activities to goals that people could look forward to.


The quilt on display at Fogler Library

     Filling out some squares was cathartic for me and I thought it might be nice to adapt a smaller scale version of this project for my craft blog.  All of us have our rough days and it can be nice to have a visual reminder of the things we have to look forward to.  I came up with a list of 50 things I like and goals I have, but you could come up with any number of reasons that works for you.  I originally wanted to arrange the squares in a quilt, but I didn't have enough space on my wall, so I arranged them around existing artwork.  You could arrange them in any pattern you'd like.

Materials:
*Sticky notes
*Marker or pen

Directions:

*Write things that you like or goals that you have on sticky notes.  You can do this yourself or with a group of friends.

*Arrange the sticky notes in whatever pattern you would like to.