Thursday, May 28, 2020

Our Alice in Wonderland Virtual Wedding Ceremony


     Brian and I got married on Friday, May 22nd, 2020.  While the ceremony was certainly different from what I had envisioned six months ago when I started planning, it was one of the best days of my life.  The joy of seeing so many friends and loved ones, either virtually or in person, and standing up with the love of my life celebrating our union, kept the perfectionist in me from noticing the little things that fell by the wayside.  Sure, we were late to the venue, and didn't have the time to put up some of the decorations I had painstakingly created for this event, and we had plenty of Zoom and internet issues, but these were nothing more than blips on my radar.  If you are currently planning a wedding, especially if things are now up in the air or you've had to change your plans substantially, I want to say that while stressful now, in my experience, none of those issues will matter in the end.  I was so happy to be marrying Brian that it did not matter on the day of if not every detail was Pinterest perfect.
     For the rest of this post, I'll walk you through the day with photos, but I also made a brief video of our day, which I have included below:


Our Wedding


     Brian and I got married at the ornamental gardens at the University of Maine.  The funny thing was, when we started talking about getting married, the gardens had been our first idea, since it is a lovely venue and UMaine is where we met.  We ended up selecting Penobscot Valley Country Club instead because it was more wheelchair accessible and I wanted to have a venue that my grandmother could navigate easily.  Unfortunately, once COVID hit, we realized we would no longer be able to have my grandmother there in person, and so when we got to the stage of downsizing and changing venues, we knew the gardens would be the right choice.  I love the flowering trees, and they were in full bloom that day, making for the perfect backdrop for our ceremony.  We still hope to do a vow renewal ceremony at PVCC next May.


     I figured I would include this zoomed out shot to give you a sense of where our guests were situated for the ceremony.  My brother was also there, although he did not make it into this picture.


     Here Brian is, reciting his vows.


     And here I am, reading mine.  Some say you should make sure your vows and your partners' vows are roughly the same length, but we didn't bother with coordinating vows.  Brian's were short and to the point, which suited him well, and mine were long and sentimental, which is very me.


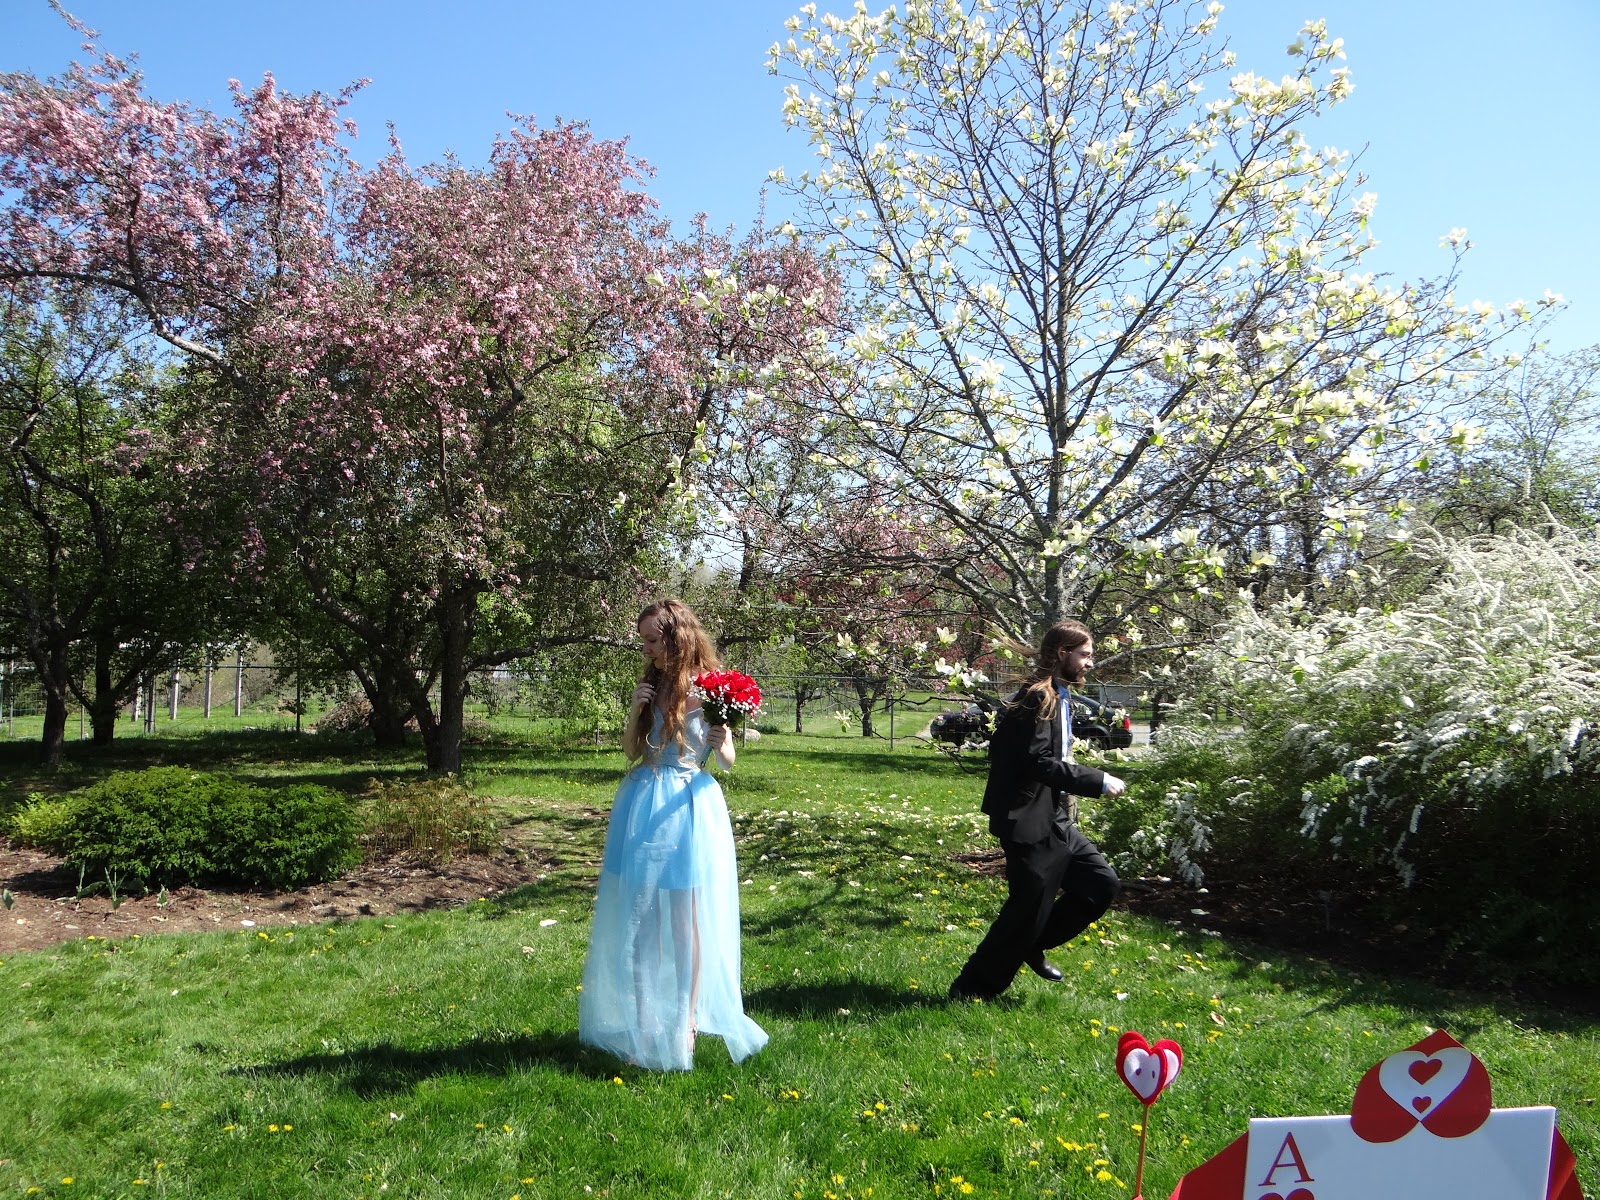
     The downside to an outdoor venue - sometimes nature gets mean.  Brian is running away from a hornet in this picture.  But not a murder hornet; those haven't made their way up to Maine yet, as far as I'm aware.


     The ring exchange.


     Brian getting chased by the hornet again.


     Taking some pictures with the family.  Even though I didn't have time to put up some of the decorations I'd made, the gardens were so lovely that it didn't really matter.  It didn't feel like we were missing something.


     I don't know if the Hathaway family knows how to take a normal picture.


     The Toner family isn't necessarily good at normalcy either.


     We had our reception in our backyard.  Here's our wedding cake.  My dad picked up these Little Debbie Fancy Cakes for us to use, and I made some cake toppers to give them a little extra flair.
     Even though our wedding was small and not at all professional, it was a great day.  I truly am lucky to have such wonderful family, friends, and partner - now husband - in my life.
     If you like wedding crafts or Alice in Wonderland crafts, stay tuned.  In the coming weeks I'll show you how I made the bouquets, the card soldiers, and how I turned a romper into a wedding dress, among other crafts.

Thursday, May 21, 2020

Shark Hair Bow


     This adorable little bow is a fun hair accessory for all ages.

Materials:

*Gray felt
*White felt
*Small black button
*Black thread
*Sewing needle
*All purpose adhesive
*Metal barrette
*Scissors

Directions:

*Cut out a strip of gray felt as wide as you would like your bow to be, and about 12" long.


*Glue the ends of the strip together.


*Cut a triangle out of one end of the felt.


*Cut out a V shape from the white felt such that when you set it inside the ribbon, the white peeks out beyond the triangle that you cut.


*Cut teeth into the V shape.


*Glue teeth inside the bow.


*Sew a black button on to make the shark's eye.


*Pinch bow in the middle.  Secure with a couple of stitches.


*Cut a shark fin from the felt and glue it to the shark's head.


*Glue the barrette to the underside of the bow.


*Cut off a strip of felt a little longer than what you would need to wind around the middle of the barrette and glue it to the back of the bow.


*Wind felt strip around the bow and secure the other end.


Thursday, May 14, 2020

Zombie Gretel (from Hansel and Gretel) Costume


     This costume came about because of a romper I found at Charlotte Russe a year or so ago.  I saw it and it just screamed Hansel and Gretel to me, not that it is anything like what a historical Gretel would have worn.  I love costumes, as many of you are aware, and so I figured I'd pick it up and save it until I had the opportunity to put a costume together.  I know this romper is a very specific garment that most of you probably won't have lying around, but if you have an old fashioned, storybook-esque dress, that would work just as well.  The props are, I think, the key to this costume.  If you haven't seen my previous posts on the props, here's how to make the lollipop and here's how to make the gingerbread plushie.


Here's another pic of the costume.


     Earlier in the day, I dressed up as a non-zombie incarnation of Gretel, as you can see in the above picture.  I only painted the blood spatters on one side of the lollipop, so if you reverse it, it looks like a normal lollipop.  At some point in time, I also want to make a cutesy gingerbread plushie to complete the non-zombie Gretel look.
     Also, if you ever need to make fake blood in a pinch, add a little red food coloring to caramel sauce and you're good to go.  If you need it to stick, you'll want to use a thicker variety of caramel sauce.  I had it on my face for at least a couple of hours, and it stayed on my face.
     I had a lot of fun with this costume, so if you're thinking about holding a quarantine costume party, I would definitely recommend.  If you do, I'd love to see what costumes you come up with.

Thursday, May 7, 2020

Zombie Gingerbread Plushie


     This zombie gingerbread plushie may be my favorite part of my costume.  Not feeling the zombie aspect?  Leave off the blood splatter and give it normal eyes, and this tutorial works fine for making a cute gingerbread plushie.

Materials:

*Light brown felt
*Light brown thread
*Sewing needle
*White paint
*Fine paintbrush or nail art brush
*Oven bake clay
*Green acrylic paint (or other gumdrop color)
*Purple acrylic paint (or other gumdrop color)
*White acrylic paint
*Red acrylic paint
*Black acrylic paint
*Brown acrylic paint
*Scissors
*Metallic marker or chalk
*Pillow stuffing
*Iridescent glitter
*All purpose adhesive

Directions:

*Print out or draw a gingerbread template.

*Cut out two copies of the gingerbread shape from the brown felt.


*Using a fine paintbrush and white paint, decorate one of the gingerbread shapes so it looks like a gingerbread cookie, except if you're going for a zombie aesthetic, give it x's for eyes.  If you have puffy fabric paint, that would probably work even better, but I didn't have any on hand, so I just used regular white acrylic paint and it worked out fine.


*Sew the two gingerbread pieces together, wrong sides together, using a blanket stitch.  Leave an opening in the gingerbread's head to add stuffing.


*Stuff and sew closed.


*Form two gumdrop shapes from oven bake clay.

*Bake the gumdrop shapes in the oven following the directions on the packaging.


*Paint the gumdrops in your chosen colors.

*While the paint is still wet, sprinkle on some iridescent glitter.  It will look a little like the sugar sprinkles on some gumdrops.


*Once the paint has dried, glue the gumdrops to the gingerbread plushie as buttons.


*Add small amounts of black and brown paint to create a crimson color.  Add crimson bloodstains to your gingerbread.

Thursday, April 30, 2020

Bloody Lollipop Prop


      Why am I posting Halloween crafts in April?  Well, a friend of mine suggested doing a costume contest as a fun self-isolation activity, and you know how much I love costumes.  Instead of saving this for Halloween season (roughly mid-July through October on this blog, unless I have a spooky themed birthday party, in which case we're talking late May-October ;)), I figured I'd post it now as an idea for something to do while you're at home.
     While I have a number of costume pieces and props on hand, I thought it wouldn't be fair to pluck something out of my stash.  I already had the clothes I wanted to use for this, so it wasn't completely from scratch, but I decided I'd make all new props.  I'll reveal the full costume as the final post in this series, but until then, see if you can guess what I dressed up as.

Materials:

*Modeling clay
*Acrylic paint in two different colors, such as pink and blue (Alternatively, you could use colorful modeling clay)
*Red acrylic paint
*Black acrylic paint
*Brown acrylic paint
*White acrylic paint
*Thin wooden dowel
*Hand saw or other wood cutting implement (If your dowel is thin enough, a box cutter will probably work just fine.  You may even be able to get away with using scissors.)
*All purpose adhesive

Directions:

*Roll out two long, thin strips of clay.  Roll them together in a spiral formation.  (Note: I originally tried dyeing the clay using food coloring, which is why one of the spiral pieces appears to have a light blue tint to it.  It didn't really work out, so that's why I'm not including instructions on that piece of the project.)


*Cut a dowel to the size that you would like your lollipop stick to be, plus an extra inch or so.

*Insert the dowel into the clay spiral in the location where you would like your lollipop stick to go.  Clay is pretty heavy, so you'll want to insert it about an inch or so into the clay so that your lollipop will be stable.


*Carefully remove the dowel.  Bake the clay in the oven according to the directions on the packaging.  Let cool.

*While the clay is cooling, paint the dowel white.

*Once the clay has cooled, paint the clay in your desired two color scheme.


*Glue lollipop to its stick.

*Mix together red, black, and brown paints to create a crimson color.

*Apply to your lollipop in a blood pattern of your choosing.  I doused my hand in crimson paint and placed it on the lollipop to try to make a bloody hand print shape, but you can't really tell it's a hand print.  A blood spatter effect might work better, which you could create by dipping the paintbrush in the crimson paint and flicking it at the lollipop.

Thursday, April 23, 2020

Rainbow Nail Art


     When I was trying to decide what nail art I wanted for my dissertation defense, Kesha's song "Rainbow" came to mind.  It's a song I listened to frequently during a rough and uncertain period of my graduate education, providing me with solace and hope, and so it seemed only fitting to bring an element of this song with me into my defense.  The opening line of the song is,"I used to live in the darkness," so I originally planned to paint all of my nails but the accent one black for the dark times I've dealt with.  On the accent nail I would have some sort of rainbow design, as the rainbow symbolizes hope and possibility throughout the song.  I ended up adding some rainbow glitter to the black nails because initially I wasn't pleased with how my nails were looking (although I think that had more to do with the beige background I originally used for the accent nails).  Even though it was primarily an aesthetic choice, you could read the rainbow glitter as light in the darkness.
     Oh, and in case you were wondering, I passed my defense.  I am now Dr. Amber Hathaway.  I can't really believe it.  It feels so surreal.


Me, post defense.  "Yeah, now I see the magic inside of me."

Materials:

*Clear nail polish base and top coat
*Black nail polish
*White nail polish
*Acrylic paint in red, orange, yellow, green, blue, and purple
*Sky blue nail polish
*Ultra fine nail art brush
*Rainbow glitter top coat

Directions:

*Paint nails with clear base coat.

*Paint four nails on either hand black, leaving the accent nail unpainted.  Paint the accent nail white.


*Using red acrylic paint, draw the first band of a rainbow on the accent nail.  You'll notice I also painted my nail a beige color.  I ended up not liking that as a base color and painting over it, so that's why I didn't include a step regarding it.


*Add in the orange band of the rainbow.


*Continue with the yellow band.


*Paint the green band.


*Paint the blue band.


*Paint the purple band.


*Paint around the rainbow with sky blue nail polish.  I used acrylic paint here because that was what I had in reach, but nail polish would probably have given a nicer finish.

*Seal the accent nail with a clear top coat.

*Add a rainbow glitter top coat to the black nails.

Thursday, April 16, 2020

DIY Face Mask Ear Savers


     Many health care providers and other essential personnel are having to wear masks that go over their ears for extended periods of time right now.  Ear savers (also called face mask adapters) can help relieve the strain and wearing on their ears.  These require only a few materials and are relatively quick to make.  If you have the resources to do so, you may want to check and see if your local first responders, other medical professionals, or anyone in your community who has to wear masks frequently is looking for donations.  Make sure to check with whomever you're hoping to donate these to first, though, as some groups may have specific needs that these will not fill.


Mary the pirate octopus serving as quality control.

Materials:

*Sturdy ribbon
*Sewing needle
*Thread
*Large buttons

Directions:

*Cut off a length of ribbon that is about 5" long.

*Fold the raw edges over by about 1/4" and hem.

*Sew buttons onto the ends of the ribbon.  I sewed through each hole three times on the four holed buttons and four times through each two holed button.  If you have a mask handy, you can use a person or a plush toy with a reasonably large head to make sure that the ear saver will hold up to strain.