Thursday, December 3, 2015

"Owl I Want for Christmas is You" Printable Ornament


Materials
*"Owl I Want for Christmas" printable (see below)
*Colored pencils
*Patterned paper
*Scissors
*Metallic thread
*Pencil
*All purpose adhesive

Directions:
*Print out a copy of the "Owl I Want for Christmas" printable.

*Color in the two circular owl panels and then cut out the shapes.
*Trace the flower-type shape onto the patterned paper, flipping over the template between traces and making sure to otherwise keep the same orientation of the template.  The scallops are not all even, so lining the two shapes up to fit can be difficult if not planned out carefully in advance.
*Cut out the flower shapes.
*Cut off a length of metallic thread and fold it in half.  Glue the ends to the back side of one of the flower shapes.
*Glue the second flower back to back with the first, making sure the two shapes fit together correctly before gluing.
*Glue the circular owl panels to either side of the flower shape.

Friday, November 27, 2015

Sales Flyer Snowflake Bows


'Tis the season for sales.  No doubt you've been inundated with countless flyers informing you of all the deals that are going on.  Instead of tossing them, use these brightly colored advertisements to make bows for your holiday gifts.  I got the idea for this craft from this site.

Materials:
*Sales flyers, magazine ads, or other brightly colored paper scraps
*Pen
*Drinking glass
*Scissors
*Brad
*Washer
*All purpose adhesive

Directions:
Note: for a video tutorial of how to make a six-pointed paper snowflake, see my Six Pointed Paper Snowflake tutorial.
*To create a six-pointed paper snowflake, choose a portion of the advertisement that you would like to use for your snowflake.  Place the glass over this space and trace around it to get a circle.


*Cut out the circle.


*Fold the circle in half.


*Fold over about 1/3 of the half circle, such that the resulting shape looks like two triangles of equal size.


*Fold the resulting shape in half to get this shape:


*Cut out triangles, semicircles, squiggly lines, etc from the folded shape.  Do not cut out the center.


*Unfold and you now have a paper snowflake.


*Repeat the above steps to create a second paper snowflake.


*Glue a washer to the center of one of the snowflakes and slide a brad through the center of the other.


*Slide the brad through the center of the second snowflake.


*Pull the two snowflakes together and fold over the prongs on the brad.  Now you have a colorful snowflake gift bow.


Thursday, November 19, 2015

Duct Tape Fall Leaves Table Runner


     I got the idea for this table runner from the duct tape leaf garland I made a couple of years ago.  If you like this craft, be sure to check out that one too.

Materials:
*Duct tape in colors of your choice
*Leaf templates or leaves and paper
*2-3 cereal boxes
*Pen
*Scissors
*All purpose adhesive

Directions:
*Print out the leaf templates given below.  Alternately, you could collect leaves of your own and trace around them to make your own set of templates.


*Choose whichever leaf templates you like and line them up along the table that you intend to place the runner on, overlapping the tips and bottoms of the leaves slightly.  You can then either measure the combined length of the leaves and compare it to the length of the table or eyeball it to determine how many of each leaf type you'll need to create your runner.
*Select one of the leaf templates.  Place about 3 strips of duct tape (or five if you're planning on cutting out two copies of the same leaf) slightly wider than the template on the inside of one of the cereal boxes, with only a slight overlap between the strips.


*Trace the leaf template onto the duct tape.


*Repeat the previous two steps until you have created as many leaves as you want for your table runner and then cut out all of the leaves.


*Line the leaves up in whatever pattern you would like, overlapping the tips and bottoms of the leaves, and then glue the tips and bottoms of adjacent leaves together.  Let dry.

Thursday, November 12, 2015

Thanksgiving Family Photos Tree Centerpiece


Materials:
*2 sheets of brown cardstock
*1 sheet of green cardstock
*1 sheet of red cardstock
*Pen
*Scissors
*All purpose adhesive
*Digital photos, computer, and printer
*Markers (optional)

Directions:
*Resize the below template to the desired size and print.  Alternately, if you have a Silhouette CAMEO, you can import this template into Silhouette Studio and have your machine cut out the pieces for you.  For a description of how to use my templates in Silhouette Studio, see this post.


*Trace each of the shapes twice, except for the leaf, which you can trace as many times as you would like.  Trace the tree and the extra set of roots onto brown cardstock, the half oval shape onto green cardstock, and the leaf onto red cardstock.  Cut out your shapes.


*Line up the two tree templates and glue together the top parts, but leave the rooty bottom part unglued, like this (you can see a double image at the bottom, where it's unglued, but not at the top, where it's glued together):


*Slide one of the green half ovals between the two trees and glue the roots to it.  Let dry.


*Glue the extra root pieces to the other green half oval (see above).  Let dry.
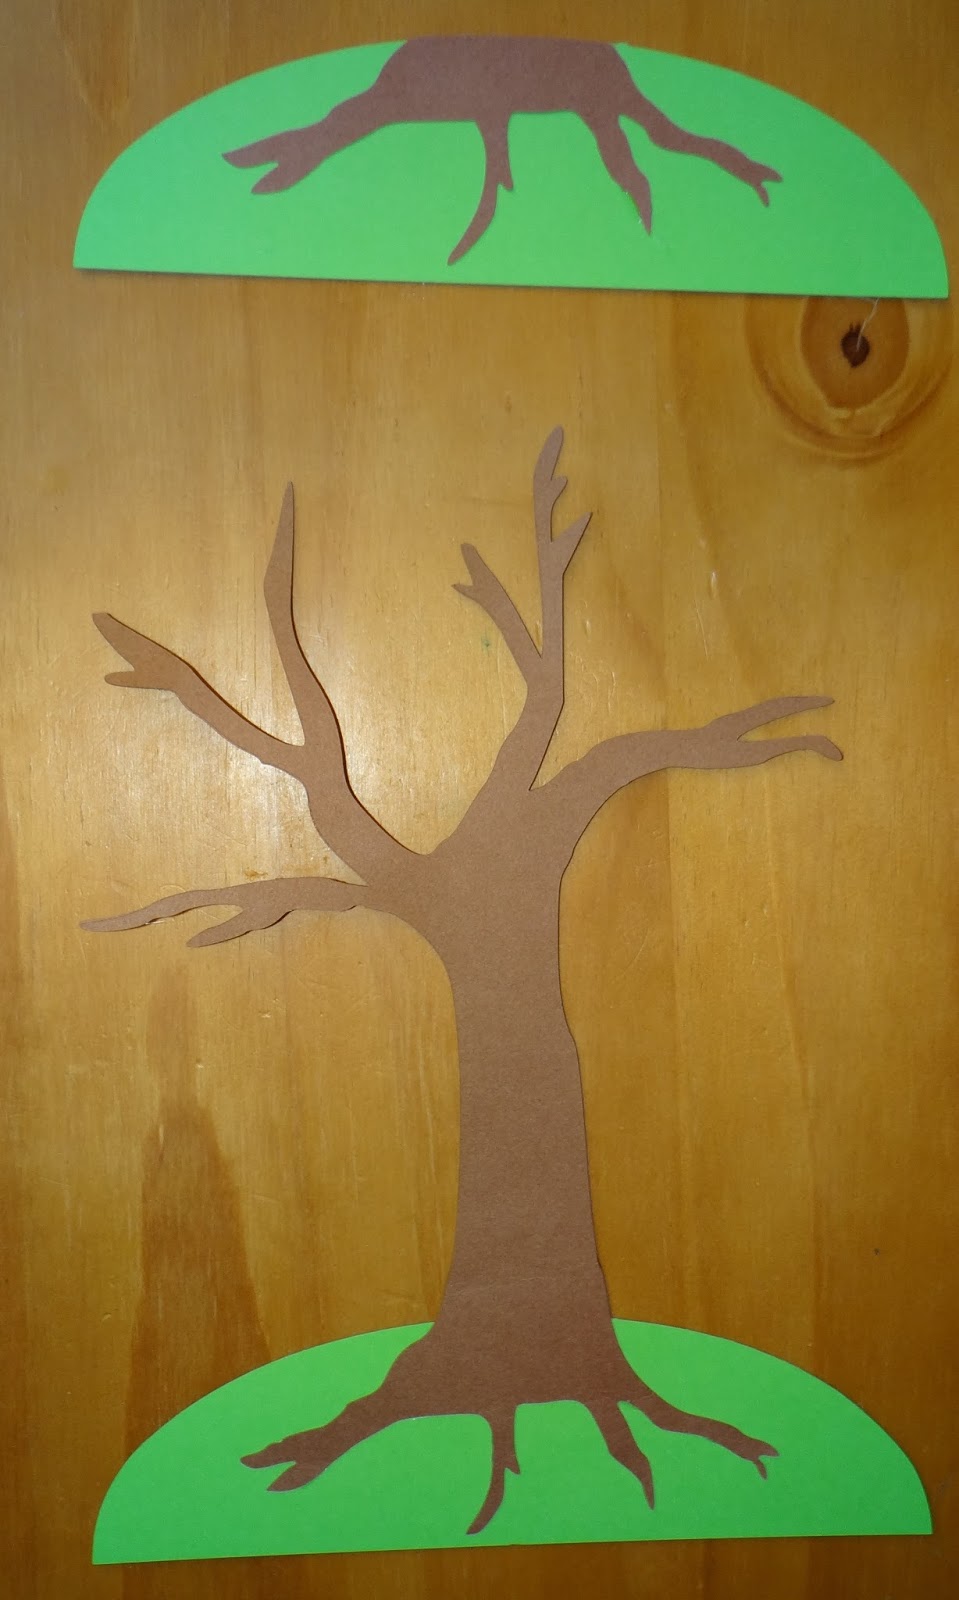
*Once everything has dried, cut a slit in the bottom of the glued together tree template, going about halfway up the green half oval.  Cut from the top of the other half oval about halfway down.  Your two pieces should look something like this:


*Fit the two pieces together to make a stand.  Due to the thickness of all of the cardstock pieces, it will be a snug fit.  If the two pieces don't fit together in such a way that the bottoms of the two half oval pieces touch the table, cut the slits a little deeper until they do.  Once you've made sure that they fit appropriately, you can disassemble the stand.


*Crop the photos into squares, paste them into a word document, shrink them down, and print them.  This is what mine looked like when printed onto a 4" x 6" sheet of photo paper:


*Cut out the photos, leaving white space around the edges to give a Polaroid-style look.
*If you want to go for a color-dipped photo look like I did, swipe a marker across the bottom of each one.
*Arrange the photos and leaves on the tree in a desired pattern and then glue down.  Set aside to dry.
*Once it's dry, slide the two half ovals together as before to make the tree stand.

Wednesday, November 4, 2015

Fall Leaves Window Clings


Materials:
*Dimensional fabric paint
*Cling wrap
*Tape
*Leaf templates

Directions:
*Print out leaf templates, such as the ones given below.  Alternatively, you can create your own leaf templates by collecting leaves and tracing around them, which is how I created these templates.


*Tape the leaf templates down to a flat surface, one that you will not need to use for at least 24 hours.  Tape some cling wrap over the templates, making sure that each leaf shape that you plan on using is entirely covered by the cling wrap.


*Carefully trace the outlines of the leaves using fabric paint.  Make sure to shake the fabric paint well before using.


*Draw a stem onto your leaves.


*Fill in the inside of the leaves with fabric paint.  If you're working with little ones who you think would be likely to smear the outline paint with their hands, it may be best to let the outline dry for 24 hours before they fill it in.

Apparently I forgot to take a pic of the red leaf once I'd finished filling it in, so here's the gold one.

*Let the paint dry for 24 hours and then carefully peel the paint off the cling wrap.  Now your leaf clings are ready for your window.

Thursday, October 29, 2015

More Halloween Perler Fuse Bead Magnets


     A few years ago I wrote a blog post about my Halloween Perler fuse bead refrigerator magnets.  I decided it was about time to add a few more to my collection.

Materials
*Fuse Beads kit
*Round magnets
*Adhesive

*Iron

Directions:
*Design your fuse bead creations by arranging beads on a peg board, following the patterns below:


*Cover the designs with a sheet of waxed paper and iron the first side.  Remove the fuse bead project from its peg board, cover with waxed paper, and iron the other side.  For more detailed instructions, visit Perler's website.
*Glue round magnets to the backs of your fuse bead creations.

Thursday, October 22, 2015

Batty Headband

     I found the idea for this headband here and modified it a bit to get the resulting look.

Materials:
*Black headband
*Black wire
*Wire cutters
*Black cardstock
*Scissors
*Pencil
*All purpose adhesive

Directions:
*Print out the bat template given below and trace it 10 times onto a sheet of cardstock.  Cut out the 10 bats.

*Cut off 5 lengths of wire about 10" and wrap the bottom of each piece of wire around the headband at evenly spaced intervals.
*Curl the rest of the wire around a pencil or another cylindrical object and then stretch out the wire.
*Glue two bats back to back on each free end of wire, so that the ends of the wire are sandwiched between the bats.  Let dry and then you are finished.