Thursday, April 25, 2019
Book Pendant Necklace
Show your love of books with these adorable book pendant necklaces.
Materials:
*Mini book (see this tutorial on one technique for making mini books)
*Jump ring
*Jewelry chain
*Jewelry clasp
*Pliers
*Sewing needle
Directions:
*Create or procure your mini book (see this tutorial for one technique for making mini books).
*Carefully poke a hole in the spine of the book toward the top of the spine.
*Open a jump ring and slide it through the hole you have created.
*Add the book pendant to the jewelry chain and close the jump ring around the chain.
*Add clasps to the ends of the jewelry chain.
Thursday, April 18, 2019
Horror Pocket Pals: Freddy Krueger
I forgot to do a Horror Pocket Pals post last month, but fear not. I still have several more horror plushies in store for you. Not familiar with my Horror Pocket Pals series? Check out this post for my Michael Myers plushie and this post for the box I made for him.
This month's pal is Freddy Krueger. A Nightmare on Elm Street was one of my favorite movies growing up, so it seemed fitting to make a Freddy Krueger plushie.
If horror villains aren't really your thing, I'll be featuring some horror protagonists as well starting in May (assuming I remember). I'm still trying to decide between two of my favorite heroines, but I definitely plan to spotlight one of the two next month, so stay tuned!
Materials:
*Red felt
*Peach felt
*Brown felt
*Black felt
*Olive green felt
*Gray felt
*Thread in corresponding colors
*Stuffing
*Black buttons
Directions:
*Print out a copy of the template given below.
*Cut out two copies of the body template from peach felt and one from red felt, two copies of the shirt from red felt, stripes for the shirt from olive green felt, two copies of the pants from black felt, two copies of the shoes from black felt, two copies of the hat from brown felt, two copies of the glove from brown felt, and the finger knives from black felt.
*Sew on a face using black thread and buttons.
*Sew the stripes on using the green felt.
*Sew the head part of the red body piece behind the face.
*Sew the clothes onto the body pieces.
*Sew the two body pieces together using a blanket stitch, leaving an opening for stuffing.
*Stuff and see closed.
Thursday, April 11, 2019
Spring Cherry Blossoms and Bumble Bee Nail Art
As I write this post, it looks like January outside. Everything is covered in snow. Maybe if I paint my nails with snowflakes, the snow will go away?
At any rate, here's how you can get some cute spring nails, whether or not it looks like spring outside for you.
Materials:
*Yellow nail polish
*White nail polish
*Light blue nail polish
*Pink nail polish
*Black nail art pen
*Small dotting tool
*Pink glitter polish
*Makeup sponge
Note: The bee was left over from my nail art from a previous week. It was still in good shape, so I couldn't bring myself to remove it and decided to incorporate it into my nails this past week. I didn't take pictures of the process because I wasn't planning on posting it, but I'll describe the process to the best of my abilities.
Directions for the bee:
*Paint one nail yellow. Let dry.
*Draw on a bumble bee using a nail art pen.
*Use a small dotting tool and white nail polish to add wings.
Directions for the cherry blossoms:
*Paint one nail blue. Let dry.
*Draw on a branch shape using a nail art pen.
*Using the small dotting tool and pink nail polish, create flowers by stamping four dots close together.
Directions for the glitter nail:
*Paint nail pink. Let dry.
*For a thicker glitter coating, apply glitter polish to a makeup sponge and sponge onto the nail. You may need to do a few coats to get the nail sufficiently glittery.
Friday, April 5, 2019
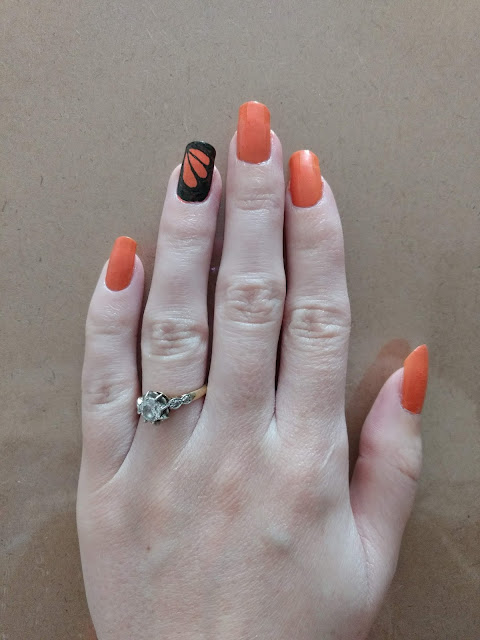
Monarch Butterfly Nail Art
It is snowing as I write this post, but someday spring will be here. Right? Until then, I'll be enjoying spring via nail art.
I love butterflies, and monarch butterflies have always been my favorites. My sister and I had a couple of pet butterflies growing up. I believe our "tightrope walking" butterfly (it walked upside down along a piece of string) was a monarch butterfly. Here is some nail art that reminds me of spring and all of the beautiful butterflies I've encountered over the years.
Materials:
*Orange nail polish
*White nail polish
*Black nail art pen
*Small dotting tool
Directions:
*Paint nails orange.
*Draw on butterfly wing shapes using a black nail art pen.
*Add white spots with white nail polish and the dotting tool.
Subscribe to:
Comments (Atom)


