Tuesday, August 25, 2020

Amber's Craft a Week Blog Turns 9! A Celebration Featuring the Teeny Tiny Seashell

     It's hard to believe I've been blogging here for nearly a decade.  I started this blog because I wanted to start a blog of some sort, and when I racked my brain for topic ideas, crafting came to mind.  While it has not been a roaring success in terms of traffic, and I've not made a single cent off of it, it has pushed me to be a better crafter, and I like to think some of you are getting enjoyment and/or inspiration from it.
     I've been doing crafty things since I was a kid, but it wasn't like I was crafting regularly before I started this blog.  I would make something here or there, but when I was looking for ideas for my inaugural blog post, I had a hard time finding a craft to use.  I ultimately settled on my Seashell Centerpiece.
     Having to post a craft every week pushed me to craft more, and the more crafts I made, the stronger a crafter I became.  When I first started my blog, I probably wouldn't have considered DIYing my wedding dress or painting intricate nail art designs or making plushies of horror movie characters (e.g., Freddy and Nancy from A Nightmare on Elm Street), but these are all projects I have attempted with reasonable success for this blog.  I am so glad that I started blogging, because I would not have the crafting chops I do today otherwise.
     For the ninth anniversary post, I want to return to my blog's roots, in a way.  When I made that seashell centerpiece which I featured in the first post, I also made a second craft.  It's that second craft I bring to you today, not so much for its craftiness as for a fun story about a teeny tiny seashell.

The Story of the Teeny Tiny Seashell


The teeny tiny seashell in its now secure display case.

     When I go to the beach, I look for seashells.  I love tiny things and I have a decent eye for picking out seashells that are not much bigger than a grain of sand.  As a kid, I would find these seashells and try to bring them home, hoping to collect them, only to lose them somewhere along the way.
     In 2011, not long before I started this blog, I worked at Upward Bound as a physics instructor.  As part of my job, I went on a camping trip to Lamoine State Park.  While on this trip, I collected some seashells, including one very tiny one.  Somehow I managed to get it home without losing it.
     I had this seashell in a little sandwich bag and I left it on the kitchen table.  Brian saw what looked like an empty sandwich bag and threw it in the trash.  By the time I noticed that my seashell was missing, Brian had already brought the trash to the dumpster.  I was pretty bummed that I had managed to bring my seashell home, only to lose it to the dumpster.
     Brian dug through the dumpster and eventually found the sandwich bag with my teeny tiny seashell.  It was clear I needed to put it in a different container, so I took a little clear plastic container and lined it with some scrap fabric, then placed my shell inside.  I believe I made this container at the same time I made my seashell centerpiece.  I can't recall now for sure one way or the other, but it's possible that the need to rehome my teeny seashell is what pushed me to make the seashell centerpiece that I wrote about in my first blog post.
     The saga of the teeny tiny seashell does not end there, though.  The container I was using for the tiny seashell has a lid that comes off easily.  Brian made the mistake of picking it up by the lid, and out fell the seashell.  He spent an hour scanning the floor for it before he finally found it.  That's why the container is now taped shut.

     Anyway, I thought this was a cute story related at least a little to both crafting and the start of my blog.  I hope you enjoyed it.  Here's to many more years of crafts and fun crafting stories.

Thursday, August 20, 2020

DIY Harley Quinn Jacket


     This project was a sewing first for me on several fronts: my first time sewing sleeves onto a garment, my first time sewing on knit trim, and my first time installing a zipper with a sewing machine.  The finished jacket is far from perfect, but honestly, given how inexperienced I am and how reckless I was with the whole process, I'm amazed that it turned out as well as it did.  I included materials links below, as well as a bit of a video tutorial of the construction process.  I didn't include a written tutorial this time because I was (kind of) following a pattern, so all of those instructions are available to you already.  But in the video I do mention where I diverged from the pattern, so if you're curious about the changes I made, you may want to give it a watch.

Materials:

*1 yard+ red jersey sequin fabric.  I made the size 0-2 and 1 yard was more than enough for me, but if you're making a larger size, you may need more fabric.
*1 yard+ blue jersey sequin fabric.  You may need more than 1 yard of fabric if you're making some of the larger sizes.
*Print out of the Avelia Bomber Jacket Pattern
*Rib knit trim, 2 strips in jet black
*Black 17" zipper
*Black thread
*Sewing machine

Directions:


    I only have a video tutorial for this one, but if you have questions about my process, don't hesitate to ask.

Monday, August 17, 2020

Easy DIY Magikarp Look: Pokemonbounding Episode 4


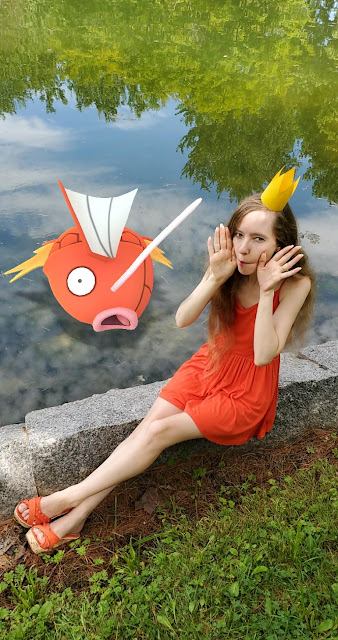
     I wasn't planning on making a Magikarp look for my fourth Pokemonbounding video (I have a few others, including Vaporeon, in the works), but when Niantic announced that August's Community Day Pokemon was Magikarp, I couldn't resist throwing together a look.  This one was much simpler than some of my previous Pokemon themed outfits, which is great if you're looking for a relatively easy and inexpensive costume or bounding idea.  You'll need some orange clothes and a yellow crown.  I've included a video tutorial of the construction process below, and keep scrolling for some more pictures and a brief discussion of Magikarp Community Day.


Magikarp Community Day


     I love Magikarp, but it was a little awkward trying to take photos with a fish Pokemon that constantly looks like it's on death's doorstep.  We even put Magikarp in a pond, but to no avail.  So for my next set of photos, I decided to go with a concept I'd been thinking about for a while: saving Magikarp.


     One of my favorite things about Community Day is the AR photo bombs.  You only get five chances, though, which makes securing a good photo a little stressful.  Luckily, I got the picture at the top of this post on my third try.  The "saving Magikarp" photo bombs came out okay, but I wish I'd had a few more chances to get the perfect picture.


     Here's a picture where you can pretty clearly see me throwing water onto Magikarp.  It was a little tricky timing my water throwing to Brian's picture capturing, but luckily there was no limit to how many general AR pictures we could take.
     All in all, Magikarp Community Day went pretty well for me.  I already had three shiny Magikarp going into the event, so it was a fairly low stress Community Day, shiny-wise.  I did manage to nab another dozen shinies, though, including one with really good IVs.  I accidentally evolved a really bad IV Magikarp, so I spent a good chunk of the day catching as many Magikarp as I could find to try to refill my candy resources.  But I still got to evolve two Gyarados, including my high IV shiny, so that was cool.
     I'm still rooting for a Meowth Community Day.  I really want shiny Meowth, and I would have so much fun with the photo bombs.  What Pokemon would you most like to see a Community Day for?

Thursday, August 13, 2020

Painted Harley Quinn Bat


     For the bat, I diverged a bit from the Harley Quinn and Poison Ivy comic series a bit.  (I mentioned it in my first post, but the Harley Quinn and Poison Ivy comic series cover art was my inspiration for this costume.)  The design still felt Harley to me, but with a little bit of my own flair.

Materials:

*Foam or wooden baseball bat
*Red acrylic paint
*Light blue acrylic paint
*Thin paintbrush
*Ultra fine paintbrush or nail art brush
*Painter's tape (optional)
*Acrylic sealer (optional)

Directions:

*I started by taping off where I wanted to paint.  I ended up spiraling a singular line all the way around the bat, alternating colors as I went along.  Taping off a spiral was a bit difficult, especially since the bat was not a uniform thickness, so I used small sections of tape and connected them, rather than one long, continuous piece of tape.


*Paint in between the sections of tape.  Note that I'm not painting all the way to the tape; I'm just using it as a guide to get a sense of where I should paint to keep my lines roughly even.  Start with red, then after about three turns, switch to blue, then after about three more turns, switch back to red.


*Let the bat dry completely and then peel off the tape.


*Once the bat is dry, it's time to get started on the detail work.  Using an ultra fine brush, paint Harley's signature on the handle of the bat in red paint.


*Add little red hearts at random along the bat.

*Seal the paint in with an acrylic sealer, if desired.  If you're using a foam bat, make sure that the sealer you're using doesn't erode away foam.

Monday, August 10, 2020

Decorating My House for Pokemon GO Fest


     Since Pokemon GO Fest was virtual this year, players could celebrate from the comfort of their homes.  I decided to turn a corner of my living room into a Pokemon paradise for the event.  I primarily used the printables that Niantic provided, but I also added in Meowth, Snorlax, Zubat, Pikachu, and Gastly plushies I've made (Pikachu and Gastly construction tutorials to come), as well as a Pokeball throw pillow I put together before the event.
     I documented the crafting and decorating process in the vlog style video below.  I hope it gives you some ideas for your next Pokemon soiree or also if you just want to decorate your house with Pokemon.


Thursday, August 6, 2020

DIY Harley Quinn Shorts


     I ended up sewing a pair of shorts from scratch for my Harley Quinn costume.  I'm still relatively new to sewing clothes and machine sewing, so I am pretty pleased with how these came out.  I only have a video tutorial for this one, since I didn't think to take pictures while I was working, but the video tutorial should be a bit more informative than a written one for a project like this anyway.


Monday, August 3, 2020

DIY Pikachu Fan Trainer Costume: Pokemonbounding Episode 3


     For the third installment in my Pokemonbounding series and my look for Day 2 of Pokemon GO Fest, I decided to take a stab at the Pikachu Fan trainer costume, which is a look based on this in-game avatar outfit:


If you've been following my craft blog for a while, you may recall that I made some Pikachu ears a couple of years ago.  In that post, I mentioned wanting to recreate the Pikachu Fan trainer costume at some point in time.  I did buy a shirt for that look, but at the time, I didn't get around to finishing it.  When I was thinking about my second GO Fest look, I remembered the Pikachu Fan trainer costume, and decided to see if I could finish the look.
     If you're wanting to make the ears, check out this blog post.  For the rest of the look, I have a video tutorial where I make a Pokeball keychain to go on my belt loop, as well as a failed attempt at a Pikachu image to adorn my shirt.  I ended up remedying that issue for GO Fest by using cardstock instead of vinyl for Pikachu.
     Here's the video tutorial.  Keep scrolling for the templates as well as more outfit pics and a discussion of Day 2 of GO Fest.


Templates

Here is the Pikachu template I mention in the video:


And here is the Pokeball template:


The Outfit and Pokemon GO Fest Day 2


     This is the original outfit I was starting from.  Even without the extra frills, I think it works reasonably well as a Pikachu Fan trainer look.


     This is the second iteration of the outfit, with my poor, faceless Pikachu which you can't even really see because it blends in with my shirt.  The video explains what happened to Pikachu, but the short of it is that the glue I chose didn't adhere well to vinyl.


     Finally we arrive at the GO Fest version of the look.  My Pikachu decal I made from cardstock, and it started raining basically every time I stepped out to take a picture, so I wasn't able to wear it much.  But I think the shirt looks fine without it, so that wasn't a big deal.
     I swapped out the shorts for a pair I liked better and the heels for more sensible sneakers.  I think I'd like to try this again sometime, but I'd like to get yellow laces for my sneakers to pull the look together a bit more.  Also, my socks have Pokeballs on them, but you can't see that under my sneakers, so I'd probably opt for yellow or black socks if I did this look again.
     By the time GO Fest Day 2 rolled around, I was a little tuckered out.  I'm not super into the battle aspect of Pokemon GO, so I didn't love the rocket research focus, but I did manage to get the shadow birds and Mewtwo to add to my shadow mon collection, so that was pretty cool.  I also nabbed another six shinies, including a shiny Alolan Marowak, which I had been wanting for a while.
     All in all, I enjoyed Pokemon GO Fest 2020.  I hope that in the future GO Fest will retain a virtual component, so that those of us who can't travel can still participate.  I'd also love it if they gave us new printables each year, because those were a lot of fun.  I plan to write up a post on my GO Fest decorations sometime in the not too distant future, so if you're curious to see that, stay tuned!