Thursday, September 17, 2015

Haunted Mirror


     If you plan to make one craft this Halloween season, make it this mirror.  It requires only minimal effort and skill, but the finished product is great.  It's definitely up there in my list of favorite Halloween decorations I've made.  I based the idea off of this tutorial, but made some modifications.

Materials:
*Picture frame
*Krylon Looking Glass Spray Paint
*Matte sealer
*Spray adhesive
*Print of an old looking photo
*Flat backed glass marbles
*Scissors

Directions:
*Find an old photo.  I went with a daguerreotype image because it already had a "ghost in the mirror" sort of look to it.  You can see it's really dusty, but in the end that doesn't matter because you're cutting around the subject(s), so as long as they aren't obscured too much by grime, you're good.  If you're photographing a daguerreotype of your own, I've found that the image shows up best when it's reflecting a dark background (in this instance my camera case).

This pic is of my great great grandfather William Cornelius "Neil" Bowen (the littler boy wearing the hat) and his brother James.  I've included some info at the end of the post if you're interested in learning more about the brothers.

*Print the photo onto plain printer paper.  If the picture you choose is not black and white (or if the lighting adds unnatural color to it, which is what happened with my photo), decrease the saturation before printing.
*Cut out the photo and then cover it with a matte sealer so that the colors won't bleed.
*Remove the glass from the picture frame and clean it, if desired.  If you don't clean it well or if you don't dry it all the way, you'll end up with splotches on your mirror.  This can add to the old mirror aesthetic, but if you want a crisp image make sure to wash it and either let it air dry or dry it with a clean T-shirt or other cloth that will not leave behind lint.
*Once the glass is dry, set it down on some newspaper in a well-ventilated area.  Slide the photo across the glass until you find a placement you like.  Place the photo face down on the glass and secure it in place by laying flat backed glass marbles on top of it.
*Spray the glass following the instructions on the back of the Looking Glass Paint bottle.  You'll end up doing five thin coats of paint to get the mirror look.
*An hour after applying the final coat of paint, remove the picture from the glass.  Apply one or two very thin coats of paint to the place where the photo was.  I ended up applying two, but I kind of wish I had done only one, as it would have allowed the image to show up better.
*Glue the photo in place using spray adhesive and set aside to dry.
*Once dry, place the glass back inside the frame.  Now you have your very own "haunted" mirror!

It's tricky getting the "ghosts" to show up well for the camera (isn't that how it always goes ;) ).  They are easiest to see when the mirror is facing a dark backdrop.  I managed to get the below picture by draping a navy blue blanket over a bench and across the floor in front of the mirror and then angling the camera so that I was cut out of the shot.  The same goes for seeing the "ghosts."  Depending on the lighting and background, you may see nothing more than a shaded region, but you also might see a sharper image, like the one pictured below.


A Haunting Good Time


     Here's a fun little trick to play on your friends.  Invite them over to your house.  If they don't immediately notice the strange reflection in the mirror, take a photo of them with the mirror and then show them the image and see what they say.  Alternately, you could upload a pic of yourself with the mirror to Facebook and see if anyone notices that you're not alone.

About the Bowen Brothers:

     John James "James" Bowen was born December 13th, 1847 and his brother William Cornelius "Neil" Bowen was born November 9th, 1849.  Their parents were Harriet Emily (Britton) of Philadelphia and Stephen Riley Bowen, born in Worcester County, Maryland.  The brothers were baptized at St. Mary's Protestant Episcopal Church in Philadelphia on November 30th, 1849.  In 1850 the boys lived in West Philadelphia with their parents, their maternal grandmother Julia Ann Allen (Blodget) Britton, and several aunts and uncles.  Their mother died in February of 1852.  I have yet to determine what happened to their father; he may have died as well, but by 1860 the brothers had been separated.  James stayed with his grandmother, while William Cornelius was sent to Northampton County, North Carolina to live with his aunt Ellen Matilda (Britton) and her husband Dr. Cornelius Godwin Cotten Moore.
     In 1870 the brothers were again living together in Philadelphia, this time at the home of their uncle John Blodgett Briton.  James was working as a medical doctor.  This is the last record I can find of him before his death certificate.  He was listed as single at the time of his death.  He worked as a physician and inventor until his retirement.  Toward the end of his life, he was living at the Old Man's Home in Philadelphia.  He died on January 4th, 1918.
     "Willie," as he was  referred to in the census record, was working as a clerk, perhaps as a summer job, since he was a student at the University of Virginia during this time period.  He was an instrumental member in the establishment of the fraternity Kappa Sigma.  After finishing his schooling he returned to Northampton County to practice law.
     On June 5th, 1877 he married Frances Josephine "Josi" Southall, daughter of Sarah Clifton (Wheeler) and James Hunter Southall.  Josi had been born in Mississippi, but was sent to North Carolina to live with her aunt Julia Monroe (Wheeler) and uncle Godwin Cotten Moore at their plantation Mulberry Grove, which was where she and Neil married.  The young couple settled into a former plantation house nicknamed "Southerly" near Jackson, North Carolina.  They had five daughters together, Harriet Emily Bowen, Julia Southall (Bowen) Peebles (my great grandmother), Ellen Britton Bowen, Josephine (Bowen) Hughes, and Bland Clifton Bowen.
     Around 1890 Neil moved to Denver, Colorado for health reasons.  Josi and the girls stayed in North Carolina.  Josi passed away on January 25th, 1893 and her sister, Julia Monroe Southall took over caring for the girls.  By 1910 Neil had returned to Jackson and three of his daughters were living with him.  He died on September 23, 1911 and was buried at the Church of the Saviour Cemetery in Jackson.

Thursday, September 10, 2015

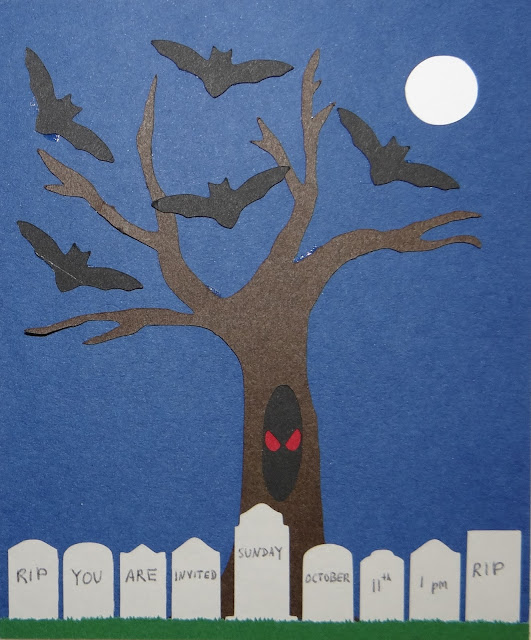
Halloween Graveyard Party Invite


Materials:
*Cardstock in red, black, dark blue, gray, green, brown, and white
*Scissors, pencil, and printer or Silhouette CAMEO
*Pen or gel pen
*Glue

Black and White and Color Templates


Cutting by Hand Directions

*Resize the invite template to the desired width for your invites and print.
*Cut out the various pieces of the template.  The grass portion (the one with all the jagged bits) may be a little time consuming for hand cutting, so feel free to smooth it out if you wish.
*Using the color-coded template guide, trace the shapes onto their respective sheets of cardstock and cut out (the moon here is yellow to distinguish it from the background, but I used white paper for it).
*Write out the party info on the tombstones, if it will fit.  Alternately, you could use a white or silver gel pen to write the info off to the side of the tree after you've settled your design.
*Taking a piece of dark blue cardstock cropped to the appropriate size, align the various pieces of the invite in accordance with the invite photo at the top of the page.  I left the roots on the tree in case you wanted to use the template for other projects, but for this you'll have to trim them a bit to get the tree to fit properly in the design.
*Glue down the various pieces of the invite.

Silhouette CAMEO Directions

*Download the black and white invite template to your computer and run the Silhouette Studio program.
*From the File menu, select "Import" and then "Import to Library" and then select the template from wherever on your computer you started.  Now the template will show up in your library.
*Set the page settings to the dimensions of your cardstock and then drag the template onto your page and resize the template to your desired size.
*Click on the button that opens the trace window (it looks kind of like a blue butterfly with a yellow background and if you hover your mouse over it, it says, "Open the Trace Window").
*Click on the "Select Trace Area" button and draw a blue rectangle around the part of the template you want to cut out first, say the tree.  At this point you should see a yellow outline around the tree.
*Adjust the High Pass Filter until the tree is entirely yellow and then click the "Trace" button under the "Apply Trace Method" section.  You should now have a red outline around your tree.
*Drag the red outline to the upper left corner of the screen.  Copy it as many times as you need invites and line them up so that they don't overlap.  DO NOT delete the template from the page.  The CAMEO will only cut out the red outlines and if you delete the template, it could make it difficult to size the rest of the pieces of the template so that they line up exactly.
*Following the color coded template guide (the moon is in yellow to distinguish it from the background, but I used white paper for it), align the appropriate colored sheet of paper on the cutting mat and load it into the machine.
*Click on the "Cut Settings" button and under material type, select cardstock, then click the "Send to Silhouette" button.
*Delete the red outlines from the page in Silhouette Studios.  Go back to the trace window, select the next part of the template you would like to use, and trace it, using the same procedure as outlined above.  Peel the pieces off the cut mat, place the next sheet of cardstock on and load the mat, and cut out as before.  Repeat this process for each of the different pieces.
*Write out the party info on the tombstones, if it will fit.  Alternately, you could use a white or silver gel pen to write the info off to the side of the tree after you've settled your design.
*Taking a piece of dark blue cardstock cropped to the appropriate size, align the various pieces of the invite in accordance with the invite photo at the top of the page.  I left the roots on the tree in case you wanted to use the template for other projects, but for this you'll have to trim them a bit to get the tree to fit properly in the design.
*Glue down the various pieces of the invite.

Thursday, September 3, 2015

Eerie Graveyard Bouquet


     Add this spooky bouquet to your Halloween graveyard or use it as a floral centerpiece for your Halloween table.

Materials:
*Cardstock in black and purple
*Floral wire
*All purpose adhesive
*Scissors
*Pen
*Floral tape
*Twist tie
*Black/Halloween ribbon
*Spiderweb
*Plastic spider

Directions:
*Make some paper roses using the techniques from my paper roses post.  The only thing I did differently this time around was I wrapped the floral wire in floral tape before I started so that the stems would look a more natural shade of green.
*Tie the roses together using a twist tie.
*Tie a ribbon around the bouquet over the twist tie.
*Add some spiderweb and a plastic spider to the top of the bouquet.


     Here's a pic of the bouquet with my latest foam tombstone.

Thursday, August 27, 2015

Insulation Foam Halloween Tombstone


     I love making Halloween crafts.  One of my favorite Halloween decorations is the Halloween graveyard and this year I've decided to work on improving my own one (see this post for a picture of my cemetery from last year).  A couple of years ago I wrote up a blog post on how to make Styrofoam headstones.  I recently found out that there is a better material for making Halloween tombstones: insulation foam.

Materials:
*2' x 2' sheet of insulation foam
*Hand saw (I used a box cutter, but the blade was too short to cut all the way through well)
*Sandpaper
*Protective goggles
*Ventilation mask
*X-acto knife
*Pen
*Dark gray paint
*Lighter gray paint
*Paintbrush

Directions:
*Decide what shape and size tombstone you would like.  If you do a quick search, you can find tons of templates and design ideas online.  I based mine off of a photo I had of one of my ancestor's headstones.
*Using your saw, cut your foam to size.  If you're going for a narrower stone, you might be able to get two stones out of this one sheet of foam.
*Sketch or trace on the design you would like to use for the top of the headstone and cut it out using the saw.
*Sand down any rough edges with sandpaper.  I used very fine grit sandpaper because that was what I had on hand, but I've read that you can use up to medium grit without trouble.  You may also want to sand down any sharp corners to make the stone look aged, if that's the style you're going for.
*Print out your design and center it on the foam and then trace over it with a pen, pressing down hard enough to indent the foam.
*Trace over your indentation with a pen.
*Cut out your design using an X-acto knife.  This Lowes tutorial suggests using a cross hatching technique.  I tried doing that a little, but I mostly just scraped out the excess foam.  If you have a dremel, you may be able to use that instead and it should give you a smoother look than what I ended up with.
*Paint the stone using the darker gray color, making sure to fill in all of the crevices to the best of your ability.  I had to do two coats to get all the nooks and crannies.  If you have fine details, you can use the end of a needle to squeeze paint into the crevices.
*Combine the two shades of gray until you get a color that is a shade or two lighter than the dark gray.  Paint the surface of the stone, but skip the inscription.  This will enhance the visibility of the inscription.

Thursday, August 20, 2015

Alice in Wonderland Costume Ideas

     Whether you're throwing an Alice in Wonderland themed birthday party or looking for a Halloween costume, here are some easy and inexpensive costume ideas.

Alice


     The black bow I wore was a remnant of my high school days, but you could easily make your own with a black headband, some black ribbon, and all purpose adhesive (or hot glue).  When I was browsing online for costume ideas, just about all of them involved a blue dress.  Since I'm not one for dresses, I looked for a blue top that I could wear instead.  This one, which I found on Target's website (sadly it's no longer available) just screamed Alice to me for some reason.  The black trim on the ruffles then inspired me to match it with black pants.  Also, I just threw on those flip flops for the purpose of not being barefoot for the photo shoot, but I wore flats with hearts on them for the party.

Mad Hatter


     The Mad Hatter's signature garment is his hat, so that was what I concentrated on.  I used these tutorials, but also added a top to the hat.  To do that, I made a circle the same size as the hat brim and then cut slits along the sides to create tabs which I could then stick to the inside of the hat.  However, an easier method would be to cut slits along the cylindrical part of the hat, fold them over, and then glue a circle to them.

Cheshire Cat Ears


Materials:
*Purple headband
*Purple felt
*Pink felt
*All purpose adhesive

Directions:
*Cut out two diamonds from pink felt and two, slightly larger diamonds from purple felt.  Center the pink diamonds on the purple ones and glue down.  (As you can see from the picture, I actually made felt triangles and glued them on at the end, but this method might be a little easier and then there is no "right side" to the ears.)
*Fold the diamonds over the headband, aligning the edges of the two sides, and glue together.

Thursday, August 13, 2015

Alice in Wonderland Photo Wall

     In Alice's Adventures in Wonderland, when Alice falls down the rabbit hole, she sees photos and maps lining the walls of the tunnel.  The book doesn't specify what these are photos of, so you could use any images you would like, but here are the ideas that I came up with.

Flowers with Faces


     Take photos of flowers and add some googly eyes to make some flowers with faces photos.  You could also add other features, like mouths, but I stuck to photos where the flowers already had a mouth-like structure.

Scrapbooking Paper and Old Maps


     Find sheets of scrapbooking paper that remind you of Wonderland or old maps and cut them to fit the frames.

Quotes


     Choose a quote from the book that you like and type up or hand write it.  Find some corresponding scrapbooking paper or stickers to decorate it.

Keys


     Using the key bookmark template, create a key and select some cardstock for the backing that you think corresponds well.

Silhouettes


     Create silhouettes following the procedure outlined in the Silhouette Cake Topper post and cut out shapes to make a scene with them.  If you have a die cutting machine that allows you to import your own designs, such as the Silhouette Cameo, you can create a scene in a program such as Paint and have the machine cut it out for you.

Wonderland Photo Shoot


     Have some of your friends dress up as Wonderland characters and take pictures.

Scrap flower


     I made this picture using the scraps from the paper teapot vases that my Cameo left behind and the petals from the red roses (since I printed the white rose template on red cardstock and so the leaves did not turn out green).

Thursday, August 6, 2015

Party Activity: Paper Fans


     Here is a fun, easy way to keep your party guests entertained.  They're more aesthetic than functional, but they're enjoyable nonetheless.

Materials:
*Fan template
*Pencil
*Cardstock in various colors and patterns
*Scissors
*Brads
*Hole punch
*Optional: stickers, rhinestones, or other embellishments

Directions:
*Print out a template for your fan blades.  I used this template I found online.
*Trace the fan blade shape onto the backs of the sheets of cardstock.
*Depending on the age of your partygoers, you can either cut out the blades in advance or have them cut them out on their own.  Each guest should choose about five blades.
*Once the blades are cut out and arranged as desired, line up the blades and punch a hole through all five at once.
*Slide a brad through the hole to hold the fan together.
*Decorate with rhinestones, stickers, and other embellishments.

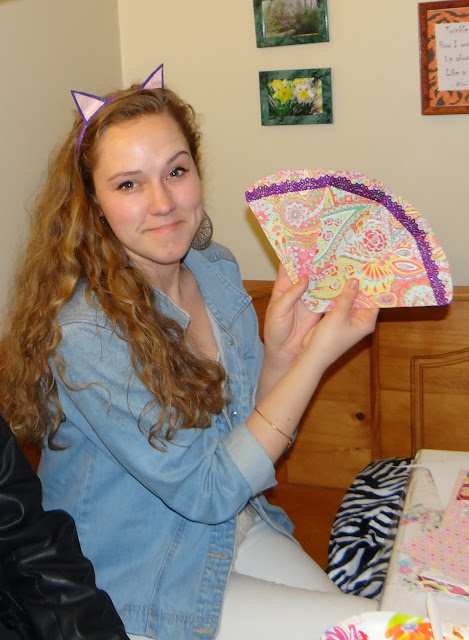
Katie with the paper fan she designed.