Thursday, October 29, 2015

More Halloween Perler Fuse Bead Magnets


     A few years ago I wrote a blog post about my Halloween Perler fuse bead refrigerator magnets.  I decided it was about time to add a few more to my collection.

Materials
*Fuse Beads kit
*Round magnets
*Adhesive

*Iron

Directions:
*Design your fuse bead creations by arranging beads on a peg board, following the patterns below:


*Cover the designs with a sheet of waxed paper and iron the first side.  Remove the fuse bead project from its peg board, cover with waxed paper, and iron the other side.  For more detailed instructions, visit Perler's website.
*Glue round magnets to the backs of your fuse bead creations.

Thursday, October 22, 2015

Batty Headband

     I found the idea for this headband here and modified it a bit to get the resulting look.

Materials:
*Black headband
*Black wire
*Wire cutters
*Black cardstock
*Scissors
*Pencil
*All purpose adhesive

Directions:
*Print out the bat template given below and trace it 10 times onto a sheet of cardstock.  Cut out the 10 bats.

*Cut off 5 lengths of wire about 10" and wrap the bottom of each piece of wire around the headband at evenly spaced intervals.
*Curl the rest of the wire around a pencil or another cylindrical object and then stretch out the wire.
*Glue two bats back to back on each free end of wire, so that the ends of the wire are sandwiched between the bats.  Let dry and then you are finished.

Thursday, October 15, 2015

Bat Mask and Halloween Party Ideas

Bat Mask


Materials:
*Tulle
*Puffy fabric paint
*Elastic cord
*Waxed paper
*Scissors
*Tape
*X-acto knife

Directions:
*I got the template and instructions for this craft from Joann's website.  I basically followed the directions given there, except for the following:
*I used elastic cord in place of ribbon to hold the mask up.
*I practiced drawing lines on a scrap of tulle to get a feel for drawing lines on the material itself.
*I peeled the mask off the waxed paper before cutting.
*I used an X-acto knife to help with cutting out parts of the mask, including for making incisions through which to loop the elastic cord.

Halloween Snacks and Food Related Party Crafts


     Brian and I made our cemetery cupcakes again this year, but we varied the recipe slightly.  I found some cute Halloween tombstone candy molds from Joann and thought they would be perfect for my cupcakes.

Halloween Cemetery Cupcakes

Ingredients:
*10 oz bag of white candy melts
*10 oz bag of black candy melts
*10 oz bag of pumpkin spice flavored candy melts (could be substituted for flavor of your choice)
*Brian's vanilla icing (scroll to the bottom of this blog post for recipe)
*Green food coloring
*Devil's food cupcakes
*Oreos

Supplies:
*Tombstone mold
*Microwave safe bowl
*Spoon
*Food processor (or blender)

Directions for tombstones:
*Place 3 pumpkin spice candy melts, 5 black candy melts, and 14 white candy melts in a microwave safe bowl and microwave for 1 minute (we have a 900 watt microwave, so time may vary depending on the wattage of your microwave).  Stir until smooth and the colors are thoroughly mixed to produce a uniform gray color.
*Spoon the mixture into the four tombstone shaped molds.  The amount of candy in the bowl should be enough to fill each mold about halfway.  I liked filling them halfway because the thinner, lighter tombstones didn't have to be pressed as deep into the cupcakes to stay upright, but if you want maximal thickness, use twice as much candy as the first step calls for.
*Place candy mold in the freezer.  Let sit for about 10 minutes and then pop the candies out of the mold.  Clean the mold and repeat the process to make the remainder of the tombstones.

Directions for cupcake decorating:
*Prepare devil's food cupcakes according to the directions on the packaging.
*Prepare icing and add green food coloring a few drops at a time, until the icing is the shade of green that you want for your cemetery "grass."
*Place three Oreos in a food processor and grind them up.
*Take one of the cupcakes, ice it, push a tombstone into the center, and sprinkle some Oreo "dirt" at the foot of the tombstone.


     Here are some of the other snacks we had.  This year Brian and I made our eyeball deviled eggs again (for recipe, see this post.  It also has instructions for how to make a neat Halloween egg plate, which the eggs are resting on, although you can't really tell from this picture).  We cut up some sharp cheddar cheese and put it in the center of the egg plate.  Brian's mom made the eyeball cookies by making a chocolate chip cookie type dough and placing Hershey's Hugs and Hershey's Drops in the center.  As for the non-food items present, here's how I made the cupcake stand, here's how I made the appetizer skewers and their "stone" holder, and here's how I made the tablecloth.


     Here's the table setup.  It's basically the same as it was for last year's Halloween party.  I again used my glittery goblets.

Indoor Decor


     This year I had so many decorations that I wanted to keep on my Halloween "mantle" that I ended up throwing some spare cloth over the printer and its stand and using that as a secondary place to put my spooky accent items.  Here's how I made the haunted mirror.  I used my Silhouette CAMEO to construct the spell book in the center.  I combined elements from this pattern and this pattern and used Old English Text MT font for the text.  That particular lenticular portrait is one that I bought from Rite Aid last year.  All of the lenticulars I've bought have either come without a frame or in a tacky plastic frame, but in this post I explain how to make them look nicer (scroll to the bottom of the post to find the directions).  On top of the printer is one of my creepy dolls.  Here's how to make them.


     Here's my traditional Halloween "mantle" (read: tower of storage containers I've thrown a sheet over).  I took some black gauzy cloth I got from Dollar Tree and threw it over my tie dyed sheet that I usually cover it with.  Instructions for the gingerbread zombie plushie will be coming in a later post.


     Here's my felt sleepy bat and my spooky sign.


     And here's my Halloween banner.


     And some pom pom pals hanging around with the sign I got from the Target dollar aisle a few years back.


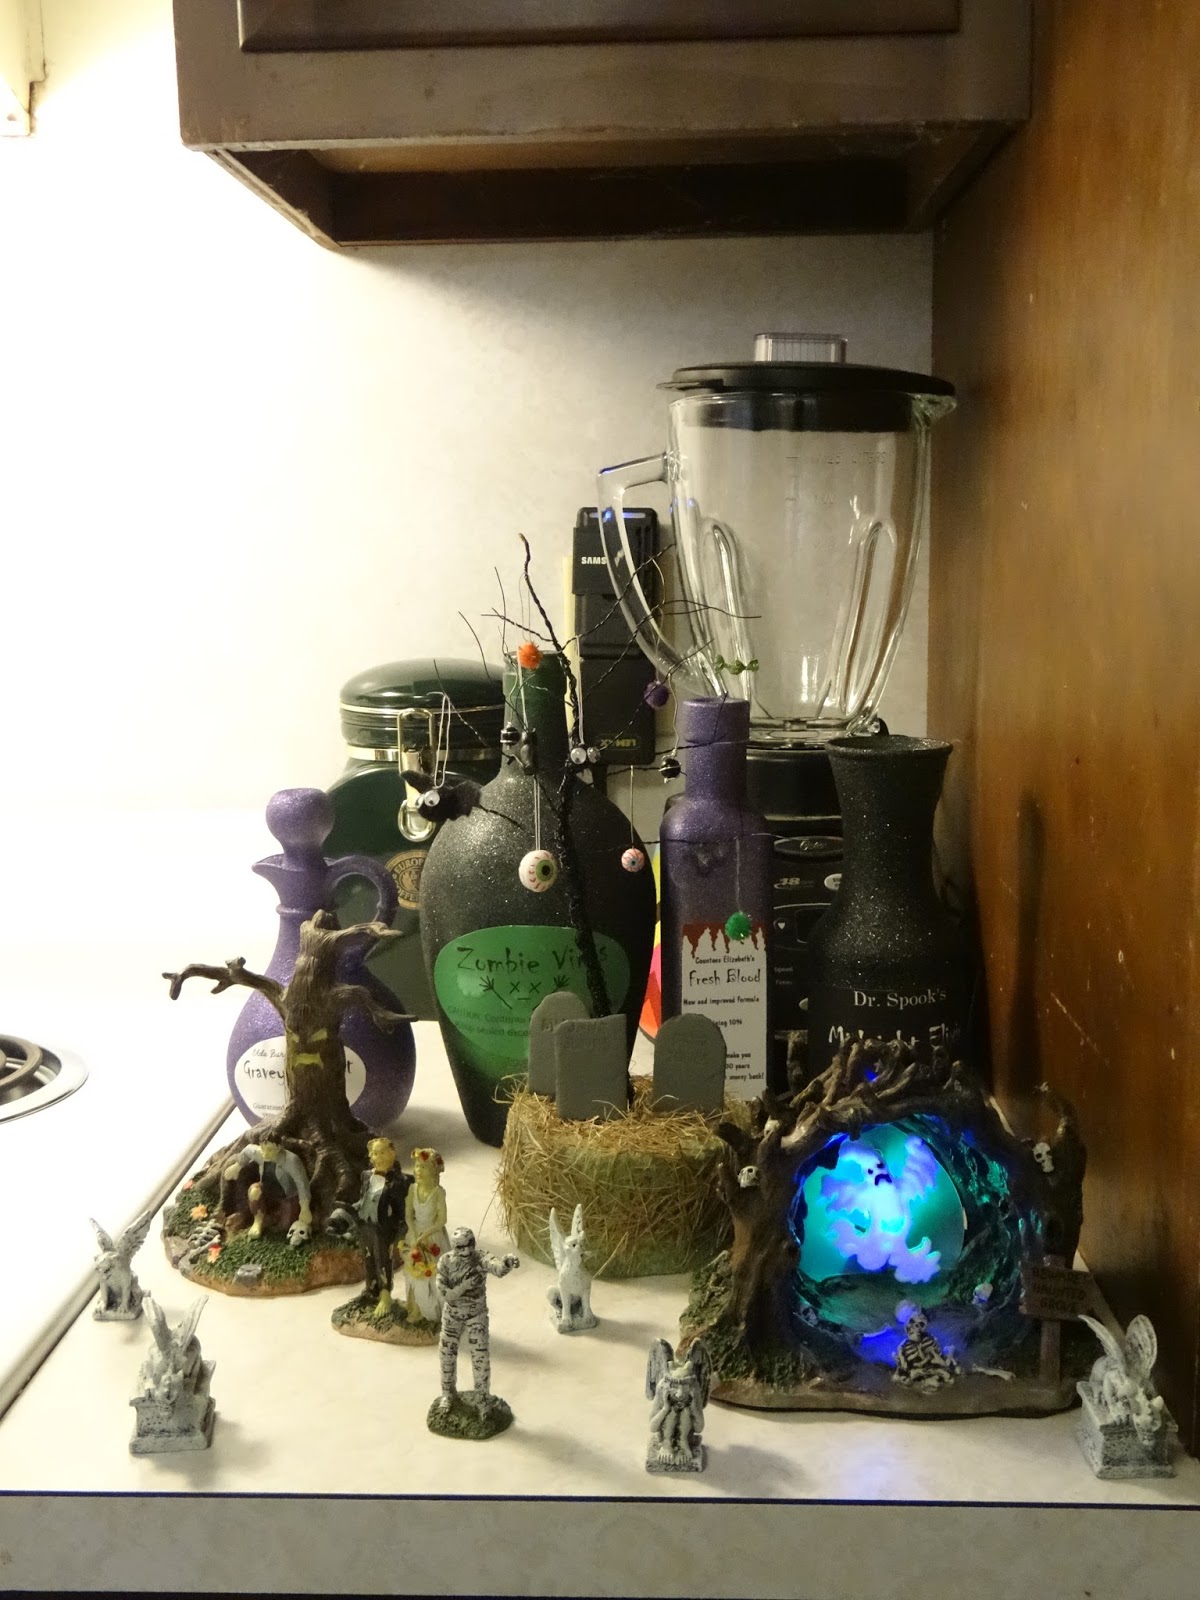
     The figurines and the light up haunted grove in the foreground of the photo my mom gave me a number of years ago.  I think she got them from A. C. Moore.  There's my Halloween tree with ornaments and behind that you can see my potion bottles.

Outdoor Decor


     Here's the whole outdoor setup.  The eyeball path markers I got from Kmart several years back and the jack o'lantern lights on the door Brian surprised me with last year for Halloween.  He got them from Rite Aid.  Those zombie lawn gnomes lurking at the edge of the house Brian's mom gave me for Christmas.  She got them from Oriental Trading.  Also, it's hard to see, but there is a light up spider on the glass part of the screen door that I got this year from Dollar Tree.


     Here's a closeup on the door.  That's my glow in the dark eyeball wreath on the door.  The door hanger I printed out from the internet and laminated, but I can't find a link to the PDF for the door hanger anymore.


     Here's my little Halloween cemetery.  It was predicted to rain up until noontime, which was one hour before my party started, so I had to wait until then to put everything up.  That's why it looks like it was just thrown together, but I'm so glad that I got to put it out there that I don't care.  The tombstone on the far left of the picture I made from insulation foam and the third and sixth from left I made from regular styrofoam.  The other tombstones came from Target (they were part of a kit along with some of the skeletal remains and fencing), Dollar Tree, and some sort of yard sale/flea market.  In front of my insulation foam tombstone you can see my eerie graveyard bouquet.  Those skeletal arms in front of the two tiny tombstones I made from skeletal salad tongs I picked up from Dollar Tree (directions to come).  Lastly, it's hard to see, but peeking out from behind the tombstone that the skull is in front of you can see my haunted hedge eyes, which I got from Target last year.  We don't have any hedges nearby, so I figured that was a good place for them.

Activities


     We had a Yankee swap again this year.  I wrote numbers on masking tape and stuck them to the bottom of the paper witch hats I made last year and Brian stuck numbers to the prizes so that no one would know which hat corresponded to a particular prize.  This year I didn't have time to craft prizes (too much time spent writing my paper on quantum teleportation :p), so I picked up inexpensive items from Joann and Dollar Tree.  What we did for the swap was that people would pick up one of the hats and then find the prize corresponding to the number on the bottom of the hat.  If they liked their prize, then they got to keep it and if they didn't, then they could swap with someone for their prize.


     This year Brian also did Tarot readings for our guests.  People seemed to get a kick out of that.  Yes, Brian is wearing his Mad Hatter hat with a vampire cape.  Don't ask me why.

Costumes


     For my Halloween parties, I like to reuse bits of old Halloween costumes.  This year I went as a "bat lady," (like a cat lady, except fond of bats instead of cats).  I'm wearing the mask I wrote about in this post, my batty cape, and a bat headband that I'll give instructions for soon.  Brian's mom went as the Queen of Hearts.  I have a number of other costume ideas in the Halloween section of my craft blog (as well as other Halloween crafting ideas), so if you're looking for costume ideas check that out.

Monday, October 5, 2015

Domestic Violence Awareness Ribbons


Trigger warning: discussion of domestic violence and sexual assault.  If you are experiencing domestic violence and need help, check out this hotline service or skip to the paragraph below the bullet points in this post for more details on how you can receive help.

     Before I get to this week's craft, I want to take a moment to talk about something serious.  October is Domestic Violence Awareness Month.  This is important because domestic violence is an issue that affects all of us in one way or another, either through our own personal experiences or the experiences of loved ones.  It can take many forms, including physical, emotional, sexual, economic and psychological abuse (source).  More than 1 in 3 women and more than 1 in 4 men in the US will experience physical violence, rape, and/or stalking by an intimate partner in their lifetime (source).  About 1 in 4 women and 1 in 7 men will experience severe physical violence at the hands of an intimate partner in their lifetime (source).  Nearly 1 in 5 women (and 1 in 71 men) will be raped in their lifetime, and of these women, more than half have been assaulted by an intimate partner (40.8% have been assaulted by an acquaintance) (source).  Here in Maine, about half of all homicides are domestic violence related  (source).
     With statistics like these, the odds are that even if you have not personally experienced domestic violence, someone close to you has.  Sadly, there are a lot of misconceptions about what domestic violence is and there is a stigma associated with experiencing it.  Many people who are experiencing emotional, psychological, or economic abuse don't realize that what they are experiencing constitutes abuse because their partner isn't hitting them (if you suspect that you or someone you care about might be experiencing domestic violence, this chart is a good starting place.  If you're still not sure or are wondering what your next step should be, try calling their hotline or talking to someone at your local anti-domestic violence organization).  Many survivors feel pressured into remaining silent about their experiences.  This is why Domestic Violence Awareness Month is so important.  It gives us a chance to come together and say that we will not tolerate domestic violence in any of its forms.  It provides us with an opportunity to educate others about what domestic violence is and to stand with survivors.
     You may be wondering how you can help.  There are numerous ways to get involved, some of which are low commitment.  For example, you could:

  • Don purple (the color of domestic violence awareness) or teal (the color of sexual assault awareness) clothing and purple or teal ribbons to show your support.
  • Change your Facebook or Twitter profile using this Domestic Violence Awareness Twibbon.
  • Attend one of the many Domestic Violence Awareness events going on across the country (this site has some of the events going on across the country, although I'm not sure how comprehensive it is).  If you're a Mainer, click on this link and select the organization corresponding to the county you live in to see what events are happening in your area.  Additionally, if you're a UMaine student or community member, the Student Women's Association will be hosting our annual Take Back The Night march and rally on Thursday, October 15th at 5 pm in the North Pod of the Memorial Union.  We would love to have your presence and support!
  • Volunteer to help with your local anti-domestic violence organization.  Needs may vary from one organization to the next, so check with your local group to see what they're looking for.  Hotline workers are a position that many organizations need volunteers to fill on a regular basis.  They often have specific times when they are hosting training sessions, so if you're interested in this be sure to keep an eye out.
  • Donate to your local organization.  Groups are always in need of money to maintain and/or expand services.  Many groups that operate shelters may also need personal care items such as shampoos and menstrual hygiene products or toys and games if there are children at the shelter, but check with your specific organization before donating to make sure that your gift best suits their needs.
     The most important thing you can do all year round is listen and offer support.  If you suspect a loved one is in an abusive situation, the best thing you can do is to be there for them in whatever capacity they need.  If you aren't sure how to handle the situation, this site has some good advice.  If you yourself are experiencing or have experienced domestic violence, the National Domestic Violence Hotline is a 24 hour hotline and chat service that can help you figure out the best course of action given your situation.  They have an escape button in the upper left hand corner of their webpage that you can click on if you need to leave the site immediately.  Many local organizations also offer hotline services and other forms of support, so if you have the ability to do so, check out the services that they have to offer.
     I know this has been a heavy post, but this is such an important issue and if I inspire even one person to take action or seek out help, then it was worthwhile.  Now on to this week's craft.

Domestic Violence Awareness Ribbons

Materials
*Purple and teal ribbons, one of which is thicker than the other (the purple ribbon is for domestic violence awareness and the teal one is for sexual assault awareness)
*Safety pins
*Scissors

Directions:
*Take one of the lengths of ribbon and cross it over itself to form a loop, adjusting it until you have a ribbon of the desired length.  Cut off excess ribbon.
*Cut the second ribbon to be the same length as the first.
*Lay the thinner ribbon over the thicker ribbon and cross the two ribbons in the same manner as you did in step one.
*Slide a safety pin through the intersection point of the ribbons.  Use the safety pin to affix the ribbon to your clothes.

Thursday, October 1, 2015

Halloween Clothespins


     Before I get started with this week's craft, I wanted to let you know that Amber's Craft a Week Blog is now on Facebook and Pinterest.  The Facebook page is a great way to keep up-to-date on my latest crafts and the Pinterest page will hopefully give you a way to keep track of your favorite crafts.  Anyway, now on to this week's project.

Materials:
*Clothespins or mini clothespins
*Scrap cardstock in Halloween prints
*Black, white, yellow, and orange cardstock
*Silhouette CAMEO or pencil, scissors, and X-acto knife
*Glue

Directions:
*Cut out strips of patterned cardstock long and wide enough to cover the upper face of your clothespins and glue down to the respective clothespins.
*While the clothespin are drying, resize the templates given below to the appropriate sizes and cut out the and assemble the shapes (if you're using a Silhouette CAMEO, see this post for instructions on how to cut out my designs with your machine).
Cut out bat from black cardstock.


Cut out the ghost shape with the face from white cardstock and the one without from black cardstock.  Glue the white cutout over the black cutout.

Cut out the whole candy corn shape from black cardstock.  Cut out the tip of the candy corn from white cardstock and the middle piece from orange.  Cut out either the plain top or one of the three tops with a face from yellow cardstock.  Glue the white, orange, and yellow pieces to the corresponding parts of the black cardstock cutout.

Cut out the filled in pumpkin shape from yellow cardstock and one of the two jack o'lantern shapes from orange cardstock.  Additionally, you may want to cut out a stem from green cardstock, although I liked my jack o'lanterns better without it.  Glue the orange cutout over the yellow cutout and then, if you're using the green stem, glue it over the orange stem shape.

Cut out the witch's shoe from black cardstock.

*Once your clothespins and Halloween shapes are dry, glue the shapes to the clothespins and let dry.