Thursday, August 22, 2019

Amber's Craft a Week Blog is Turning 8!

     It's almost party time!  On Saturday, August 25, my craft blog will turn 8.  I've managed to keep it going through the end of my undergrad program, through my master's, and now well into my PhD program.  Here's to hoping for many more years of crafty fun.
     I'll have a special post for you all this Saturday in which I'll tell you a little bit about an old crafting project of mine.  In some ways it's kind of embarrassing looking back on this old endeavor, but I've been having fun unearthing these old projects and I can't wait to share them with you all.  At the very least, I hope you get a good chuckle out of it.
     For today's post, I wanted to celebrate the upcoming anniversary of my craft blog with a round up of previous crafts.  Instead of doing a best/worst list, I decided to do crafts that I love that have challenged me creatively and crafts that I would like to redo.  Some of the crafts I'd like to redo are actually ones I like quite a bit, but that I feel I could do a better job of with my current skill set.  I've narrowed it down to 10 crafts of each, spanning all nearly 8 years of my blog.  Feel free to let me know which ones are your favorites or which ones you'd like to see redone.

Crafts I'd Like to Redo


     I love flower crowns in theory, but I've never really liked the way the ones I've made have come out.  However, after seeing Halloween flower crowns on Spooky Little Halloween's blog, I'm tempted to give them another try.


     I love the concept of the Gift Genie, a silly little fortune teller toy to help you pick gifts for your friends and family, or at least give you a few laughs.  However, aesthetically, I think this particular incarnation leaves something to be desired.  I just slapped some stickers on because I didn't really know what else to do to decorate it.  However, with a little more thought, I could probably make a version of this that looks much better.


     The Zombie Fortune Valentine's Day Card I absolutely adore the concept of.  However, again, the aesthetics are not as great as they could be.  With a better design, I think this card could be a real scream.


     Instead of using generic Alice in Wonderland cake toppers, I thought it might be neat to use silhouettes of people and pets that I know to create the toppers.  Unfortunately, I don't think these worked out as well as they could have, in that they're not necessarily as recognizable as I would have liked.  Also, I think the paper I picked was a little busy for silhouettes.  If I were to redo these, I think I might either do black silhouettes or superimpose the faces/hair of the people onto cartoony bodies.  Or maybe just add some more details, like how I have the Cheshire Cat's smile on that particular topper.


     These worked out pretty well, function-wise, but they don't look as egg-like as they could.  If I were to redo them, I would try molding them inside plastic Easter eggs to give them a more egg-like shape.


     This is another one where my poor graphic design skills kind of overwhelm an otherwise nice craft.  Also, the kind of paint I used did not scratch off like it was supposed to, but rather had to be peeled off, so I'd like to try it with different paint to see if I could get the scratch off effect.


     These just straight up need a do-over.  I didn't try burning any after we made them because I don't like fire, but one of the recipients of these candles found that they did not stay lit as well as they could have.


     The labels.  Graphic design is not my strong suit.


     I actually love this craft, and these pages came out looking pretty nice, especially considering that I made these before I had my Silhouette CAMEO, so I had to do all the cutting by hand.  It almost could have made my crafts that I love that have challenged me list because this craft did push me creatively.  However, instead of compiling the pages in a book, which would have been the sensible thing to do, I decided to make wall hangings out of them.  This might not have been such a bad idea, except our house gets really humid, so the pages ended up wrinkling really badly.  If I ever try remaking a childhood book of mine again, I'll definitely put the pages somewhere safe from the humidity.


     I set the prongs too far apart, making it difficult to actually wear the earrings.  More tapered fireworks might not look quite as firework-like, but they would be more wearable.

Crafts that I Love that have Challenged Me


     I've made felt plushies before, but the Horror Pocket Pals are some of my most detailed.  On top of that, I wanted a hand drawn picture of 1428 Elm Street to complete the play set, when I haven't really drawn since middle school, and I was never one of the artistic all stars.  Drawing the house took a ridiculous amount of time, but I think it came out well given my skill level, and I love how the plushies turned out.  


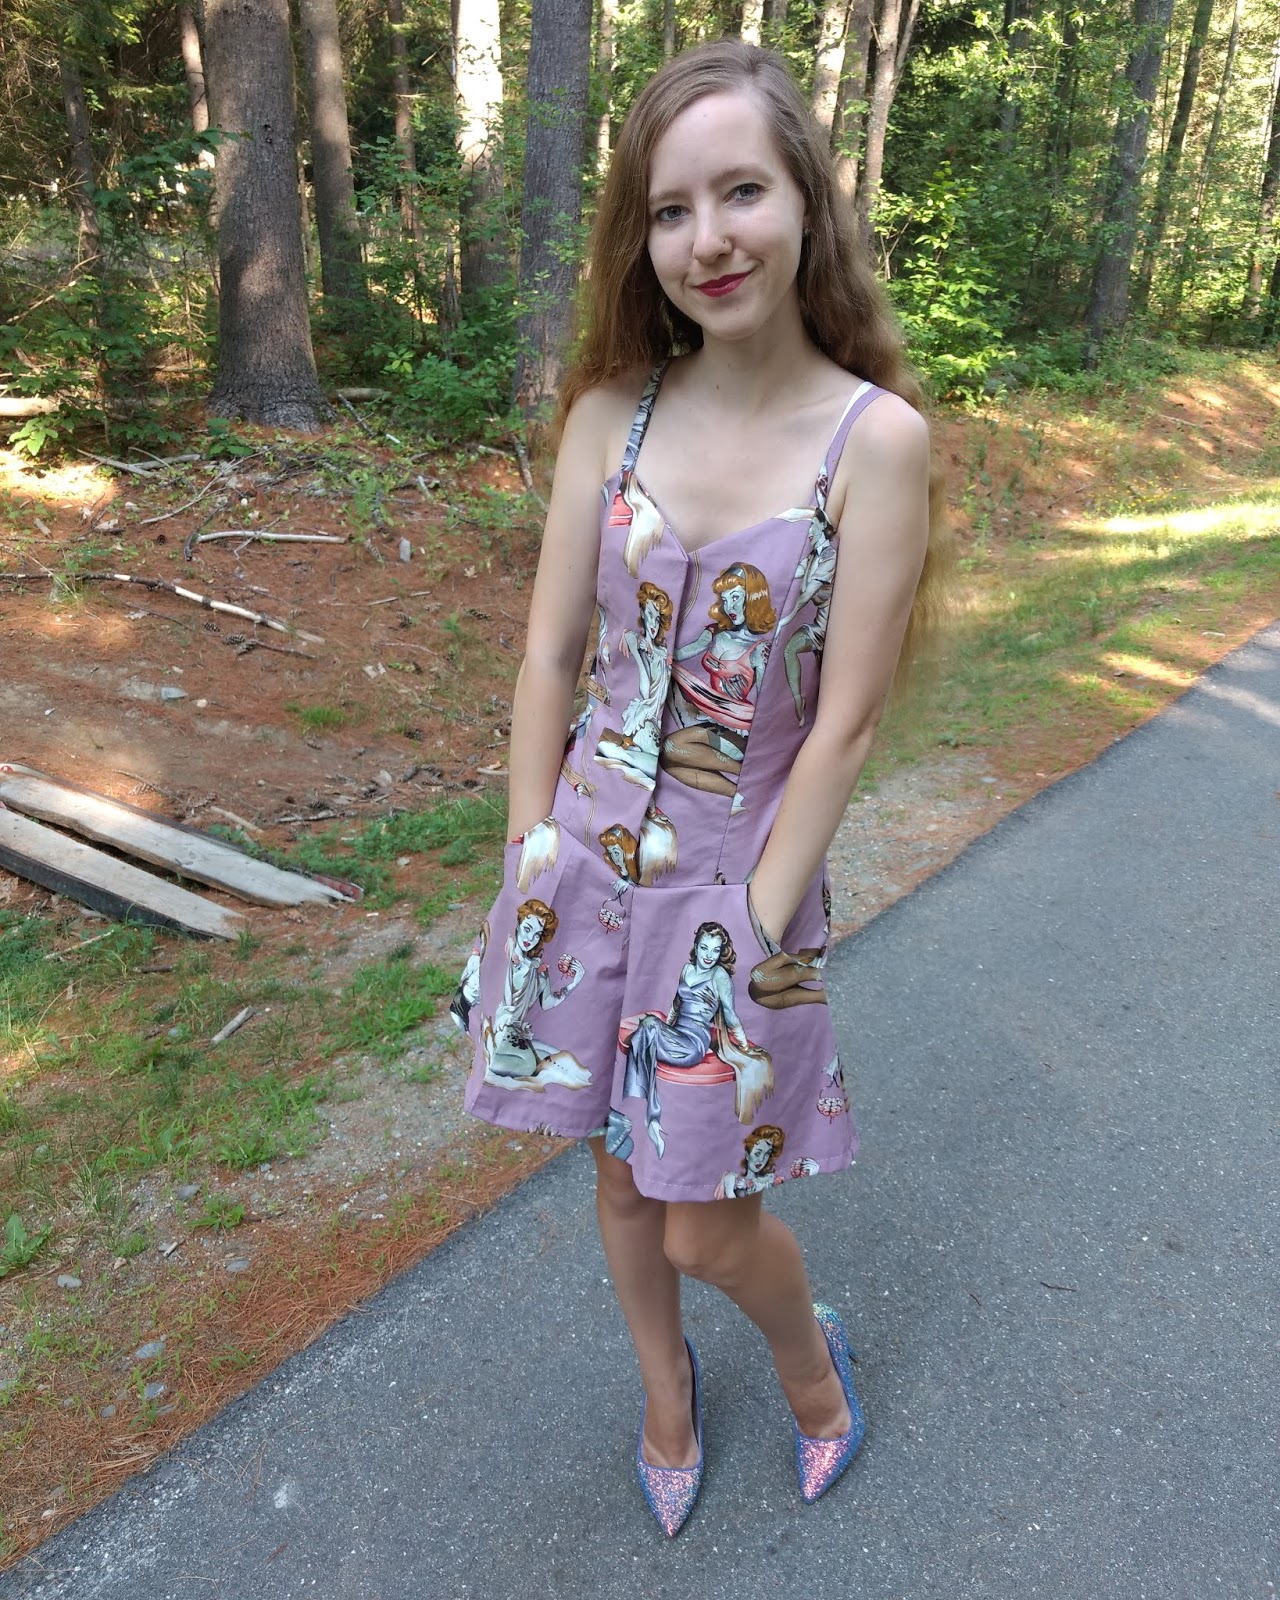
     For my second ever attempt at pattern sewing, I decided to make a romper.  By hand, as in literally a needle and thread, no sewing machine.  I also decided to modify the pattern, as I did not like the button closure and instead wanted hook and eye closures.  It's beyond incredible that I ended up with a garment that fits me and actually looks pretty decent.


     As a kid, I loved the Give Yourself Goosebumps books, wherein you would make choices which would lead you to one of several possible endings.  I tried writing some of my own as a kid, but only ever completed one, which I think had two places in the story where you would make choices and three possible endings.  For my Goosebumps birthday party, I decided not only to write such a story, but to make it so my guests could act out the story.  The story writing itself was not so bad, as I kept the story branches relatively short.  There were many different endings, so figuring out which props to include was a bit tricky, but I think everything worked out really well and people seemed to have fun enacting the story.


     This craft would not have been possible without Brian's help.  Or at least I probably would have assumed it would be impossible.  There actually weren't many modifications he had to make to the RC car to turn it into an RC Roomba.  Sewing the mini shark costume was a bit tricky, as I made up the design on the fly and just hoped for the best (I made an identical shark suit for one of the Halloween costume contest trophies), but I think this project worked out really well.


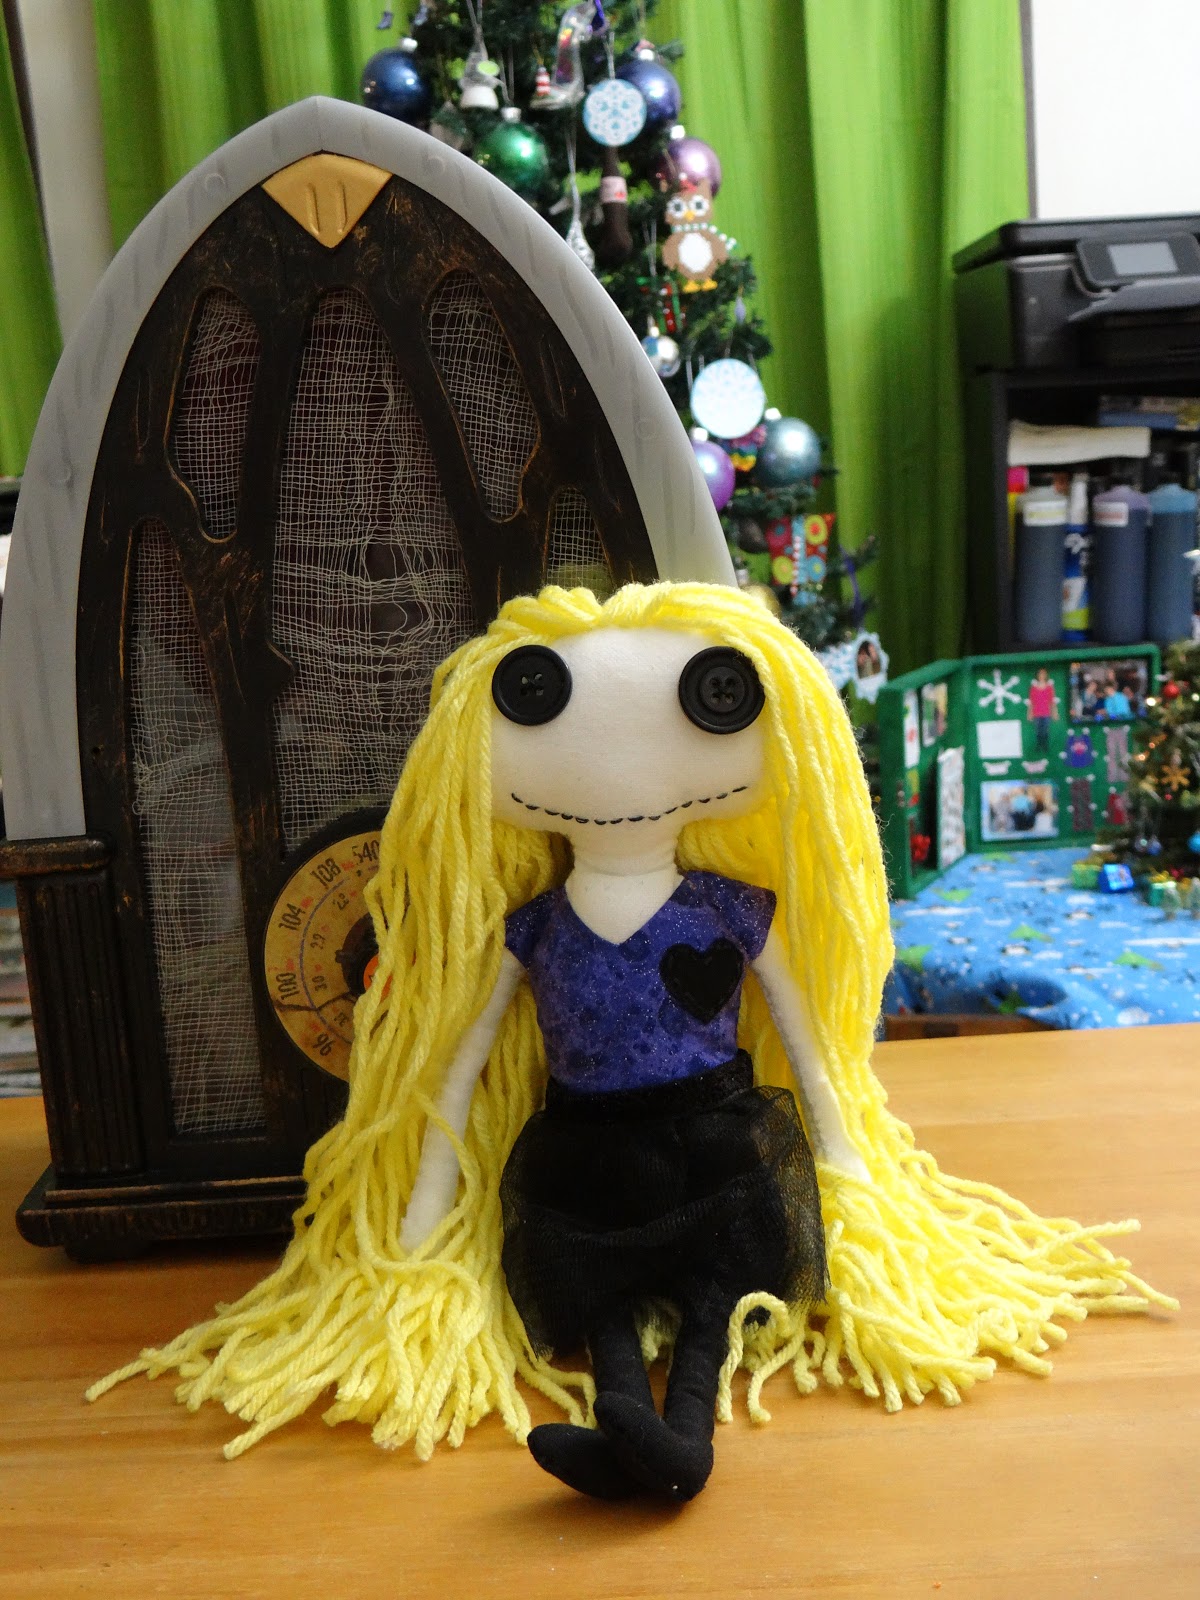
     The rag doll itself wasn't too tricky, as it was similar to making plushies, but I had to learn how to make rag doll hair.


     The tricky part of making these masks was making realistic looking feathers from paper.  I think I accomplished that reasonably well.


     Here I developed my own technique for making a haunted mirror.


     I have made several Halloween tombstones over the years, but this headstone remains my favorite.  It was the first one I made using insulation foam and I think it came nicely.


     This was my first real attempt at making my own Halloween costume.  I have worn it many times in the years since.


     The Great Graveyard Getaway 2010 remains one of my favorite games.  Brian and I devised it our first Halloween together.  I'd tried my hand at game making a few times before this, but this is the game with the most interesting and complicated mechanics of the lot, and also the one that I find most enjoyable to play.

     I hope you enjoyed this journey looking back on some of my previous crafts.  Stay tuned for Saturday, when I'll share with you a series of crafting projects that I began long before I started my craft blog.

Thursday, August 15, 2019

Bat Wing Boots


     Looking for a way to add a touch of Halloween to your wardrobe?  Try adding some felt bat wings to a pair of lace up boots.  I used these for my Dark Alice Halloween costume last year, but will probably pull them out again this fall to wear on days when I could use a little Halloween spirit.


Me wearing the bat wing boots as part of my Dark Alice Halloween costume

Materials:

*Lace up boots
*Black felt
*Black or silver thread
*Metallic marker or chalk
*Scissors
*Hole punch that can punch through felt (or a sufficiently sharp pair of scissors)

Directions:

*Trace two copies of the template given below onto black felt.  Don't trace the veins.  Those are there as a visual guide.


*Stitch on veins.  You may want to use black thread for a more natural look or silver or purple for more visible veins.

*Mark out where you would like the holes for the laces to be.  Make sure they align with your particular boots.

*Punch or cut out holes for the laces.

*Lace the wings into the boots.

Thursday, August 8, 2019

Haunted Artifact Prop


     The year before last, Brian and I had a plant pot outdoors that shattered during the course of the winter.  Rather than clean up the shards, I decided to incorporate them into my Halloween decor.  Unfortunately I was really busy last fall, so the prop was thrown together last minute, but I'm hoping to bring it back this year for my party.  All you need for this setup is broken pottery and a museum-style sign with some kind of legend explaining what will go wrong if said pottery breaks.  I made up a culture and legend (included below), but you can use whatever lore you would like to.

Legend

Ajegwan Burial Urn, ca. 500 CE

Urn is believed to contain the remains of Sjan Vlavec, 395-503 CE.  Known by her subjects as the "Queen of Death," Vlavec ascended to the throne at 15.  Her elder cousin and childhood confidante (his name is unknown, as Vlavec made sure all references to him were destroyed) was second in line for the throne and he devised a plan to assassinate her.  When his plot failed, she ordered her ladies' maids to tie him up and throw him into a nearby river, which was teeming with crocodiles.  After his betrayal, she became increasingly mistrustful of those around her and would have her maids execute anyone she felt had wronged her.  Contemporaries estimate her death toll at upwards of 2,000.  Toward the end of her life, she became convinced that someone was poisoning her and vowed that upon her death, she would return and kill every last person on earth.  Upon her death, a local sorceress bound her soul to the urn in which her remains were placed.  It is rumored that if her urn is ever broken, her soul will return to annihilate humanity.


Haunted artifact in my Halloween cemetery, Halloween 2018.

Materials:

*Broken pottery
*Printed legend
*Laminator
*Long wooden stake
*All purpose adhesive

Directions:

*Print and laminate legend.

*Glue legend to the wooden stake.

*Place the wooden stake in the ground.  Surround the stake by pottery shards.

Thursday, August 1, 2019

Room 217 Passkey


     As some of you may know if you've been following my blog for a while, my favorite movie is Stephen King's The Shining.  No, not the Stanley Kubrick film.  The made-for-TV miniseries that basically no one likes except for the Master of Horror himself and me.  Each year for Halloween, I decorate the bathroom as room 217 (see, e.g., Halloween 2018) and last year I decided to add the stolen passkey into the mix.  I tried to design mine to be reasonably close to the one featured in the miniseries adaptation of The Shining.  However, if you like Kubrick's adaptation better, you could easily mimic the passkey from his film instead.


The stolen passkey on the sink in "room 217."

Materials:

*Skeleton key
*Cream colored cardstock
*Color printer or brown marker (I used my Silhouette CAMEO to cut the "2" from the cream colored cardstock and added brown cardstock in behind, but printing or drawing on the "2" would be faster and easier).
*Hole punch
*Key ring

Directions:
*Print the number 2 onto a sheet of cream colored cardstock.  (If you're drawing on the number with a marker, you can wait to add the "2" until after you've cut out the diamond shape.)

*Cut out a rounded diamond shape with the "2" at its center, using the template below.


*Punch a hole in the top of the passkey and attach the skeleton key to the passkey using a key ring.

Thursday, July 25, 2019

Radiation Hazard Printable Sign


     If you've looked at my party pics from my recent Halloween parties (see Halloween 2017 and Halloween 2018), you may have noticed my radiation hazard sign on my fridge.  I actually made mine using my Silhouette CAMEO, but since Blogger doesn't make it easy to add SVG files to posts and since I imagine most of my readers don't have die cutting machines at home, I've turned it into a printable sign.  I made it in Paint, so it is a little pixelated if you print it at a large size.  However, if you have a better photo editing program which allows you to smooth the edges, that will probably fix the issue.  This sign could be a great addition to a Halloween zombie or science lab setup.

Materials:

*White cardstock
*Color printer
*Laminator (optional)

Directions:

*Print the sign out onto a sheet of white cardstock.
*Laminate if you wish.

Wednesday, July 17, 2019

Hot Glue Alien Parasite Specimen


     This hot glue alien parasite is easy and inexpensive to make, and is the perfect addition to a Halloween specimen collection.  Although I didn't use this for my X-Files party, it reminds me a little of the alien parasite in the X-Files episode "Ice."  You could also fill the vial with a colored liquid to make it look like you've embalmed the specimen, but I'm not sure if that would adversely affect your parasite if you want to reuse it for future years.

Materials:

*Hot glue and glue gun
*Vial
*Fine tipped black marker
*Label (see this post for creating potion labels)
*Thread

Directions:

*Apply some hot glue to the bottom of the vial's cork and create a line of hot glue going downward.  Make sure that the line of hot glue is still short enough to fit inside the vial.  Let harden.

*Once the hot glue has solidified, you can peel the parasite from the cork or leave it hanging from the cork, whichever way you like.

*Add a couple of eyes to the parasite using a fine tipped marker

*Close the parasite inside the vial.

*Tie a specimen label around the parasite vial.

Friday, July 12, 2019

X-Files Darkness Falls Cocooned Skeleton


     Welcome to the final X-Files Darkness Falls post.  Even if you're not planning on hosting an X-Files themed party, you can string up one of these cocoons in your yard as part of your Halloween decor.  Instead of little green mites, perhaps your skeleton was the victim of a giant spider.  Use your imagination, and have fun!


Materials:

*Plastic skeleton or bones
*Light colored "creepy" cloth (large mesh cheesecloth-like cloth sold at, e.g., Dollar Tree)
*Clear elastic cording
*Fake spider webbing
*Scissors

Directions:

*Lay your skeleton or bones on the "creepy" cloth.  If you're working with loose bones, like I was, the bones may move around a bit as you're making this, so you may have to shift them around a few times.

*String the clear elastic through the edges of the cloth, slowly pulling the edges together.  Creepy cloth tends to come as a rectangular sheet, which means that when you pull the edges together, you may get some uneven bunching at the top, which you can see a little bit in my pictures.  I didn't think it was that much of a detraction, and if you have a tree way above eye level that you can hang it from, the bunching probably won't be noticeable.

*Tie the cording to hold the edges of the cloth together.  Make sure the ends of the cording are long enough to tie around a tree branch or whatever you would like to hang your cocoon from.

*Pull spider webbing across the cocoon to give it a more web-like appearance.  Use as much or as little spider webbing as you like.