Monday, October 5, 2015

Domestic Violence Awareness Ribbons


Trigger warning: discussion of domestic violence and sexual assault.  If you are experiencing domestic violence and need help, check out this hotline service or skip to the paragraph below the bullet points in this post for more details on how you can receive help.

     Before I get to this week's craft, I want to take a moment to talk about something serious.  October is Domestic Violence Awareness Month.  This is important because domestic violence is an issue that affects all of us in one way or another, either through our own personal experiences or the experiences of loved ones.  It can take many forms, including physical, emotional, sexual, economic and psychological abuse (source).  More than 1 in 3 women and more than 1 in 4 men in the US will experience physical violence, rape, and/or stalking by an intimate partner in their lifetime (source).  About 1 in 4 women and 1 in 7 men will experience severe physical violence at the hands of an intimate partner in their lifetime (source).  Nearly 1 in 5 women (and 1 in 71 men) will be raped in their lifetime, and of these women, more than half have been assaulted by an intimate partner (40.8% have been assaulted by an acquaintance) (source).  Here in Maine, about half of all homicides are domestic violence related  (source).
     With statistics like these, the odds are that even if you have not personally experienced domestic violence, someone close to you has.  Sadly, there are a lot of misconceptions about what domestic violence is and there is a stigma associated with experiencing it.  Many people who are experiencing emotional, psychological, or economic abuse don't realize that what they are experiencing constitutes abuse because their partner isn't hitting them (if you suspect that you or someone you care about might be experiencing domestic violence, this chart is a good starting place.  If you're still not sure or are wondering what your next step should be, try calling their hotline or talking to someone at your local anti-domestic violence organization).  Many survivors feel pressured into remaining silent about their experiences.  This is why Domestic Violence Awareness Month is so important.  It gives us a chance to come together and say that we will not tolerate domestic violence in any of its forms.  It provides us with an opportunity to educate others about what domestic violence is and to stand with survivors.
     You may be wondering how you can help.  There are numerous ways to get involved, some of which are low commitment.  For example, you could:

  • Don purple (the color of domestic violence awareness) or teal (the color of sexual assault awareness) clothing and purple or teal ribbons to show your support.
  • Change your Facebook or Twitter profile using this Domestic Violence Awareness Twibbon.
  • Attend one of the many Domestic Violence Awareness events going on across the country (this site has some of the events going on across the country, although I'm not sure how comprehensive it is).  If you're a Mainer, click on this link and select the organization corresponding to the county you live in to see what events are happening in your area.  Additionally, if you're a UMaine student or community member, the Student Women's Association will be hosting our annual Take Back The Night march and rally on Thursday, October 15th at 5 pm in the North Pod of the Memorial Union.  We would love to have your presence and support!
  • Volunteer to help with your local anti-domestic violence organization.  Needs may vary from one organization to the next, so check with your local group to see what they're looking for.  Hotline workers are a position that many organizations need volunteers to fill on a regular basis.  They often have specific times when they are hosting training sessions, so if you're interested in this be sure to keep an eye out.
  • Donate to your local organization.  Groups are always in need of money to maintain and/or expand services.  Many groups that operate shelters may also need personal care items such as shampoos and menstrual hygiene products or toys and games if there are children at the shelter, but check with your specific organization before donating to make sure that your gift best suits their needs.
     The most important thing you can do all year round is listen and offer support.  If you suspect a loved one is in an abusive situation, the best thing you can do is to be there for them in whatever capacity they need.  If you aren't sure how to handle the situation, this site has some good advice.  If you yourself are experiencing or have experienced domestic violence, the National Domestic Violence Hotline is a 24 hour hotline and chat service that can help you figure out the best course of action given your situation.  They have an escape button in the upper left hand corner of their webpage that you can click on if you need to leave the site immediately.  Many local organizations also offer hotline services and other forms of support, so if you have the ability to do so, check out the services that they have to offer.
     I know this has been a heavy post, but this is such an important issue and if I inspire even one person to take action or seek out help, then it was worthwhile.  Now on to this week's craft.

Domestic Violence Awareness Ribbons

Materials
*Purple and teal ribbons, one of which is thicker than the other (the purple ribbon is for domestic violence awareness and the teal one is for sexual assault awareness)
*Safety pins
*Scissors

Directions:
*Take one of the lengths of ribbon and cross it over itself to form a loop, adjusting it until you have a ribbon of the desired length.  Cut off excess ribbon.
*Cut the second ribbon to be the same length as the first.
*Lay the thinner ribbon over the thicker ribbon and cross the two ribbons in the same manner as you did in step one.
*Slide a safety pin through the intersection point of the ribbons.  Use the safety pin to affix the ribbon to your clothes.

Thursday, October 1, 2015

Halloween Clothespins


     Before I get started with this week's craft, I wanted to let you know that Amber's Craft a Week Blog is now on Facebook and Pinterest.  The Facebook page is a great way to keep up-to-date on my latest crafts and the Pinterest page will hopefully give you a way to keep track of your favorite crafts.  Anyway, now on to this week's project.

Materials:
*Clothespins or mini clothespins
*Scrap cardstock in Halloween prints
*Black, white, yellow, and orange cardstock
*Silhouette CAMEO or pencil, scissors, and X-acto knife
*Glue

Directions:
*Cut out strips of patterned cardstock long and wide enough to cover the upper face of your clothespins and glue down to the respective clothespins.
*While the clothespin are drying, resize the templates given below to the appropriate sizes and cut out the and assemble the shapes (if you're using a Silhouette CAMEO, see this post for instructions on how to cut out my designs with your machine).
Cut out bat from black cardstock.


Cut out the ghost shape with the face from white cardstock and the one without from black cardstock.  Glue the white cutout over the black cutout.

Cut out the whole candy corn shape from black cardstock.  Cut out the tip of the candy corn from white cardstock and the middle piece from orange.  Cut out either the plain top or one of the three tops with a face from yellow cardstock.  Glue the white, orange, and yellow pieces to the corresponding parts of the black cardstock cutout.

Cut out the filled in pumpkin shape from yellow cardstock and one of the two jack o'lantern shapes from orange cardstock.  Additionally, you may want to cut out a stem from green cardstock, although I liked my jack o'lanterns better without it.  Glue the orange cutout over the yellow cutout and then, if you're using the green stem, glue it over the orange stem shape.

Cut out the witch's shoe from black cardstock.

*Once your clothespins and Halloween shapes are dry, glue the shapes to the clothespins and let dry.

Thursday, September 24, 2015

Halloween Countdown Photo Calendar


     Looking for a fun way to count down the days until Halloween?  Try making a photo calendar using old Halloween pictures.  Don't have 31 Halloween pictures you want to use?  Leave some of the tags blank and let the calendar grow over time.  I used 11 pictures from the past 5 years for mine and am excited to see how the calendar will change in the years to come.

Materials:
*Tags numbered 1-31 (see below for ideas)
*Mini clothespins
*Small photos
*Glue
*Scissors
*Halloween ribbon
*Halloween themed bottle cap magnets
*Magnetic tape
*Black and white cardstock

Directions:
*Create number tags.  I cut out this pattern with my Silhouette CAMEO, using white cardstock to cut out the outside part of the tag and purple, black, green, and orange cardstock for the inserts.  However, there are tons of ways you could hand make tags, such as by using Halloween themed cardstock and gluing numbers to the tag, similar to what I did with this Christmas advent calendar.
*Select the photos that you would like to use for your calendar.  Crop them to squares and resize them so that they are small enough to fit on either the insert tags if you're using the same pattern I did, or on the back of the tags if you're making them by hand.  Glue them to the tags accordingly.
*Once the tags are dry, clip them to lengths of ribbon with mini clothespins such that the photo side of the tags are hidden from view.  Next week I'll be explaining how I decorated my clothespins, but if you're looking to make some in the interim, you can use paint, cardstock, stickers, Halloween shaped confetti, etc. for decorating.
*Use bottle cap magnets to hold the ribbon to the refrigerator.  Make sure to use strong magnets.  Mine weren't strong enough and so I ended up having to tape the ribbon to the refrigerator.
*Create a month label.  I used black cardstock and some ribbon from Dollar Tree for the background and overlaid white text in Times New Roman Font (with the exception of the "O," which I got from this Halloween monogram set), but decorate yours as you wish.
*Add magnetic tape to the back of the month label and place it on the fridge.
*To use the calendar, as each day of October passes, turn over the tags (or inserts) to reveal the photo, like I did with the "1" tag in the picture below:


Thursday, September 17, 2015

Haunted Mirror


     If you plan to make one craft this Halloween season, make it this mirror.  It requires only minimal effort and skill, but the finished product is great.  It's definitely up there in my list of favorite Halloween decorations I've made.  I based the idea off of this tutorial, but made some modifications.

Materials:
*Picture frame
*Krylon Looking Glass Spray Paint
*Matte sealer
*Spray adhesive
*Print of an old looking photo
*Flat backed glass marbles
*Scissors

Directions:
*Find an old photo.  I went with a daguerreotype image because it already had a "ghost in the mirror" sort of look to it.  You can see it's really dusty, but in the end that doesn't matter because you're cutting around the subject(s), so as long as they aren't obscured too much by grime, you're good.  If you're photographing a daguerreotype of your own, I've found that the image shows up best when it's reflecting a dark background (in this instance my camera case).

This pic is of my great great grandfather William Cornelius "Neil" Bowen (the littler boy wearing the hat) and his brother James.  I've included some info at the end of the post if you're interested in learning more about the brothers.

*Print the photo onto plain printer paper.  If the picture you choose is not black and white (or if the lighting adds unnatural color to it, which is what happened with my photo), decrease the saturation before printing.
*Cut out the photo and then cover it with a matte sealer so that the colors won't bleed.
*Remove the glass from the picture frame and clean it, if desired.  If you don't clean it well or if you don't dry it all the way, you'll end up with splotches on your mirror.  This can add to the old mirror aesthetic, but if you want a crisp image make sure to wash it and either let it air dry or dry it with a clean T-shirt or other cloth that will not leave behind lint.
*Once the glass is dry, set it down on some newspaper in a well-ventilated area.  Slide the photo across the glass until you find a placement you like.  Place the photo face down on the glass and secure it in place by laying flat backed glass marbles on top of it.
*Spray the glass following the instructions on the back of the Looking Glass Paint bottle.  You'll end up doing five thin coats of paint to get the mirror look.
*An hour after applying the final coat of paint, remove the picture from the glass.  Apply one or two very thin coats of paint to the place where the photo was.  I ended up applying two, but I kind of wish I had done only one, as it would have allowed the image to show up better.
*Glue the photo in place using spray adhesive and set aside to dry.
*Once dry, place the glass back inside the frame.  Now you have your very own "haunted" mirror!

It's tricky getting the "ghosts" to show up well for the camera (isn't that how it always goes ;) ).  They are easiest to see when the mirror is facing a dark backdrop.  I managed to get the below picture by draping a navy blue blanket over a bench and across the floor in front of the mirror and then angling the camera so that I was cut out of the shot.  The same goes for seeing the "ghosts."  Depending on the lighting and background, you may see nothing more than a shaded region, but you also might see a sharper image, like the one pictured below.


A Haunting Good Time


     Here's a fun little trick to play on your friends.  Invite them over to your house.  If they don't immediately notice the strange reflection in the mirror, take a photo of them with the mirror and then show them the image and see what they say.  Alternately, you could upload a pic of yourself with the mirror to Facebook and see if anyone notices that you're not alone.

About the Bowen Brothers:

     John James "James" Bowen was born December 13th, 1847 and his brother William Cornelius "Neil" Bowen was born November 9th, 1849.  Their parents were Harriet Emily (Britton) of Philadelphia and Stephen Riley Bowen, born in Worcester County, Maryland.  The brothers were baptized at St. Mary's Protestant Episcopal Church in Philadelphia on November 30th, 1849.  In 1850 the boys lived in West Philadelphia with their parents, their maternal grandmother Julia Ann Allen (Blodget) Britton, and several aunts and uncles.  Their mother died in February of 1852.  I have yet to determine what happened to their father; he may have died as well, but by 1860 the brothers had been separated.  James stayed with his grandmother, while William Cornelius was sent to Northampton County, North Carolina to live with his aunt Ellen Matilda (Britton) and her husband Dr. Cornelius Godwin Cotten Moore.
     In 1870 the brothers were again living together in Philadelphia, this time at the home of their uncle John Blodgett Briton.  James was working as a medical doctor.  This is the last record I can find of him before his death certificate.  He was listed as single at the time of his death.  He worked as a physician and inventor until his retirement.  Toward the end of his life, he was living at the Old Man's Home in Philadelphia.  He died on January 4th, 1918.
     "Willie," as he was  referred to in the census record, was working as a clerk, perhaps as a summer job, since he was a student at the University of Virginia during this time period.  He was an instrumental member in the establishment of the fraternity Kappa Sigma.  After finishing his schooling he returned to Northampton County to practice law.
     On June 5th, 1877 he married Frances Josephine "Josi" Southall, daughter of Sarah Clifton (Wheeler) and James Hunter Southall.  Josi had been born in Mississippi, but was sent to North Carolina to live with her aunt Julia Monroe (Wheeler) and uncle Godwin Cotten Moore at their plantation Mulberry Grove, which was where she and Neil married.  The young couple settled into a former plantation house nicknamed "Southerly" near Jackson, North Carolina.  They had five daughters together, Harriet Emily Bowen, Julia Southall (Bowen) Peebles (my great grandmother), Ellen Britton Bowen, Josephine (Bowen) Hughes, and Bland Clifton Bowen.
     Around 1890 Neil moved to Denver, Colorado for health reasons.  Josi and the girls stayed in North Carolina.  Josi passed away on January 25th, 1893 and her sister, Julia Monroe Southall took over caring for the girls.  By 1910 Neil had returned to Jackson and three of his daughters were living with him.  He died on September 23, 1911 and was buried at the Church of the Saviour Cemetery in Jackson.

Thursday, September 10, 2015

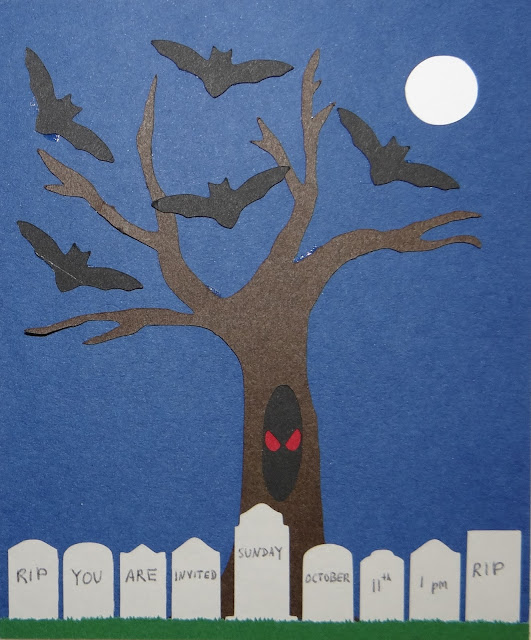
Halloween Graveyard Party Invite


Materials:
*Cardstock in red, black, dark blue, gray, green, brown, and white
*Scissors, pencil, and printer or Silhouette CAMEO
*Pen or gel pen
*Glue

Black and White and Color Templates


Cutting by Hand Directions

*Resize the invite template to the desired width for your invites and print.
*Cut out the various pieces of the template.  The grass portion (the one with all the jagged bits) may be a little time consuming for hand cutting, so feel free to smooth it out if you wish.
*Using the color-coded template guide, trace the shapes onto their respective sheets of cardstock and cut out (the moon here is yellow to distinguish it from the background, but I used white paper for it).
*Write out the party info on the tombstones, if it will fit.  Alternately, you could use a white or silver gel pen to write the info off to the side of the tree after you've settled your design.
*Taking a piece of dark blue cardstock cropped to the appropriate size, align the various pieces of the invite in accordance with the invite photo at the top of the page.  I left the roots on the tree in case you wanted to use the template for other projects, but for this you'll have to trim them a bit to get the tree to fit properly in the design.
*Glue down the various pieces of the invite.

Silhouette CAMEO Directions

*Download the black and white invite template to your computer and run the Silhouette Studio program.
*From the File menu, select "Import" and then "Import to Library" and then select the template from wherever on your computer you started.  Now the template will show up in your library.
*Set the page settings to the dimensions of your cardstock and then drag the template onto your page and resize the template to your desired size.
*Click on the button that opens the trace window (it looks kind of like a blue butterfly with a yellow background and if you hover your mouse over it, it says, "Open the Trace Window").
*Click on the "Select Trace Area" button and draw a blue rectangle around the part of the template you want to cut out first, say the tree.  At this point you should see a yellow outline around the tree.
*Adjust the High Pass Filter until the tree is entirely yellow and then click the "Trace" button under the "Apply Trace Method" section.  You should now have a red outline around your tree.
*Drag the red outline to the upper left corner of the screen.  Copy it as many times as you need invites and line them up so that they don't overlap.  DO NOT delete the template from the page.  The CAMEO will only cut out the red outlines and if you delete the template, it could make it difficult to size the rest of the pieces of the template so that they line up exactly.
*Following the color coded template guide (the moon is in yellow to distinguish it from the background, but I used white paper for it), align the appropriate colored sheet of paper on the cutting mat and load it into the machine.
*Click on the "Cut Settings" button and under material type, select cardstock, then click the "Send to Silhouette" button.
*Delete the red outlines from the page in Silhouette Studios.  Go back to the trace window, select the next part of the template you would like to use, and trace it, using the same procedure as outlined above.  Peel the pieces off the cut mat, place the next sheet of cardstock on and load the mat, and cut out as before.  Repeat this process for each of the different pieces.
*Write out the party info on the tombstones, if it will fit.  Alternately, you could use a white or silver gel pen to write the info off to the side of the tree after you've settled your design.
*Taking a piece of dark blue cardstock cropped to the appropriate size, align the various pieces of the invite in accordance with the invite photo at the top of the page.  I left the roots on the tree in case you wanted to use the template for other projects, but for this you'll have to trim them a bit to get the tree to fit properly in the design.
*Glue down the various pieces of the invite.

Thursday, September 3, 2015

Eerie Graveyard Bouquet


     Add this spooky bouquet to your Halloween graveyard or use it as a floral centerpiece for your Halloween table.

Materials:
*Cardstock in black and purple
*Floral wire
*All purpose adhesive
*Scissors
*Pen
*Floral tape
*Twist tie
*Black/Halloween ribbon
*Spiderweb
*Plastic spider

Directions:
*Make some paper roses using the techniques from my paper roses post.  The only thing I did differently this time around was I wrapped the floral wire in floral tape before I started so that the stems would look a more natural shade of green.
*Tie the roses together using a twist tie.
*Tie a ribbon around the bouquet over the twist tie.
*Add some spiderweb and a plastic spider to the top of the bouquet.


     Here's a pic of the bouquet with my latest foam tombstone.

Thursday, August 27, 2015

Insulation Foam Halloween Tombstone


     I love making Halloween crafts.  One of my favorite Halloween decorations is the Halloween graveyard and this year I've decided to work on improving my own one (see this post for a picture of my cemetery from last year).  A couple of years ago I wrote up a blog post on how to make Styrofoam headstones.  I recently found out that there is a better material for making Halloween tombstones: insulation foam.

Materials:
*2' x 2' sheet of insulation foam
*Hand saw (I used a box cutter, but the blade was too short to cut all the way through well)
*Sandpaper
*Protective goggles
*Ventilation mask
*X-acto knife
*Pen
*Dark gray paint
*Lighter gray paint
*Paintbrush

Directions:
*Decide what shape and size tombstone you would like.  If you do a quick search, you can find tons of templates and design ideas online.  I based mine off of a photo I had of one of my ancestor's headstones.
*Using your saw, cut your foam to size.  If you're going for a narrower stone, you might be able to get two stones out of this one sheet of foam.
*Sketch or trace on the design you would like to use for the top of the headstone and cut it out using the saw.
*Sand down any rough edges with sandpaper.  I used very fine grit sandpaper because that was what I had on hand, but I've read that you can use up to medium grit without trouble.  You may also want to sand down any sharp corners to make the stone look aged, if that's the style you're going for.
*Print out your design and center it on the foam and then trace over it with a pen, pressing down hard enough to indent the foam.
*Trace over your indentation with a pen.
*Cut out your design using an X-acto knife.  This Lowes tutorial suggests using a cross hatching technique.  I tried doing that a little, but I mostly just scraped out the excess foam.  If you have a dremel, you may be able to use that instead and it should give you a smoother look than what I ended up with.
*Paint the stone using the darker gray color, making sure to fill in all of the crevices to the best of your ability.  I had to do two coats to get all the nooks and crannies.  If you have fine details, you can use the end of a needle to squeeze paint into the crevices.
*Combine the two shades of gray until you get a color that is a shade or two lighter than the dark gray.  Paint the surface of the stone, but skip the inscription.  This will enhance the visibility of the inscription.