Thursday, June 1, 2017

Nail Polish Roulette Slumber Party Game


     Here's a fun sleepover party (or un-slumber party) game.  If you already have a collection of nail polish, you have the bulk of what you'll need to make the game (and if you don't, you can pick up bottles at Dollar Tree for $1 each or buy multi-packs after Halloween and Christmas at steep discounts).  If you're buying new bottles rather than digging into your personal collection, you could even give away some of the bottles as party favors.
     My version of the game requires 20 different nail polish colors, but you could easily play with fewer bottles by using a six-sided die instead of a 20 sided one or using a game spinner (Brian suggested using a spinner from the game of Life and matching nail polish colors to the colors on the spinners.  I've also seen several variations of this Spin the (Nail Polish) Bottle game, which generally use 8 colors but which could be modified to use more or fewer).  Also, although I thought my game board was a nice touch, you can easily make a variation of this game using only nail polish, a die, and some way of numbering your nail polish bottles.

Materials:

*20 bottles of nail polish
*20 sided die
*Painter's or masking tape
*Marker
*12x12 sheet of cardstock
*Number and letter stickers (or cutouts; I used my CAMEO for the lettering/numbering)

Directions:

*For making the game board, add a title like "Nail Polish Roulette" to the top of a 12x12 sheet of paper and then place numbers 1-20 along the board.


*Write numbers 1-20 on painter's or masking tape and stick them to the backs of the nail polish bottles.

*Place the nail polish bottles along the board at their designated spots.


Game Play

 *Players sit in a circle around the game board taking turns rolling the die.

*The number a player rolls corresponds to the nail polish color a player will have to paint one of their nails.

*The game concludes when each player has painted all of their fingernails (or toenails).

Thursday, May 25, 2017

Birthday Un-Slumber Party

     As far as parties go, it's hard to beat a sleepover party.  My sister and I used to have friends over whenever possible growing up, and I have fond memories of those days (some of which you'll find at the end of this post).  Living in a one bedroom apartment with no couch, hosting an overnight party is out of the question.  However, there was nothing keeping me from offering the games, activities, and food of a slumber party during the day, and I decided to throw an un-slumber party.
     Over the next few weeks, I'll be sharing the details of how I made the various crafts for this party.  For now, though, here's an overview of the decorations, activities, games, and food I had at my party, plus some memories of sleepovers past.


     While in years past I've thrown some elaborately decorated parties, this year I focused a lot more on the games and activities than I did on aesthetics.  As far as themes go, an un-slumber party doesn't have an obvious decorating scheme.  I chose a black and silver color scheme because that reminds me of stars in the nighttime sky.  I made this curtain of streamers to cover the entryway.


     Here are the plates, cups, utensils, etc.  All of the tableware came from Dollar Tree.  I bought plain black party supplies and then decorated the cups and utensils so that things weren't so dark.


     Here's the tablescape.  I bought a plain black tablecloth from Dollar Tree and scattered silver stars across it.  On the table you'll see two of our party activities.  One is a nail polish roulette game I made.  The other is coloring page photo frames which I designed, although you can't really see what's on the pages in this picture.  My plan was to have people color the photo frames and then send them home with the photo frames and a group photo to put in one of the frames as a souvenir.  However, we ended up spending a lot of time on the other activities, so I gave people plain pages to color at home.


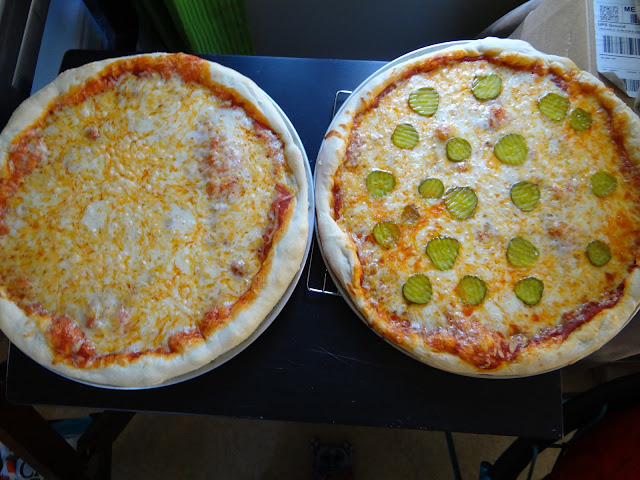
     Brian made homemade pizza.  Pictured above are the pickle and cheese pizzas, but he also made Alfredo pizza (cheese pizza with Alfredo sauce instead of tomato sauce) and his "heart attack pizza" (pizza loaded with hamburger and pepperoni).


     Playing nail polish roulette . . .


     . . . and the aftermath of our game.  Some of the colors kind of worked together, and some really didn't.


     Here we are taking a group photo with some of the photo booth props I made.  It's hard to see from this picture, but dad and I tried to give Katie bunny ears simultaneously.  Also, you can see Katie's lovely Stephen King book artwork on the fridge.


     For my cake this year, we I didn't do a lot of decorating.  I just made that Little Owl cake "topper."  Brian added some icing decorations.  I found the black candles with silver glitter at Party City.
     While eating cake and ice cream, we also played Mad Libs.  There is a free Mad Libs app that you can download for your phone or tablet.  It comes with a handful of free stories, but if you need more than what they offer, you can also buy whole Mad Libs books through the app.


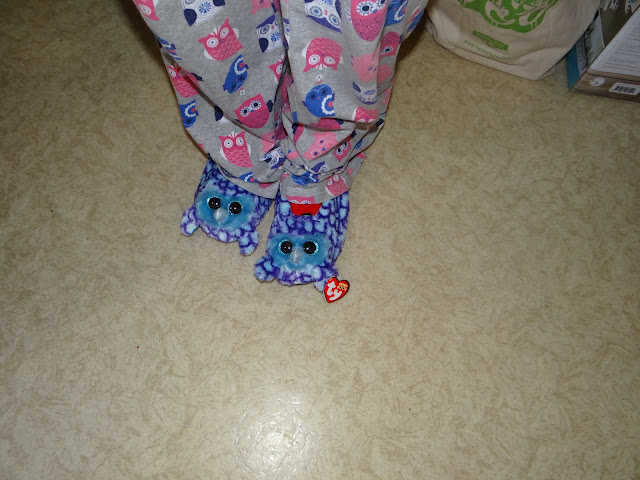
     Aren't these slippers adorable?  They have the cutest little faces.  Brian got them for me for Christmas.  If you're throwing a party for a younger audience (I think the size I have is about the largest they offer) and you can afford to spend some money, these could make for great party favors.


     Dad always gives awesome birthday cards.


     It wouldn't be a Hathaway family function without an attempted murder!


     Failing to give dad bunny ears.  I always underestimate how high I'll have to lift my arm to make bunny ears visible.
     Well, that wraps up another birthday party.  What are your favorite sleepover activities?  Snacks?  Any favorite sleepover memories?  Here are some of the sleepovers that stick with me.  


     Katie, Becky, and I decided to camp out on Becky's porch swing.  We draped sleeping bags over the swing to seal it off from the bugs, but the bugs still got in and had a feast.  Plus it was really cold.
    Another time, we camped out in a tent in Becky's front yard.  Katie had seen one of those true crime shows in which a man cut a hole in the wall of a tent and abducted and murdered a little girl.  Katie was worried that someone was going to cut a hole in our tent and kidnap her, so I had to sleep near the wall of the tent.


     One final memory.  When my mom bought a shed for our house, Katie and I decided that before she started filling it up with boxes, we were going to have a sleepover in it.  She, Breanna, and I grabbed our bedding and junk food and camped out.  One of our neighbors heard about our plan and started banging on the shed.  We were sure we were about to be murdered.


     I can't remember if we barred the door before or after the knocking, but we were not letting any murderers in if we could help it!

Thursday, May 18, 2017

DIY Denim Cutoffs, with Tips for Getting Bloodstains out of Clothes


Warning: if period talk makes you uncomfortable, turn back now.  I have 298 non-period related posts that you might enjoy more.  Also, there are pictures of bloodstained clothes, so if the sight of (dried) blood bothers you, this is not the post for you.

Warning: The bloodstain removal tips are intended to remove visible blood from periods and minor accidents like scraped knees.  It is not intended to be a method to remove all traces of DNA from clothing.  If you have murdered someone and are looking for ways to get their blood out of your clothes, leave this page and turn yourself into the police immediately.

     I was initially hesitant to write this post because I'm kind of embarrassed to admit that even though I've been  dealing with periods for fifteen years, I still bleed through from time to time.  This most recent incident was particularly messy because it began as I was about to teach a two hour lab section, so I didn't have the opportunity to clean up until I was back at home.  Usually I'll throw a little OxyClean into the wash and it'll come right out, but this time it didn't work.  I didn't bother to check them until the jeans were already dry because OxyClean is usually effective, and by then it was too late.  I had set-in bloodstains not just on the crotch of my jeans, but also by the knee?


     I'd been wanting to try making rainbow cutoffs, so this seemed like the perfect opportunity.  I cut the legs off my jeans to make them into cutoffs.  I know you can sand them and whatnot to make them fray more and give them more of a worn look, but I figured that if I wear them a few times, they'll eventually fray on their own, so I literally just cut the legs off and wound up with this:


     My next step was bleaching the shorts.  I put them in some water and Brian threw in some bleach.  Bleach is a harsh base which can damage fabrics and Brian was insistent that we err on the side of caution, so we started out with only two capfuls of bleach mixed in with the water.  We let the shorts sit and nothing happened.  We added more bleach and a little more, eventually reaching a concentration of maybe 1 part bleach to 3 or 4 parts water.  I let that sit for half an hour.  I still wasn't seeing any changes, but I decided to put them through the wash to see if maybe the washing process would remove some of the color.  The dye did not come out, but the bloodstain did, leaving me with a nice pair of denim cutoffs.

Bloodstain Removal Tools

*Hydrogen peroxide - works well for fresh bloodstains.  Put stained clothes in a tub of cold water (hot water helps set the stains) and add a few capfuls of hydrogen peroxide.  Alternately, you could put the clothes in the wash and throw a little peroxide in with them.

*OxyClean - works well for fresh bloodstains.  The active ingredient in OxyClean is hydrogen peroxide, but I've had better luck removing stains with OxyClean than with hydrogen peroxide on its own.  Add some to the wash and your clothes will most likely come out clean, as long as the blood is fresh and there isn't too much of it.

*Bleach - works for set in stains.  Bleach really should be used as a last resort because of the potential it has to damage your clothes.  Start out using only a small concentration of bleach, probably no more than 1 part bleach to 4 parts water.  Let set for half an hour and then wash immediately.  Denim is a fairly rugged material, so if you're cleaning something less robust, start with even more dilute concentrations of bleach and keep them in the bleach water for an even shorter amount of time.  No matter how cautious you are, you are risking bleaching out the fabric and perhaps even damaging the fibers of the item, so be aware of that.

Thursday, May 11, 2017

DIY Fringed Crop Top


     Wanting something new to wear this summer?  Look no further than your wardrobe.  With a little time and effort, you can transform existing clothes that have become worn or damaged (the hem of this shirt had unraveled and the bottom of the shirt had gotten stretched out) into something that you'll want to wear.

Materials:
*Shirt that you want to turn into a crop top
*Scissors
*Metallic marker or chalk

Directions:
*Cut off the bottom hem of the shirt.  If you know you want relatively short fringes, you can cut off a bit more of the bottom of the shirt too, but if you're not sure you can always keep the length at the outset and crop it more later.


*Put on the shirt inside out and draw a line going across the shirt marking where you want the fringes to end.

*Cut the lower portion of the fabric into thin, vertical strips.


*Knot neighboring strips together in pairs, going all the way around the shirt.

*Knot neighboring strips in pairs, tying together neighbors that you did not tie together the previous time.


*Trim fringes to desired length, if necessary.

Thursday, May 4, 2017

Morse Code Earrings


     These asymmetric earrings make a statement - literally!  I used the seed beads to denote the dots and the tube-shaped beads for the dashes.  The big beads at the center of each earring are also dots, made larger to distinguish them as a new letter.  See if you can figure out what these ones say (there's a typo in the first earring; there should be one fewer dots in the first letter), and have fun coding your own jewelry.

Materials:
*Two different types of beads, one to denote dots and the other dashes
*Head pins
*Ear wires
*Round nosed pliers
*Needle nosed pliers
*Wire cutters

Directions:
*Pick a short message to encode.  Each of the earrings I made spells out one three-letter word.
*Translate your message into Morse code.
*Add beads to a head pin to spell out your message.  If you want your message to read vertically from top to bottom, you'll have to put the beads on in the reverse order in which you would read them.  For example, if your message ends with the letter "A," which is dot dash, you'll want to put the dash bead on first and then the dot.
*Cut off all but about 1/4" of excess pin.  Curl the tops of the head pins using round nosed pliers and clamp onto the ear wires using needle nosed pliers.

Thursday, April 27, 2017

DIY Vanilla Lip Balm


     This lip balm is fast and easy to make and requires only three ingredients: coconut oil, vanilla extract, and beeswax (you could probably also use a different type of wax if you want to make it vegan).

Materials:
*Coconut oil
*Beeswax
*Vanilla extract
*Clean, empty makeup container
*Tablespoon measure
*Glass measuring cup
*Spoon

Directions:
*Combine 3 tbsp of beeswax and 5 tbsp of coconut oil in a glass measuring cup.
*Place measuring cup in the microwave and set for 2 minutes.  Every 30 seconds, take the cup out and mix it.  By the end of the 2 minutes, the wax and oil should be completely liquefied, although depending on the power of your microwave, this may or may not be the case.  If not, continue melting and mixing in 30 second increments until it is completely liquefied.
*Add a small amount of vanilla extract (I used 2 "splashes" from the rather wide necked container) to the measuring cup and mix.  The vanilla extract won't want to mix completely with the oil and wax, so it will form these little brown bubbles.  The more you mix, the smaller they'll become and the more uniformly they will be distributed.
*Pour the mixture into clean, empty makeup containers and let harden.


Thursday, April 20, 2017

Quick and Easy Card Scrapbook


     For me, cards have long posed a storage challenge.  If you've been following my blog for some time, you've probably seen my various card scrapbooking attempts.  Each one has its charm, but I needed something fast and easy that would work for oversized and musical cards.  I have some antique family photo albums on which my ancestors glued photos to black paper and I decided to use the same idea here.

Materials:
*Cardstock in a color of your choice
*All purpose adhesive
*3-ring binder
*3-hole punch
*Cards

Directions:
*Take a sheet of cardstock and punch one of the long edges so that it will fit into your binder.
*Glue on cards and other mementos.  My dad rarely signs his cards, so I included envelope pieces as well on many of the pages.
*If you have cards that you can't glue down or don't want to glue down, stick them in the pockets of the binder.