Thursday, April 21, 2016
Clay and Wine Cork Stamp
There are tons of neat crafts out there for using wine corks, but many of these require stockpiling large numbers of corks. If you only have a few corks on hand, here's a good way to reuse them.
Materials:
*Polymer clay
*Wine cork
*All purpose adhesive
*Aluminum foil
*Optional: shape molds
Directions:
*Cover your work space. I used the aluminum foil I was going to use to bake it on to cover my work space.
*Create the shape that you would like your stamp to have. If you're using a mold, you can just squish the clay into the mold. It doesn't matter if there's excess clay sticking out over the edge; in fact, that makes it easier to make your stamp.
*Cover the top of the wine cork with about 1/4" thick slab of clay. If the surface of the clay is uneven, you can flatten it against a (covered) table or other flat surface.
*Add the shape to the clay on top of the wine cork. If you're using a shape mold, you can just press the cork against the mold and the two pieces of clay should stick together.
*Mold the edges of the two layers of clay together. It doesn't have to be perfect. You just need them to hold together so your stamp doesn't break on you.
*Press the clay end of the cork straight down against a flat surface very lightly. This is important, because you need your shape to be flat to work well as a stamp. I skipped this with the butterfly stamp because I thought it would work well enough and I didn't want to squish away the wing detail, but when I try to stamp with it, it misses chunks of the middle of the butterfly. It's better to have a functional stamp with less detail than a stamp that doesn't work.
*Carefully pull the clay off the end of the wine cork and bake according to the instructions on the packaging. Once it's finished, pull it out of the oven and set it aside to cool.
*As soon as the clay is cool enough to handle, glue it to the end of the wine cork and then set aside to dry. Once dry, it's ready to use! As you can see from the picture below, the heart one works all right, but the butterfly stamp only produces a partial butterfly. That's why the flattening step is so important.
Thursday, April 14, 2016
5 Minute Wire Ring
Make yourself this cute new accessory in no time! I got the idea from this site.
Materials:
*Wire
*Bead of your choice
*Wire cutters
*Glue of your choice
*Thin, cylindrical object to shape the wire
Directions:
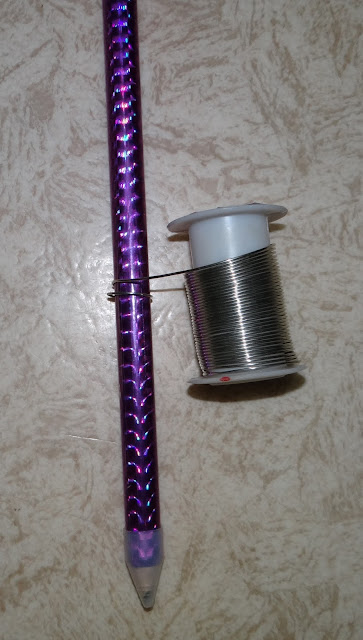
*Find a thin, cylindrical object, like a jumbo pencil, to wrap the wire around. It should be about as thick around as your finger. Loop the wire around like in the picture below:
*Snip off the shaped wire, making sure to leave a little excess.
*Add your bead to one end of the wire and try sliding the ring back and forth over your finger:
*If it is secure, but you can still get it off, then snip off the excess and glue in the other end. If not, try adjusting the wire until it fits as you want it to, then snip off the excess and glue in the end. I actually haven't glued mine yet; it seems to be holding together pretty well on its own. However, if you want to make sure the bead doesn't fall off, glue is probably the way to go.
Thursday, April 7, 2016
Easy Coasters
I have an odd affinity for coasters. For some reason, having them around makes me feel like a real adult. When I decorated my house for spring this year, I realized that I didn't have any coasters that matched my spring decor, so I decided to make a few. This method is relatively quick, easy, and, if you already have access to a laminator, really inexpensive.
Materials:
*Patterned cardstock
*Thin cardboard, such as from a cereal box
*Double sided tape
*Laminator
*Drinking glass with large rim
*Pencil
*Scissors
Directions:
*Trace around the rim of the drinking glass onto the patterned cardstock and then cut out the resulting circle.
*Note: I used cardboard to make my coasters a bit more robust, but adding the cardboard to the back of the cardstock makes it a little harder to send through the laminator. You can skip the cardboard steps and just laminate cardstock circles if you would prefer.
*Trace circles onto the cardboard as well, one circle for each coaster you intend to make. Cut out the circles.
*Tape the cardstock circles to the cardboard ones.
*Place the circles inside the laminate, keeping plenty of distance between neighboring circles and then laminate following the instructions for your laminator.
*Cut out the laminated circles, leaving a decent amount of laminate around the edges of the circles.
Thursday, March 31, 2016
Mini Checkers Board
*Mini image of a checkers board
*Thin cardboard (e.g. from a cereal box)
*Scissors
*Hole punch
*Cardstock in two different colors
*All purpose adhesive
Directions:
*Print out an image of or construct a mini checkers board, with squares just slightly wider than the size of a circle produced from a hole punch. I took a picture of my butterfly checkers board and then resized and printed it.
*Reinforce the mini checkers board by gluing some thin cardboard to the back.
*Punch out game pieces from cardstock in two different colors. You can either glue the pieces to the game board or leave them unglued so that they can be moved around.
Thursday, March 24, 2016
Mini Colored Pencils
Here's the next installment in my miniseries (pun courtesy of Brian).
Materials:
*Toothpicks
*Box cutter or other reasonably sharp cutting tool
*Emory board or sandpaper
*Full size colored pencils
*Paint
*Paintbrush
Directions:
*Cut a toothpick in half using a box cutter or other cutting implement. Scissors work too, but I didn't like the way they squished the wood around the cut site. The two halves can be used to make two mini colored pencils.
*If the end of the pencil is a bit jagged after cutting, file it down with an Emory board or sandpaper.
*Paint the pencil the color that you would like it to be, leaving the pointed tip unpainted. Set aside to dry. I like painting the whole pencil rather than painting one side and letting it dry, then comping back to paint the other and I found that Perler fuse bead crafts are a good way to handle this. You just paint the toothpick except for both ends and then stick the pointed end in one of the holes in the fuse bead creation. You then carefully paint the end that is now sticking up in the air.
*Once the pencil is dry, color the very tip using a colored pencil. You could also paint the tip, which is what I found I had to do for the white one to get the color to show up.
Thursday, March 17, 2016
Itty Bitty Books
This is roughly the actual size of the mini book I made.
Materials:
*Paperboard or other thin cardboard/heavy paper, such as an old cereal box, heavyweight junk mail, etc.
*Scrapbooking paper with small pattern
*All purpose adhesive
*Scissors
*Pencil
*Ruler
*Plain paper
*Paper to use for mini pages
Directions:
*Decide what size you would like your mini book to be. The first books I made were about 3.5 cm high and a little more than 2 cm wide. Draw two rectangles of the desired dimensions on your paperboard/cardboard to make the front and back covers and another, thinner rectangle to make the spine. Cut out these three pieces.
*Lay out your rectangles on your sheet of scrapbooking paper, with the thin rectangle sandwiched between the two wider rectangles, and a slight gap of space between each piece, as shown below. Glue the three pieces down.
*Cut around the rectangles, leaving about 1/4" or so of space around the edges of the cardboard and then cut off square chunks at the corners, as shown below.
*Cut slits at the top and bottom where the spine of the book is. It's kind of hard to see in the picture below, so if you can't tell exactly what's going on, check out the picture after for further guidance.
*Fold over the overhanging paper at the sides and glue down. Repeat with the pieces of paper at the top, ignoring for the time being the tabs at the spine.
*Glue down the tabs at the spine.
*Cut out rectangles of paper just slightly smaller than the size of the book covers and glue over the inside of the covers.
*Print out mini pages sized to fit in your book. The way I did this was I opened up an old document in Word or Adobe Reader and then changed the view to display two pages at once. I then took a screenshot of the two pages and pasted this into Paint. I moved one of the pages up against the other so that there was no longer a gap between them and then I selected the two pages together and pasted them into Word. I then shrunk them down to fit the book. From here if you're not too concerned about the text you're using, you could just copy and paste the two pages a bunch of times, or you could take screenshots of different pages and repeat the procedure with those pages.
*Print out enough pages to fill your book. This will vary depending on the thickness of the spine. For this one, I used five copies of the stuck together two pages. Cut out pages, leaving them stuck together in groups of two.
*Fold in half along the divide between the two pages.
*Place pages in a stack, gluing together the blank sides as you go.
*Glue along the spine and stick into the hardcover part. Now you have your book! Make a whole bunch of them!
Thursday, March 10, 2016
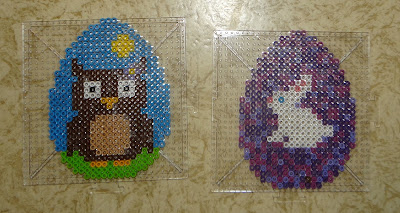
Perler Fuse Bead Easter Eggs
Celebrate Easter and spring's arrival with these fuse bead Easter eggs. For some fun spring themed fuse bead magnets, check out this post.
Materials:
*Fuse beads (e.g. Perler beads)
*Large square peg board
*Iron
Directions:
Design your fuse bead creations by arranging beads on a peg board, following the patterns given below:
The rainbowy egg is supposed to look like a melted crayon art egg.
I love Easter eggs with faces, so I decided that I had to make one for this craft.
*Cover the designs with a sheet of waxed paper and iron the first side. Make sure to iron the edges especially well, as the beads may not stick together and may fall off if you don't.
*Remove the fuse bead project from its peg board, cover with waxed paper, and iron the other side.
Subscribe to:
Posts (Atom)


