Showing posts with label Nail Art. Show all posts

Wednesday, October 28, 2020

Halloween Spider Web Nail Art


Need a Halloween manicure idea?  Why not try adding a spider web accent nail?  I forgot to take pictures while I was painting this, so I have only a video tutorial this time around, which you'll find below, but feel free to ask me any questions you have about the process.


Thursday, June 18, 2020

Pride Nails


     Happy Pride everyone!  I had been hoping to do a video tutorial on my pride nails this year.  Unfortunately, when I'm doing nail art that requires a fair amount of precision, I have a tendency to angle my hands upward, away from the camera.  This means that the footage I took wasn't stellar, and there are lots of points during the video where my hands are angled in such a way that you can't actually see what I'm doing.  So I decided not to do the video and instead just do a written tutorial.  Hopefully I can redo the video tutorial at some point in the future.

Thumbnail: 8 Color Philadelphia Pride Flag

This variation on the rainbow pride flag includes black and brown stripes to represent People of Color in the LGBTQIA+ community.  Although People of Color have been instrumental in the struggle for equality, their contributions are often overlooked (e.g., Marsha P. Johnson, who took part in Stonewall and co-founded with Sylvia Riviera the organization STAR, which provided assistance and housing to homeless trans and queer youth and sex workers [1]).  They are also more likely to face more discrimination and violence due to their multiple marginalized identities.  For example, black trans women are murdered at a rate more than seven times that of the general population [2].

Materials:

*Base coat
*Black acrylic paint or nail polish
*Brown acrylic paint or nail polish
*Red acrylic paint or nail polish
*Orange acrylic paint or nail polish
*Yellow acrylic paint or nail polish
*Green acrylic paint or nail polish
*Blue acrylic paint or nail polish
*Purple acrylic paint or nail polish
*Fine nail art brush
*Holographic nail polish top coat (optional) or glossy top coat

Directions:

*Apply nail polish base coat.  Let dry.

*Apply a thin horizontal stripe of black paint at the top of your thumbnail.  The width of the stripe depends on the length of your nails.  To get a sense of how wide each stripe should be, measure the length of your nail and divide that number by 8.  The resulting number will give you an approximate width.  (Honestly I just eyeballed it, but if you're worried about spacing, math can help.)

*Apply a thin stripe of brown paint in the same fashion.

*Continue applying the remaining colors in thin layers, starting with red and progressing to purple in rainbow order.

*Seal with a top coat, either a clear top coat or a holographic top coat for some rainbowy sparkles.

Index Finger: Trans Flag

Someone who is transgender has a gender identity than doesn't match the sex they were assigned at birth.  (The term for people whose gender identities match the sex they were assigned at birth is cisgender.)  While we hear about women who were assigned male at birth and men who were assigned female at birth, someone does not have to be a woman or a man to be trans.  Many people who are nonbinary, gender fluid, or agender, for example, may also consider themselves trans.  However, not everyone who is nonbinary, for example, will consider themselves trans.  This is partly why many of these communities have their own flags.

Materials:

*Nail polish base coat
*Light blue acrylic paint or nail polish
*Light pink acrylic paint or nail polish
*White acrylic paint or nail polish
*Fine nail art brush
*Holographic or clear nail polish top coat

Directions:

*Apply a clear base coat.  Let dry.

*Paint light blue horizontal stripes at the top and bottom of each nail.  If you're not sure how wide to make each stripe, take the length of your nail and divide it by five.  The resulting number will give you the approximate width each stripe should be.

*Paint pink stripes below the top blue stripe and above the bottom blue stripe.

*Fill in the middle of the nail with white paint or polish.

*Apply a clear top coat, or a holographic top coat for some extra shine.

Middle Finger: Bi Pride Flag

While some people have come to associate bisexuality with being attracted to both women and men, many bisexual people find themselves attracted to people of genders outside of the binary, for example, people who are nonbinary or agender.

Materials:

*Nail polish base coat
*Magenta acrylic paint or nail polish
*Purple acrylic paint or nail polish
*Blue acrylic paint or nail polish
*Fine nail art brush
*Holographic or clear nail polish top coat

Directions:

*Apply a clear base coat.  Let dry.

*Paint the top part of your nail magenta.  The purple stripe on the bi flag is often thinner than the pink and blue stripes, but I've seen a lot of people use equal widths too.

*Paint the middle of your nail purple.

*Paint the bottom of your nail blue.

*Apply a clear or holographic top coat.

Ring Finger: Asexual Pride Flag

One thing to know about asexuality is that it is a spectrum.  While some people who are asexual have zero sexual attraction, others (sometimes called gray asexuals or gray aces) do experience some sexual attraction.  The attraction could be infrequent or limited to a small number of individuals.  Demisexuality is often considered as a subset of asexuality.  Demisexual individuals have to form a connection with someone first before they can become sexually attracted to this person.

Another important thing to note about asexuality is that sex and romance are not the same.  People who don't experience romantic attractions are called aromantic.  While some asexual people are also aromantic, many are not.  Much like some people can have sex without developing romantic feelings, other people can have romantic feelings without a desire for sex.

Materials:

*Nail polish base coat
*Black acrylic paint or nail polish
*Gray acrylic paint or nail polish
*White acrylic paint or nail polish
*Purple acrylic paint or nail polish
*Fine nail art brush
*Holographic or clear nail polish top coat

Directions:

*Apply a clear base coat.  Let dry.

*Paint the top of your nail black.  To figure out how wide to make your stripe, take the length of your nail and divide it by four.  The resulting number will give you the width of each stripe.

*Paint a gray stripe below the black one.

*Paint a white stripe below the gray one.

*Paint the bottom stripe purple.

*Seal with a clear or holographic top coat.

Pinkie Finger: Pan Pride Flag

For people who are pansexual, gender is generally not a factor in their attractions.  While some people who are bisexual may experience the same thing, and some use the terms interchangeably, pansexuality makes it explicit that people who use this term are attracted to a multitude of genders, not just two.

Materials:

*Nail polish base coat
*Magenta acrylic paint or nail polish
*Yellow acrylic paint or nail polish
*Blue acrylic paint or nail polish
*Fine nail art brush
*Holographic or clear nail polish top coat

Directions:

*Apply a clear base coat.  Let dry.

*Paint the top part of your nail magenta.  To figure out how wide to make your stripe, take the length of your nail and divide it by three.  The resulting number will give you an approximation of how wide each stripe should be.

*Paint the middle of your nail yellow.

*Paint the bottom of your nail blue.

*Apply a clear or holographic top coat.

[1]https://www.workers.org/2006/us/lavender-red-73/
[2]https://unerased.mic.com/

Thursday, June 4, 2020

Alice in Wonderland Heart Wedding Nails


     For my wedding nails, I wanted a design that was relatively simple, but still had an Alice in Wonderland feel.  I opted for this heart nail design.  With perhaps some modifications to the base color, this heart design could work well for weddings, Alice in Wonderland parties, Valentine's day, etc.


Here's what my "other hand" looked like.  The hearts are a little more lopsided, but in my opinion, not too bad.

     I have both a photo and video tutorial for this video.  The video tutorial is included immediately below, but for a photo tutorial, keep scrolling.


Alice in Wonderland Inspired Heart Wedding Nails

Materials:

*Light blue nail polish
*Clear nail polish base/top coat
*Red acrylic paint
*Sparkly red nail polish
*Ultra fine nail art brush

Directions:

*Paint on nail polish clear base coat.

*Paint nails with light blue nail polish.  Let dry.  Add a second coat if needed.


*Using the red acrylic paint and nail art brush, draw red hearts onto your nails.  Let dry.


*For the ring finger nail, go over the heart shape with sparkly red nail polish to create an accent nail.

*Seal with a clear top coat.

Thursday, April 23, 2020

Rainbow Nail Art


     When I was trying to decide what nail art I wanted for my dissertation defense, Kesha's song "Rainbow" came to mind.  It's a song I listened to frequently during a rough and uncertain period of my graduate education, providing me with solace and hope, and so it seemed only fitting to bring an element of this song with me into my defense.  The opening line of the song is,"I used to live in the darkness," so I originally planned to paint all of my nails but the accent one black for the dark times I've dealt with.  On the accent nail I would have some sort of rainbow design, as the rainbow symbolizes hope and possibility throughout the song.  I ended up adding some rainbow glitter to the black nails because initially I wasn't pleased with how my nails were looking (although I think that had more to do with the beige background I originally used for the accent nails).  Even though it was primarily an aesthetic choice, you could read the rainbow glitter as light in the darkness.
     Oh, and in case you were wondering, I passed my defense.  I am now Dr. Amber Hathaway.  I can't really believe it.  It feels so surreal.


Me, post defense.  "Yeah, now I see the magic inside of me."

Materials:

*Clear nail polish base and top coat
*Black nail polish
*White nail polish
*Acrylic paint in red, orange, yellow, green, blue, and purple
*Sky blue nail polish
*Ultra fine nail art brush
*Rainbow glitter top coat

Directions:

*Paint nails with clear base coat.

*Paint four nails on either hand black, leaving the accent nail unpainted.  Paint the accent nail white.


*Using red acrylic paint, draw the first band of a rainbow on the accent nail.  You'll notice I also painted my nail a beige color.  I ended up not liking that as a base color and painting over it, so that's why I didn't include a step regarding it.


*Add in the orange band of the rainbow.


*Continue with the yellow band.


*Paint the green band.


*Paint the blue band.


*Paint the purple band.


*Paint around the rainbow with sky blue nail polish.  I used acrylic paint here because that was what I had in reach, but nail polish would probably have given a nicer finish.

*Seal the accent nail with a clear top coat.

*Add a rainbow glitter top coat to the black nails.

Thursday, April 2, 2020

Dandelion Puff Nail Art


     Make a wish with these adorable dandelion puff nails.


     I generally don't show pictures of my "other hand" (as Simply Nailogical would call it) because I'm very dominantly right handed, so the nail art I do with my left hand usually doesn't come out as nice looking.  However, I'm really pleased with how the dandelion puff came out on my right hand.  It's a bit of a different from the left hand stylistically, a little messier, but I like it.

Materials:

*Sky blue nail polish
*Black acrylic paint
*White acrylic paint
*Ultra fine nail art brush
*Medium dotting tool
*Black nail gem
*Clear nail polish base coat/top coat

Directions:

*Paint on a clear base coat.  Let dry.

*Paint each nail with a coat of sky blue nail polish.


*Dip the dotting tool into black acrylic paint and place a dot of it in the center of your ring finger nail.


*Using your nail art brush, paint a black stem attached to the black dot.


*Use white acrylic paint to draw lines emanating from your dot, like this:


*Add little "fringes" protruding from the ends of the white lines, like this:


*Continue adding lines with fringes.


*Add lines with fringes until you have filled in the whole dandelion head.


*Using the ultra fine nail art brush and white paint, paint a couple of dandelion seeds on your middle finger nail and one seed on your index finger nail.

*Seal nails with a clear top coat.

*Add a black nail art gem over the black dot at the center of your dandelion head.  Cover with another clear top coat.

Thursday, March 26, 2020

Springy Sunflower Nail Art


     Welcome spring with these bright, sunny nails.  Sunflowers are probably my second favorite flowers, my first being red roses.  These sunny flowers put a smile on my face when I see them, so I decided to add them to my nails.

Materials:

*Sky blue nail polish
*Clear base/top coat
*Yellow acrylic paint
*Brown acrylic paint
*Black acrylic paint
*Ultra fine nail art brush
*Various sizes of dotting tools, ranging from large to very small

Directions:

*Apply clear base coat to nails.  Let dry.

*Apply light blue polish to nails.  Let dry.


*Paint on yellow flower shapes using yellow paint.  To make the flower shape, I began by painting a plus sign on the nail.  I then painted an "x" through the plus sign to make something resembling an asterisk.  I then painted on a line between each of the lines already on my nail.  I've tried to illustrate the process with the image below, with the index finger showing the plus sign stage, the middle finger the plus sign with the x through it, and the ring finger showing the completed flower shape.  Let dry.


*Dip a large dotting tool in brown paint and add brown centers to each of the flower shapes.


*Mix together black and brown paint and use a medium sized dotting tool to add a bit of this color to the center of each flower.


*Mix yellow and brown acrylic paints together to create a light brown paint.  Using a very small dotting tool, add dots around the brown ring of the sunflower.


*Seal with a clear top coat.

Thursday, February 27, 2020

Strawberry Frosted Donut Inspired Nail Art


     Give yourself a manicure that looks good enough to eat!

Materials:

*Clear base/top coat
*Pink nail polish
*Acrylic paint in red, orange, yellow, green, blue, purple, and white
*Fine nail art brush

Directions:

*Paint nails with a clear base coat, followed by a coat of pink polish.  Let dry.

*Paint on "sprinkles" by adding randomly oriented streaks of color.  Start with some red acrylic paint and add one to two sprinkles per nail.


*Next add one to two orange sprinkles per nail, making sure to leave enough space for the remaining colors.


*Continue adding one to two sprinkles of each color, one color at a time.


*Seal with a clear top coat.

Thursday, September 12, 2019

DIY Freddy Krueger Inspired Nails


     Tomorrow is Friday the 13th, so I figured, why not celebrate with some horror movie inspired nail art?  Now it might seem more fitting to do a Jason Voorheese inspired manicure for Friday the 13th, but I've never really gotten into the Friday the 13th movies, so I figured I'd do a Freddy Krueger inspired nail art tutorial instead.

Materials:

*Nail polish base coat
*Red nail polish
*Olive green nail polish
*Crimson nail polish
*Nail art brush
*Fine detail nail art brush

Directions:

*Paint nails with a base coat.  Let dry.

*Using a nail art brush, paint nails with alternating red and olive green stripes.  Let dry.

*Once nails are fully dry, use a fine nail art brush to draw crimson slash marks across the nails.  Let dry.

*Seal with a top coat if you would like.

Thursday, May 16, 2019

Uranium-238 Decay Series Nail Art


     On May 8th I gave my dissertation proposal.  Since my proposal was on radiometric dating, I thought it would be fun to style my nails based on the uranium-238 decay series.  I was waiting to write the post until after I passed my defense because I can be a bit superstitious and didn't want to jinx myself.  I am pleased to report that I did indeed pass, so as soon as I turn in my paperwork, I will officially be a PhD candidate.

Me at the end of my talk.

     I tried to match my nail colors to the colors of the elements.  However, a lot of the elements in the uranium-238 decay series are gray or silver, so I took liberties in some instances for a wider variety of colors.  If you're planning on being somewhere at night with these nails, glow in the dark nail polish could add a fun twist to this manicure.

Materials:

*Nail polish in radioactive colors of your choice
*Nail art pen

Directions:

*Paint your nails in the color scheme that you deem appropriate.

*Using the nail art pen, write radioisotopes of your choice on your nails.  Since my dissertation work focuses a lot on lead-210, I chose part of the decay series that would include lead-210, but use whatever part of the decay series that appeals to you.

Thursday, April 11, 2019

Spring Cherry Blossoms and Bumble Bee Nail Art


     As I write this post, it looks like January outside.  Everything is covered in snow.  Maybe if I paint my nails with snowflakes, the snow will go away?
     At any rate, here's how you can get some cute spring nails, whether or not it looks like spring outside for you.

Materials:

*Yellow nail polish
*White nail polish
*Light blue nail polish
*Pink nail polish
*Black nail art pen
*Small dotting tool
*Pink glitter polish
*Makeup sponge

Note: The bee was left over from my nail art from a previous week.  It was still in good shape, so I couldn't bring myself to remove it and decided to incorporate it into my nails this past week.  I didn't take pictures of the process because I wasn't planning on posting it, but I'll describe the process to the best of my abilities.

Directions for the bee:

*Paint one nail yellow.  Let dry.

*Draw on a bumble bee using a nail art pen.

*Use a small dotting tool and white nail polish to add wings.

Directions for the cherry blossoms:

*Paint one nail blue.  Let dry.


*Draw on a branch shape using a nail art pen.


*Using the small dotting tool and pink nail polish, create flowers by stamping four dots close together.


Directions for the glitter nail:

*Paint nail pink.  Let dry.

*For a thicker glitter coating, apply glitter polish to a makeup sponge and sponge onto the nail.  You may need to do a few coats to get the nail sufficiently glittery.

Friday, April 5, 2019

Monarch Butterfly Nail Art


     It is snowing as I write this post, but someday spring will be here.  Right?  Until then, I'll be enjoying spring via nail art.
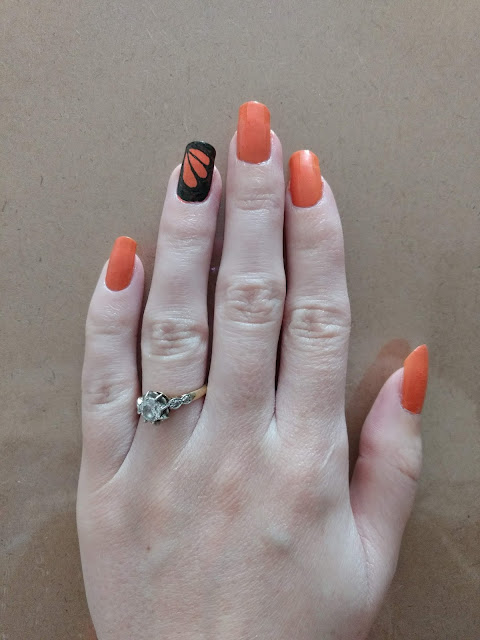
     I love butterflies, and monarch butterflies have always been my favorites.  My sister and I had a couple of pet butterflies growing up.  I believe our "tightrope walking" butterfly (it walked upside down along a piece of string) was a monarch butterfly.  Here is some nail art that reminds me of spring and all of the beautiful butterflies I've encountered over the years.

Materials:

*Orange nail polish
*White nail polish
*Black nail art pen
*Small dotting tool

Directions:

*Paint nails orange.

*Draw on butterfly wing shapes using a black nail art pen.


*Add white spots with white nail polish and the dotting tool.


Thursday, March 28, 2019

Floral Nail Art


     Spring is here, at least technically.  While the flowers are not yet blooming here in Maine, you can still add some springiness to your look with these floral nails.

Materials:

*White nail polish
*Pink nail polish
*Red nail polish
*Black nail polish
*Green nail polish
*Medium sized dotting tool
*Small dotting tool
*Fine nail art brush
*Base coat

Directions:

*Paint nails with a base coat.  Let dry.

*Paint nails pink, with the exception of your ring finger nail, which you'll want to paint white.  Let dry.


*Using the medium dotting tool, add pink and red dots to the white nails.  Let dry.


*Using the small dotting tool, add black dots to the centers of the pink and red dots.  Let dry.


*Using the nail art brush, paint on green leaves.  This was the part of the process that I had trouble with.  None of my nail art brushes are super fine, so painting on leaf shapes was difficult.  I ended up using the brush basically as a stamp after some point in time and that worked out okay, but I would definitely recommend using a very fine brush if you can.

Thursday, December 6, 2018

Christmas Lights Nail Art


Materials:

*Gold nail polish or other "background" color
*Nail polish in the colors you would like the lights to be
*Black nail art pen
* Clear base/top coat
*Very fine nail art brush

Directions:

*Paint your nails gold or whatever color you chose for your "canvas."

*Using your nail art pen, draw two lines that oscillate up and down on each nail.

*Draw 4-5 lines perpendicular to each wavy line, with the first one pointing up, the second one pointing down, the third one pointing up, etc.  These are where your light bulbs will go.

*Using the nail art brush, paint the bulbs.  It's okay if they're not lopsided or not perfectly bulb shaped.  If you look at my nails up close, you can see many imperfections and asymmetries, especially on my right hand.  People will still get the idea.