
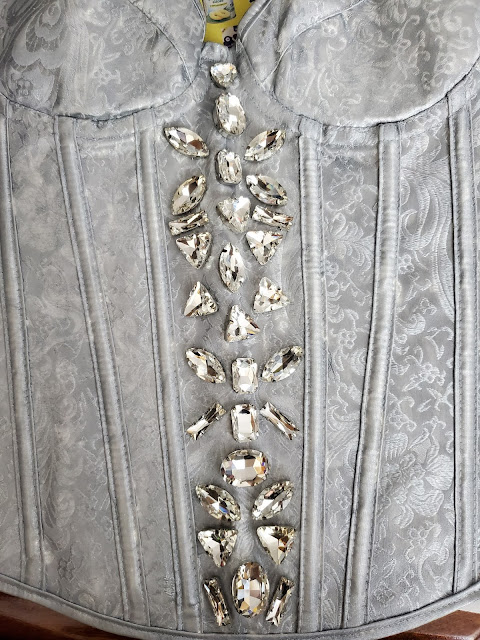
My journey in making my own Holiday Barbie 2021 dress continues. Last week, I painted the white corset I had chosen for the bodice silver. This week, I began adding embellishments. It turns out, sewing on a ton of rhinestones and faux pearl strings is pretty time consuming, so I'll have to update you on the rest of the embellishing in next week's post, but we're making progress.
Materials:
*Silver corset (if you need to paint a corset, see this post)
*The largest rhinestones you can find
*Faux pearl garland
*All-purpose adhesive
*Sewing needle
*White or silver thread
Directions:
Note: The largest rhinestones I was able to find were about 30 mm high. Thus, I was not able to replicate the pattern on Holiday Barbie's dress. I used her pattern for some inspiration and then filled in the remaining space with designs of my own.
*Secure a small group of rhinestones to the corset using all-purpose adhesive. Let dry.

*Sew the rhinestones into place to ensure that they stay on the bodice. The all-purpose adhesive I use is reasonably sturdy, but for something like a clothing item which you'll be pulling on and off, I definitely recommend securing them with some thread to make sure they stay in place.
*Repeat the gluing and sewing with another small cluster of rhinestones.

*Keep repeating until the central panel is done.
*Next, take your pearl ribbon and glue it onto the corset. Let dry.

*Sew the ribbon down for extra stability. I basically sewed every third or fourth string section between pearls.
*The pearl ribbon maps out where the rest of the rhinestones will go. Arrange your rhinestones, glue down, and sew them in place.
And that's what I've done so far, although the bodice is still far from complete. Tune in next week to see the next phase of decorating the bodice.
No comments:
Post a Comment