
One of my many Alice in Wonderland Disneybounds.
This month I want to shift gears a bit and tell you about my new pandemic hobby: Disneybounding. If you’ve been following this blog for a while, you may have picked up on the fact that I love dressing up. Disneybounding is another avenue I’ve found that lets me play around with my outfits. It’s less over-the-top than costuming and cosplay, so it works better for everyday wear. In today’s post, I’ll give you a brief introduction to Disneybounding, using some of my own Disneybounds as examples. Later on in this series, we’ll explore specific bounds and crafty accessories you can make for them.
What is Disneybounding?
Disneybounding is like cosplaying, but less elaborate. Instead of trying to replicate a character’s look exactly, Disneybounding uses a character’s color scheme and symbolic accessories to try to capture and convey the character’s essence. You don't need bulky cosplaying accessories, like swords, or character masks, or anything elaborate. All you need are some solid-colored clothes (there's definitely room for some patterns and prints too), maybe a few accessories, and a little imagination.
Is Disneybounding Limited to Disney Characters?
No. Disneybounding extends to anything Disney, including things like rides and food. It also extends to franchises that did not originate as Disney, but that Disney now owns and operates, such as Star Wars and Marvel. You can apply the principles of Disneybounding to media that has nothing to do with Disney as well. These are often referred to as bounds or rulebreaker bounds since they’re not Disney, but it’s the same basic idea. There are also mashups, where you take elements of different characters and combine them in a cohesive look. These mashups often combine Disney characters with non-Disney characters, such as Disney x Clueless or Disney x Mean Girls. When it comes to bounding, the sky is the limit.
How Do I Disneybound?
What makes a Disneybound is open to interpretation. In this section, I'll go through my main considerations when putting together a Disneybound, but this is intended to give you ideas, not to give you hard and fast rules. If you want to learn more about getting started with Disneybounding, you may want to check out the book Disneybound: Dress Disney and Make It Fashion by Leslie Kay. She's the person who coined the term "Disneybound" and she runs the Disneybounding website, so she's way more of an authority than me.
As I go through my Disneybounding process, I'll be using these two Disneybounds as examples:
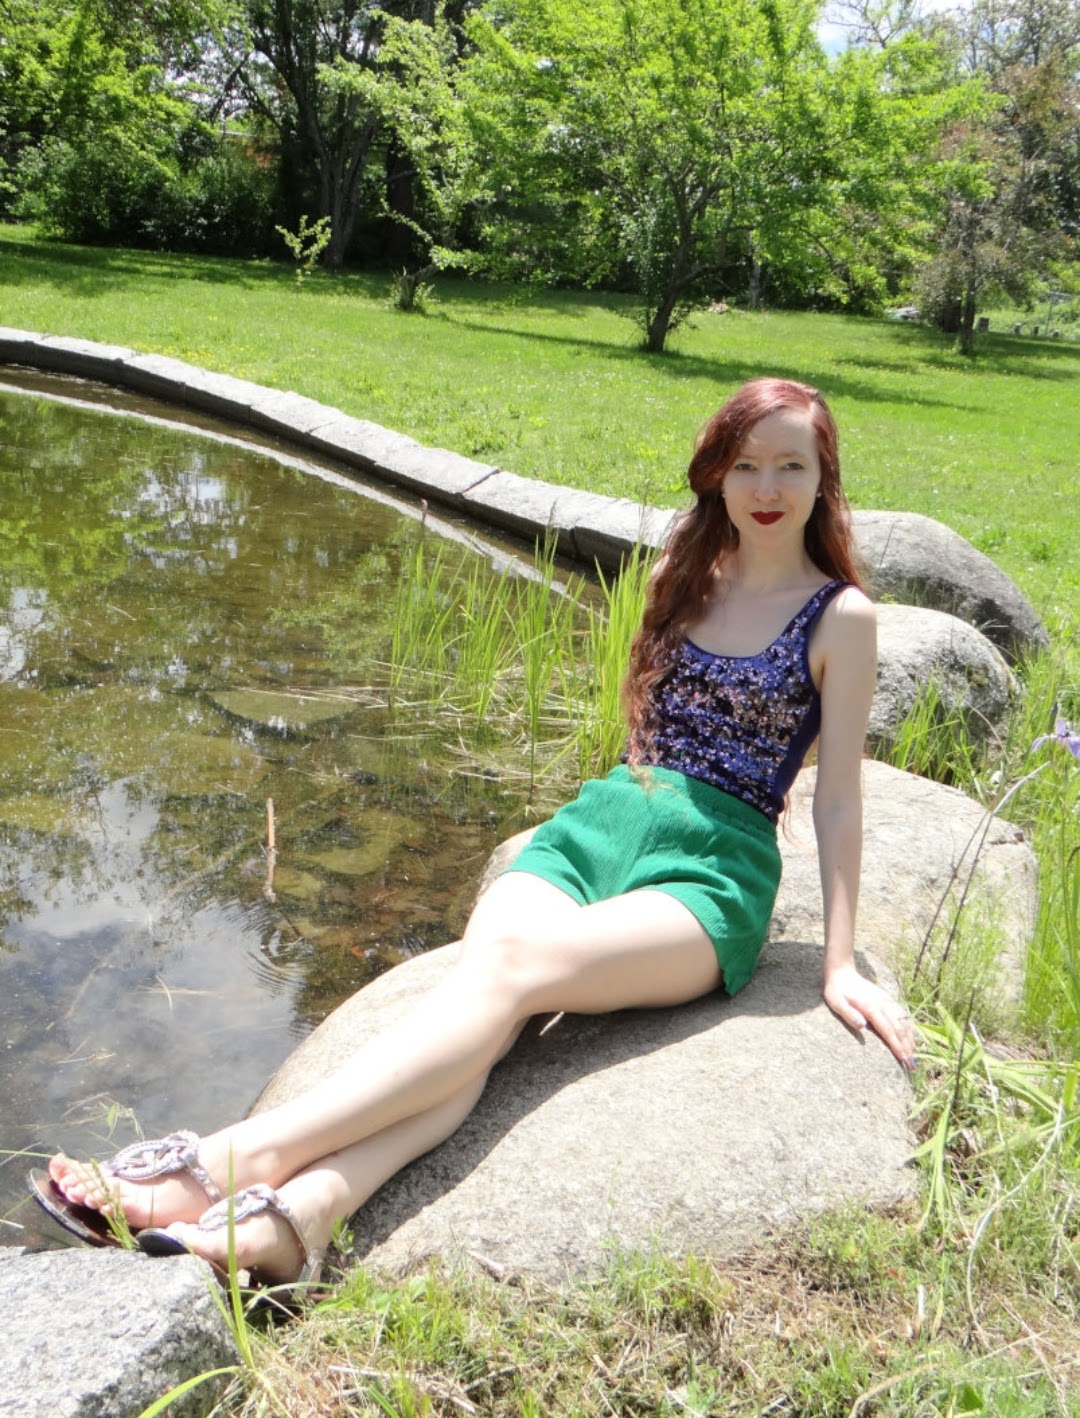
Ariel from The Little Mermaid in her classic mermaid color scheme.

Ursula from The Little Mermaid. This look was for a villains masquerade challenge, hence the last minute mask.
I'll divide my Disneybounding process into four categories: color blocking, silhouette and style, accessories, and makeup.
Color Blocking
Disneybounding relies heavily on color blocking. Let’s say you want to bound as Ariel and are using her mermaid look for inspiration. Her main colors are purple and green, so a purple top and green bottoms would provide the perfect base for your outfit. Or maybe Disney villains are more your jam, and you want to go for an Ursula look. Her main colors are black and purple, so a black dress with purple tights would work well as an outfit base.
Silhouette and Style
Consider also whether the silhouette and style of the clothes you’re working with can express anything about your character. For example, Ariel is a mermaid. I thought this sequined top was reminiscent of scales. Now, Ariel’s purple shell top isn’t scaly, but we’re not trying to match her look exactly, so it doesn’t matter if the “scales” are on top or on bottom. Having some sort of sequined garment can add to the mermaid vibes. Her clothes are fitted, so choosing tighter-fitting garments made sense to me. Ursula's dress is fitted on top, but she has all those tentacles on bottom that kind of flare out away from her body. I chose a dress with a fitted top and puffier skirt to reflect that.
Accessories
Accessories can really help bring your character to life. For Ariel, I opted for pearl accessories, since pearls come from the ocean. I didn’t use anything unique to Ariel or ultra creative there. However, my Ursula accessories were more specific to her character. She takes Ariel’s voice and keeps it inside a shell necklace, so I used some clay to recreate her shell necklace. Likewise, she has tentacles, and I decided to make some tentacle earrings as a nod to this.
A word of caution: there are tons of cute Disney-themed accessories available. If you’re planning on buying some or investing money into supplies to create some, keep versatility in mind. Is this an item you can use for multiple bounds? A pink hair bow might be a good accessory choice because there are a number of Disney characters who wear pink bows (e.g., Marie, Minnie Mouse, Daisy Duck, and Georgette). There are also lots of Disney characters with pink as part of their color scheme, for whom a pink bow might fit perfectly with their vibe. A pink bow has a lot of versatility, whereas something more character-specific may not.
If it’s specific to a particular character, is this a character you could see yourself bounding as often? I love Alice in Wonderland (we’ll have a whole post devoted to her later in this series) and bound as her frequently, so it seems reasonable to me to invest in Alice-specific accessories. Ursula is probably my favorite Disney villain, and since I already had
clay on hand, it made sense to put together a couple of accessories that
would suit her. However, there are lots of other characters that I don’t really bound as frequently enough to justify buying a character-specific item, regardless of how cute it is.
Makeup
Makeup can be another great tool to help you with your bound. Bounding as a character with purple skin, such as Ursula? Add some purple eyeshadow. I don't usually do anything too elaborate with my makeup, but if you love creating makeup looks, this can be a great avenue for enhancing your bounds.
Disneybounding Inspiration
Looking for some ideas to help you get started? I’ve included some of my bounds below, and will be featuring more as the series progresses. Need even more inspiration? The internet is full of bounding ideas. Pinterest and Instagram are two great resources for bounding inspiration. There’s also the official Disneybounding website.
Milo Thatch from Atlantis: The Lost Empire

I put together this look for a “character crush” challenge. It should probably come as no surprise that I went with the bookish, slightly awkward Milo for this one. I don’t have a lot of neutrals in my wardrobe, so I couldn’t match Milo’s color scheme exactly, but I thought the brown dress and white sweater came close enough for an outfit base. Adding a red bowtie and a pair of Brian’s old glasses really helped pull the look together.
Ariel's "Kiss the Girl" Look

Ariel has three main colors in this outfit: white, black, and light blue. I started with a light blue romper and then layered a white shirt and black corset over top. Ariel is wearing a blue bow in her hair in this look, so I added a blue bow in my hair. I also added some pearl earrings as a reminder of Ariel’s connection to the ocean.
Cinderella from Cinderella

Cinderella’s ball gown is light blue, so I used my DIY wedding dress, which is light blue, as the base of this look. Cinderella has a blue headband, so I added a blue headband. I used a high heel necklace to symbolize her glass slippers.
Magic 8 Ball from Toy Story

The theme for this challenge was 90s Pixar, as in choose a Pixar character and make it 90s. I thought the dress and headband had 90s vibes, and fit well with the Magic 8 Ball’s color scheme. I designed a magic 8 ball window and printed it, and then held it in front of my stomach to finish off the magic 8 ball effect.
Jenny Foxworth from Oliver and Company

This was my look for an 80s Disney challenge. Jenny has a few different outfits in the film, but one is a seafoam green dress and blue leggings. I used a seafoam green sweater and blue skirt to approximate the colors of her outfit. She has her hair partially up in a scrunchie, so I added a scrunchie to my look. I also wore a cat necklace and socks with cat silhouettes on them to represent Oliver.
Alice in Wonderland x Clueless

This was a look I put together for a Disney x Clueless challenge. I thought the plaid skort had strong Clueless vibes, and the light blue accents in the skirt also kind of matched Alice. Alice’s other main color is white, so I paired it with a white blouse and white tights. Headbands were big in Clueless, but instead of a plain headband, I went with Alice’s signature bow.
This is just a small sampling of the looks I’ve done. If you’d like to see more of my Disneybounds, I post them to my Insta account @all_of_my_outfits. I also post a lot of spooky/horror looks as well as some general outfit pictures.
Next week we'll continue our exploration of Disneybounding, so stay tuned!


