Friday, November 29, 2013
Perler Fuse Bead Ornaments
Materials:
*Fuse bead kit (e.g. Perler beads kit)
*Scissors
*Iron
*Gold or silver thread
Directions:
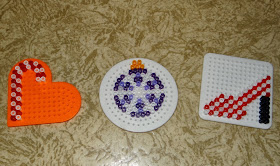
*Select the appropriate peg board for the ornament you would like to make. Both the owl and the penguin require a large square pegboard, the candy cane uses the small heart pegboard, the shoe needs only a small square pegboard, and the ornament takes a small circle pegboard.
*Arrange beads on the peg board in the desired pattern. I forgot to take pictures of the arrangement of the beads for the owl ornament, but here are the other ones:
*Cover your beaded project with a sheet of waxed paper and iron the first side, then remove from the peg board, flip over, put waxed paper on top and iron the second side. You can find more detailed directions here.
Wondering why I made a shoe ornament? I am rather fond of shoes and so for the past couple of years I have received shoe ornaments for Christmas. I decided to make the shoe ornament a tree tradition and plan to add a new one each year, starting with this fuse bead shoe. Does your family collect a specific type of ornaments for your tree? Try making one out of fuse beads. You can find fuse bead patterns online for almost anything, or you could always design your own .
Also, if you're looking for more fuse bead ornament patterns for your tree, check out my snowflake designs in this post.
Thursday, November 21, 2013
Duct Tape Ornaments
Here's a fast and easy way to liven up some plain ball ornaments. Looking for more ornament ideas? Check out these ornament ideas and stay tuned, because I'll be posting new ornaments, if all goes as planned, from now until Christmas.
Materials:
*Plastic or glass ball ornaments
*Duct tape
*Scissors
Directions:
*Cut off thin strips of duct tape and stick the duct tape strips to the ornament.
*Continue adding duct tape strips until the whole ornament is covered in duct tape.
Thursday, November 14, 2013
Ornament wreath
My first Christmas post of the year! This year I plan on making some new ornaments for my tree, so if you're looking for ornament ideas, keep an eye out. This week's craft is not about making ornaments, but it does involve them. I saw this craft on favecrafts and thought I would try it for myself. It was a lot more work than I initially thought it would be, but the end result was pretty nice.
Materials:
*Wire coat hanger
*About 72 small plastic ball ornaments
*Wire cutters
*Ribbon
*Needle nose pliers (optional)
*All purpose adhesive (optional)
*Thread
*Scissors
Directions:
*Depending on what type of ornaments you are using, you may find it helpful to glue the ornament tops to the ornaments before you get started. I didn't do this and I kept having ornaments separate from their tops and fall off the wreath. Let the glue dry before using the ornaments.
*Bend the hanger into a circle.
*Untwist the wire hanger. This can be a bit difficult to do with just your hands, so you may want to use pliers, as I did.
*Slide the ornaments onto the hanger in an arrangement you find pleasing. I rotated through the four colors, but I wasn't careful about how I arranged them, so I still ended up with some clusters of the same color.
*Once you've finished adding ornaments, twist the ends of the hanger back together. Again, you may find it easier to use pliers here.
*Snip off the hook just above where the hanger ends intertwine using heavy duty wire cutters.
*Carefully bend over the twisted part of the hanger to form a hook, making sure not to undo the twist in the process.
*Use heavyweight thread to hang up the wreath. Tie a bow around the twisted part of the hanger to cover it up.
Thursday, November 7, 2013
Fall Leaves Bookmarks
Materials:
*Leaves
*Heavy book
*Scrap paper
*Scissors
*Self-adhesive laminating sheets
Directions:
*Collect various fall leaves. Place the leaves between a couple of sheets of scrap paper and place a heavy book on top of the paper. Let sit undisturbed for several days.
*Once you have finished pressing the leaves, laminate the leaves following the instructions on your laminating sheets box. Leave ample space between the leaves, particularly around the stems as the laminate does not seal as well around the thicker parts of the leaf.
*Cut apart the leaves and trim off excess laminate.
Friday, November 1, 2013
Duct Tape Leaf Garland
Materials:
*Duct tape in colors of your choice
*Leaf templates or leaves and paper
*2-3 cereal boxes
*Pen
*Scissors
*Light brown colored pencil
*Ribbon
*All purpose adhesive
Directions:
*Print out leaf templates in a variety of shapes. Alternately, you can make your own templates by tracing around leaves you have collected, as I did.
*Select a leaf template. Place about 3 strips of duct tape slightly wider than the template on the inside of one of the cereal boxes in the top left corner, with only a slight overlap between the strips.
*Trace the leaf shape onto the duct tape. Draw a stem coming out of the bottom of the leaf on the cardboard. Color the stem in with a light brown colored pencil.
*Repeat the process with other leaf templates. You should end up with something like this:
*Cut out your leaves. Arrange them in a pattern that you find pleasing, then glue the stems of the leaves to the ribbon.


